

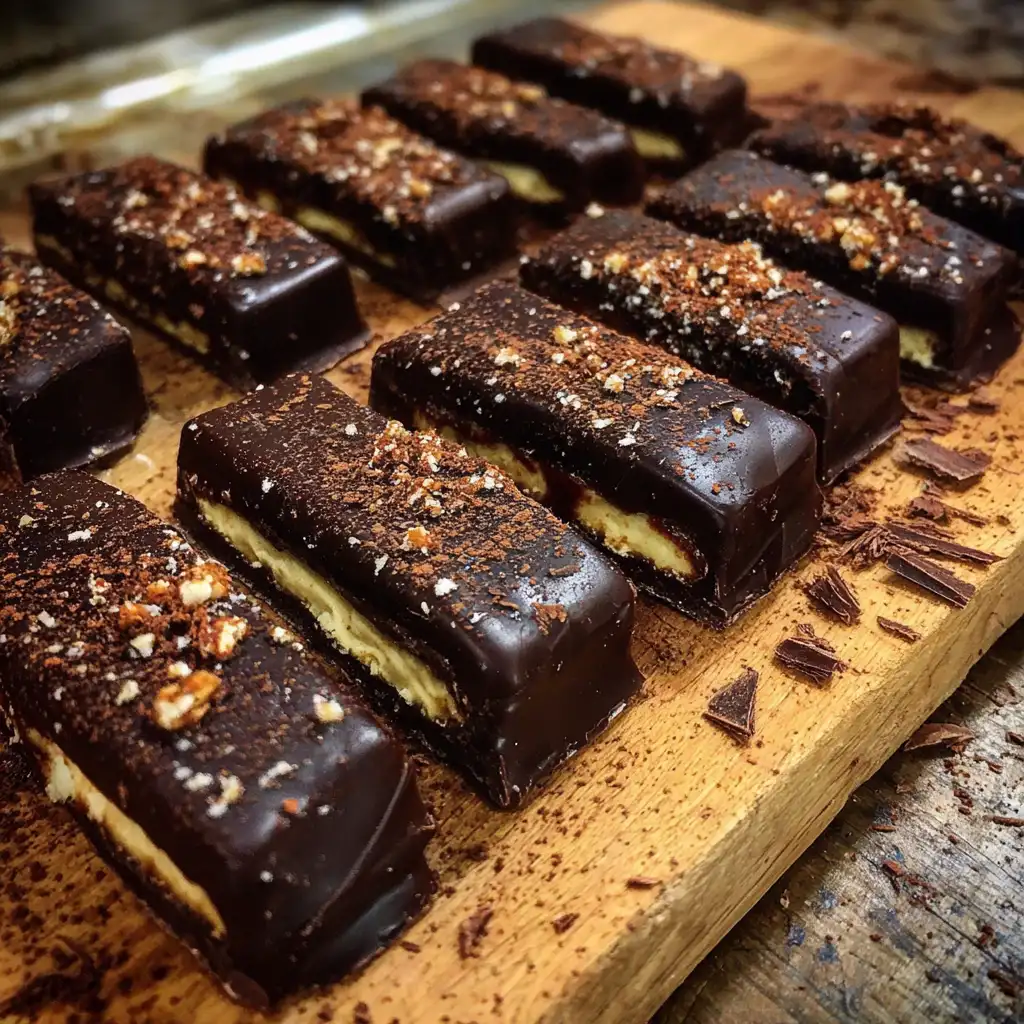
Tombstone Chocolate Bars are a delightful treat that combines rich dark chocolate with a creamy, sweet filling. These bars are not just a dessert; they are a celebration of flavors and textures. The smooth filling, made from sweetened condensed milk and cocoa powder, contrasts beautifully with the crunchy nuts sprinkled on top. Each bite offers a perfect balance of sweetness and richness, making them a favorite among chocolate lovers. Whether you enjoy them as a snack or a dessert, Tombstone Chocolate Bars are sure to satisfy your sweet tooth.
The History Behind Tombstone Chocolate Bars
The origins of Tombstone Chocolate Bars are a bit of a mystery, but they are believed to have been inspired by classic chocolate confections. The name “Tombstone” may evoke images of the Wild West, where cowboys enjoyed simple yet satisfying treats. Over the years, these bars have evolved, with many home bakers adding their unique twists. Today, they are a popular choice for gatherings, parties, and even as homemade gifts. The combination of nostalgia and deliciousness makes Tombstone Chocolate Bars a timeless favorite that continues to bring joy to many.
Ingredients for Tombstone Chocolate Bars
Essential Ingredients for the Perfect Tombstone Chocolate Bars
To create the perfect Tombstone Chocolate Bars, you need a few essential ingredients. First, dark chocolate is the star of the show. It provides a rich, deep flavor that pairs wonderfully with the sweet filling. You’ll need about 200 grams, which is roughly 7 ounces. Next, sweetened condensed milk is crucial for that creamy texture. One can, which is 14 ounces or 397 grams, will do the trick. Unsweetened cocoa powder adds an extra chocolatey kick, so don’t forget the 2 tablespoons. A teaspoon of vanilla extract enhances the overall flavor, while a pinch of salt balances the sweetness. Lastly, crushed nuts, like almonds or hazelnuts, add a delightful crunch. You’ll need about 1/4 cup of these. Butter is also necessary, with 2 tablespoons helping to melt the chocolate smoothly.
Optional Ingredients to Enhance Your Tombstone Chocolate Bars
While the essential ingredients create a fantastic base, you can enhance your Tombstone Chocolate Bars with a few optional ingredients. For instance, adding a few drops of peppermint or orange extract to the filling can give your bars a refreshing twist. You might also consider using different types of nuts or even adding dried fruits for a unique flavor profile. If you want a more decadent treat, try drizzling some caramel or white chocolate over the top. These additions can elevate your bars and make them even more enjoyable. Remember, the beauty of making Tombstone Chocolate Bars lies in your creativity!


Preparation of Tombstone Chocolate Bars

Step-by-Step Instructions for Making Tombstone Chocolate Bars
Step 1: Gather Your Ingredients
Before diving into the fun of making Tombstone Chocolate Bars, it’s essential to gather all your ingredients. This includes dark chocolate, sweetened condensed milk, cocoa powder, vanilla extract, crushed nuts, butter, and a pinch of salt. Having everything ready will streamline your cooking process and make it more enjoyable. Plus, it helps to avoid any last-minute trips to the pantry!
Step 2: Prepare the Base
Now, let’s get started on the creamy filling! In a medium saucepan, combine the sweetened condensed milk, cocoa powder, vanilla extract, and a pinch of salt. Heat this mixture over low heat, stirring continuously. This step is crucial, as it ensures a smooth and creamy texture. After about 5-7 minutes, the mixture should be heated through and well combined. Once it reaches that perfect consistency, remove it from the heat and let it cool slightly. This creamy filling is what makes your Tombstone Chocolate Bars so irresistible!
Step 3: Mix the Chocolate Mixture
Next up, it’s time to create the delicious chocolate coating. In a separate bowl, melt the dark chocolate and butter together. You can do this in a microwave, using 30-second intervals and stirring in between, or by using a double boiler on the stove. Once the chocolate is melted and smooth, set it aside. This rich chocolate coating will give your bars a glossy finish and enhance their flavor.
Step 4: Pour and Set
Now that you have your creamy filling and chocolate mixture ready, it’s time to assemble! Line an 8×8 inch rectangular baking dish with parchment paper, leaving some overhang for easy removal later. Pour the creamy filling into the dish and spread it evenly. This step is important for ensuring that each bar has a consistent texture. Place the dish in the refrigerator for about 30 minutes. This will help the filling firm up, making it easier to cut into bars later.
Step 5: Cut and Serve
Once the filling has set, it’s time for the fun part! Remove the dish from the refrigerator and use a sharp knife to cut the filling into rectangular bars of your desired size. Now, dip each bar into the melted dark chocolate, ensuring they are fully coated. Use a fork to lift them out, allowing any excess chocolate to drip off. Place the coated bars back on the parchment-lined dish. While the chocolate is still wet, sprinkle crushed nuts and a light dusting of cocoa powder on top for added texture and flavor. Finally, return the bars to the refrigerator for about 30 minutes, or until the chocolate is fully set. Once hardened, carefully remove the bars using the parchment overhang, trim any uneven edges, and enjoy your delicious homemade Tombstone Chocolate Bars!
Tips for Perfecting Your Tombstone Chocolate Bars
Common Mistakes to Avoid When Making Tombstone Chocolate Bars
Making Tombstone Chocolate Bars can be a fun and rewarding experience. However, there are a few common mistakes that can affect the final product. First, be careful not to overheat the chocolate when melting it. If chocolate gets too hot, it can seize up and become grainy. Always melt it slowly, either in short bursts in the microwave or over a double boiler.
Another mistake is not allowing the filling to cool properly before cutting. If you cut the bars too soon, they may fall apart. Make sure the filling is firm enough to hold its shape. Additionally, when coating the bars in chocolate, ensure they are fully submerged. This helps create a smooth and even coating. Lastly, don’t skip the chilling step after coating. This is crucial for the chocolate to set properly, giving your bars that perfect snap when you bite into them.
Storage Tips for Your Tombstone Chocolate Bars
To keep your Tombstone Chocolate Bars fresh and delicious, proper storage is key. First, place the bars in an airtight container. This will help prevent them from absorbing any unwanted odors from the refrigerator. You can store them in the fridge for up to one week. If you want to keep them longer, consider freezing them.
To freeze, wrap each bar individually in plastic wrap, then place them in a freezer-safe container. This way, they can last for up to three months. When you’re ready to enjoy them, simply take out the desired amount and let them thaw in the refrigerator for a few hours. This method ensures that your Tombstone Chocolate Bars remain tasty and enjoyable for a longer time!
Variation of Tombstone Chocolate Bars
Creative Twists on the Classic Tombstone Chocolate Bars
If you’re looking to shake things up, there are plenty of creative twists you can add to your Tombstone Chocolate Bars. One fun idea is to incorporate different flavors into the filling. For instance, try adding a tablespoon of peanut butter for a nutty taste. You can also mix in some crushed cookies, like Oreos or graham crackers, to give your bars a crunchy texture.
Another exciting variation is to use flavored chocolate for the coating. White chocolate or milk chocolate can provide a sweeter taste that contrasts nicely with the rich filling. You could even swirl in some caramel or butterscotch sauce into the filling for an extra layer of flavor. Don’t forget to experiment with toppings! Instead of just nuts, consider using sprinkles, shredded coconut, or even mini marshmallows for a fun and festive look.
Dietary Alternatives for Tombstone Chocolate Bars
For those with dietary restrictions, there are several alternatives to make Tombstone Chocolate Bars more inclusive. If you need a dairy-free option, use dark chocolate that is labeled dairy-free and substitute the sweetened condensed milk with coconut milk or almond milk. You can also find vegan sweetened condensed milk in stores or make your own at home.
For a gluten-free version, ensure that all your ingredients, especially the cocoa powder and any added toppings, are certified gluten-free. If you want to reduce sugar, consider using sugar-free chocolate and a sugar substitute in the filling. These alternatives allow everyone to enjoy the deliciousness of Tombstone Chocolate Bars without compromising on taste or dietary needs!
FAQs About Tombstone Chocolate Bars
How long do Tombstone Chocolate Bars last?
Tombstone Chocolate Bars can last up to one week when stored properly in an airtight container in the refrigerator. This helps maintain their freshness and flavor. If you want to keep them longer, consider freezing them. When frozen, they can last for up to three months. Just remember to wrap each bar individually in plastic wrap before placing them in a freezer-safe container. This way, you can enjoy your delicious bars even after some time!
Can I freeze Tombstone Chocolate Bars?
Yes, you can freeze Tombstone Chocolate Bars! Freezing is a great way to extend their shelf life. To freeze, wrap each bar tightly in plastic wrap and place them in a freezer-safe container. When you’re ready to enjoy them, simply take out the desired amount and let them thaw in the refrigerator for a few hours. This method ensures that your bars remain tasty and enjoyable, just like when they were freshly made!
What can I substitute for chocolate in Tombstone Chocolate Bars?
If you need to substitute chocolate in your Tombstone Chocolate Bars, there are a few options. You can use carob chips as a chocolate alternative. Carob has a naturally sweet flavor and is caffeine-free. Another option is to use white chocolate or flavored chocolate, like butterscotch or peanut butter chips, for a different taste. Just keep in mind that these substitutes may alter the overall flavor and texture of the bars, but they can still be delicious!
Are Tombstone Chocolate Bars suitable for kids?
Absolutely! Tombstone Chocolate Bars are a delightful treat that kids will love. They are sweet, creamy, and fun to eat. However, it’s always a good idea to check for any allergies, especially with ingredients like nuts. You can also make them healthier by using less sugar or adding in some dried fruits. Overall, these bars can be a great addition to a kid-friendly dessert table or snack time!
Print
Tombstone Chocolate Bars
- Total Time: 1 hour 5 minutes
- Yield: 12 bars 1x
- Diet: Vegetarian
Description
Tombstone Chocolate Bars are a delightful treat that combines rich dark chocolate with a creamy, sweet filling, offering a perfect balance of sweetness and richness.
Ingredients
- 200 grams dark chocolate (about 7 ounces)
- 1 can sweetened condensed milk (14 ounces or 397 grams)
- 2 tablespoons unsweetened cocoa powder
- 1 teaspoon vanilla extract
- 1/4 cup crushed nuts (almonds or hazelnuts)
- 2 tablespoons butter
- Pinch of salt
Instructions
- Gather your ingredients.
- Prepare the base by combining sweetened condensed milk, cocoa powder, vanilla extract, and salt in a saucepan and heating over low heat for 5-7 minutes.
- Melt the dark chocolate and butter together in a microwave or double boiler.
- Line an 8×8 inch baking dish with parchment paper, pour the creamy filling, and refrigerate for 30 minutes.
- Cut the filling into bars, dip each in melted chocolate, and sprinkle with crushed nuts and cocoa powder before refrigerating again for 30 minutes.
Latest Amazon Finds


Notes
- Be careful not to overheat the chocolate.
- Allow the filling to cool properly before cutting.
- Ensure bars are fully coated in chocolate.
- Chill after coating for proper setting.
- Prep Time: 20 minutes
- Cook Time: 15 minutes
- Category: Dessert
- Method: No-bake
- Cuisine: American
Nutrition
- Serving Size: 1 bar
- Calories: 250
- Sugar: 20g
- Sodium: 50mg
- Fat: 15g
- Saturated Fat: 8g
- Unsaturated Fat: 5g
- Trans Fat: 0g
- Carbohydrates: 30g
- Fiber: 2g
- Protein: 4g
- Cholesterol: 10mg
Keywords: Tombstone Chocolate Bars, chocolate dessert, homemade chocolate bars