
Craving a slice of indulgence that’s as smooth as silk and packed with creamy decadence? A classic New York cheesecake recipe made in a blender recipe is the epitome of dessert perfection. This guide breaks down everything you need to create this iconic treat—from understanding the magic of New York-style cheesecakes to the shortcuts that make this recipe foolproof.
By the end of this article, you’ll have a step-by-step guide to whipping up a cheesecake that’s not just delicious but effortless, all thanks to the magic of a blender. Let’s dive right in, starting with what makes this cheesecake a standout.
What is a New York Cheesecake?
A New York cheesecake isn’t your average cheesecake—it’s the dessert equivalent of a symphony. Renowned for its rich, dense texture, this cheesecake melts in your mouth, delivering a velvety smoothness and tangy kick. The secret? A simple yet powerful lineup of ingredients: cream cheese, eggs, sugar, and heavy cream.
Unlike lighter, fluffier cheesecakes, the New York style skips shortcuts like gelatin or whipped toppings. Instead, it doubles down on the essentials, ensuring every bite is a creamy masterpiece. And with a blender at your side, this dessert transforms from gourmet to gloriously simple.
Why Use a Blender for Cheesecake Recipes?
Say goodbye to messy mixing bowls and elbow grease! Using a blender for your cheesecake recipe is a total game-changer. Why? It’s faster, cleaner, and delivers a perfectly smooth batter every single time. Here’s why the blender method steals the show:
- Time-Saving: No hand mixing, no fuss—blend and pour.
- Silky Smooth Texture: Lumps? Never heard of them.
- Beginner-Friendly: You’ll nail this recipe even if you’ve never baked before.
The blender’s high-powered blades quickly work with the cream cheese and other ingredients, giving you a batter so smooth it feels like velvet. And trust me, it’s as satisfying to make as it is to eat.
Benefits of the Blender Method for Cheesecake
Still on the fence about this shortcut? Let’s spell out why this method works like a charm:
- Less Cleanup: Who wants to scrub a mountain of dishes? With a blender, you’ll only need a few tools.
- Foolproof Consistency: Achieve professional results without breaking a sweat.
- Elevated Results, Minimal Effort: Get that bakery-level texture and taste from the comfort of your kitchen.
By the end of this process, you’ll wonder why you ever made cheesecake any other way. With the blender, it’s smooth sailing to dessert heaven.
Print
New York Cheesecake Recipe Made in Blender
- Total Time: 6 hours
- Yield: 12 servings
Ingredients
For the Crust:
– 2 cups graham cracker crumbs
– 6 tbsp unsalted butter, melted
– 2 tbsp granulated sugar
For the Cheesecake Batter:
– 24 oz (3 blocks) full-fat cream cheese, softened
– 1 cup granulated sugar
– 3 large eggs, at room temperature
– 1 cup heavy cream
– 2 tsp vanilla extract
– Optional: 1 tbsp lemon juice for tanginess
Instructions
Step 1: Prepare the Crust
1. Preheat the oven to 325°F (163°C). Grease a 9-inch springform pan.
2. Combine the graham cracker crumbs, melted butter, and sugar in a mixing bowl. Mix until it resembles wet sand.
3. Press the mixture evenly into the bottom of the pan. Use a glass to compact it.
4. Bake for 10 minutes, then let cool while you prepare the batter.
Step 2: Make the Batter in the Blender
1. Add softened cream cheese to the blender and blend until smooth.
2. Gradually add sugar and vanilla extract, blending until combined.
3. Add eggs one at a time, blending briefly after each addition.
4. Slowly pour in heavy cream and blend until smooth. Be careful not to overmix.
Step 3: Assemble and Bake
1. Wrap the outside of the springform pan with heavy-duty aluminum foil to prevent water from seeping in during the water bath.
2. Pour the batter over the cooled crust and smooth the top with a spatula.
3. Place the pan in a larger baking dish. Fill the outer dish with hot water halfway up the sides of the pan.
4. Bake for 55–65 minutes or until the edges are set and the center jiggles slightly.
Step 4: Cool and Chill
1. Turn off the oven, crack the door open, and let the cheesecake cool in the oven for 1 hour.
2. Remove from the oven and let it cool to room temperature.
3. Refrigerate for at least 4 hours or overnight for the best texture and flavor.
Optional Toppings:
– Fresh fruit (berries, sliced mango, or kiwi)
– Chocolate drizzle or caramel sauce
– Whipped cream or fruit compote
- Prep Time: 20 minutes
- Cook Time: 55–65 minutes
Keywords: new york cheesecake recipe made in blender recipe
Key Ingredients and Substitutions
Essential Ingredients for the Perfect Cheesecake Batter
You’ll need just a handful of simple, high-quality ingredients to make the ultimate New York cheesecake recipe made in blender. Each one plays a vital role in creating that signature creamy texture and rich flavor:
- Cream Cheese is the foundation of your cheesecake. For the silkiest batter, use full-fat cream cheese at room temperature.
- Eggs: These bind the ingredients and give the cheesecake its structure. Room-temperature eggs blend better, ensuring a smooth texture.
- Granulated Sugar: Adds sweetness without overpowering the tanginess.
- Vanilla Extract: A splash enhances the flavor, adding warmth and depth.
- Heavy Cream: For that velvety consistency that defines New York-style cheesecakes.
- Graham Crackers: Crushed and combined with melted butter to form the classic buttery crust.
Using room-temperature ingredients, your batter will blend effortlessly, avoiding lumps that can ruin the cheesecake’s texture. Trust me, a little prep goes a long way!
Substitutions for Dietary Needs
Baking for guests with dietary restrictions? No problem! Here’s how you can tweak this New York cheesecake recipe made in blender recipe to suit different needs:
- Gluten-Free Crust: Swap traditional graham crackers for a gluten-free version or almond flour mixed with melted butter.
- Low-Sugar Option: Replace granulated sugar with stevia, monk fruit, or another substitute.
- Dairy-Free Cheesecake: Use vegan cream cheese and coconut cream for a rich, creamy alternative.
While these substitutions may alter the texture slightly, they keep the cheesecake delicious and accessible for everyone at the table.
Why Room-Temperature Ingredients are Crucial
Here’s a golden rule: always use room-temperature ingredients when making cheesecake. Cold cream cheese or eggs can cause lumps, making the batter harder to blend. Room-temperature ingredients, on the other hand, ensure the smooth, lump-free texture that makes this New York cheesecake recipe made in a blender recipe shine.
Tools and Equipment
Must-Have Tools for Blender Cheesecake
Good news! You don’t need a fully stocked kitchen to make this cheesecake. With just a few essential tools, you’re all set:
- Blender: A high-powered blender is ideal for creating a silky batter. No blender? A food processor works, too.
- Springform Pan: This ensures your cheesecake pops out easily without losing shape.
- Mixing Bowl: Use this to combine the crust ingredients.
- Measuring Cups and Spoons: Precision is key when baking!
These tools simplify the process, making creating a bakery-quality cheesecake at home easy.
Tips for Preparing Your Blender for Smooth Batter
To get the best results, a little prep goes a long way. Follow these tips to make sure your blender does the heavy lifting:
- Start Clean: Wash the blender jar thoroughly to avoid unwanted flavors.
- Add Ingredients Gradually: Begin with the cream cheese, followed by eggs, sugar, and cream. This layering ensures everything blends evenly.
- Pulse, Then Blend: Pulsing first breaks down ingredients, while blending creates that velvety consistency.
By taking these steps, you’ll ensure your batter is smooth, creamy, and lumps-free.
The Role of a Springform Pan and Water Bath
The springform pan is an essential cheesecake pan. Its removable sides make it easy to serve your dessert without damaging its edges. A water bath is your secret weapon to avoid cracks and ensure even baking. The moisture prevents the cheesecake from drying out and guarantees a perfect finish every time.
With these tools and techniques, your New York cheesecake recipe made in blender is destined for success.
Step-by-Step Instructions for the New York Cheesecake Recipe Made in Blender Recipe
How to Make the Graham Cracker Crust for Blender Cheesecake
The crust is the foundation of this New York cheesecake recipe made in a blender. It’s buttery and crunchy and perfectly complements the creamy filling.
- Crush the Graham Crackers: Place the graham crackers in a zip-top bag and crush them with a rolling pin or a food processor until you have fine crumbs.
- Mix with Melted Butter: Combine the crumbs with melted butter in a mixing bowl until the texture resembles wet sand.
- Press Into the Springform Pan: Firmly press the mixture into the base of a greased springform pan. Use the bottom of a glass or measuring cup for an even layer.
- Chill the Crust: Place the pan in the fridge for about 15 minutes to set while preparing the batter.
A solid crust ensures your cheesecake holds together and has a delightful crunch with every bite.
Blending the Perfect Cheesecake Batter in a Blender
Here’s where the blender makes life easier. It creates a silky-smooth batter with no lumps or hassle.
- Add Ingredients Gradually: Start with the cream cheese, blending until smooth. Add sugar and vanilla extract, pulsing to combine.
- Incorporate the Eggs: Add eggs one at a time to ensure even blending.
- Pour in Heavy Cream: Add heavy cream last, blending until the mixture is velvety smooth.
This method guarantees the perfect texture for your cheesecake, making it taste like it came from a bakery.
Setting Up the Water Bath for Baking
A water bath is the secret to a crack-free cheesecake with a creamy consistency.
- Wrap the Pan: Cover the outside of your springform pan with heavy-duty aluminum foil to prevent water from seeping into the crust.
- Prepare the Outer Dish: Place the springform pan in a larger baking dish. Pour hot water into the dish until it reaches halfway up the sides of the springform pan.
- Bake at 325°F: Place the dish in the oven and bake for 55-65 minutes. The edges should be set, and the center should jiggle slightly when shaken.
With this setup, your cheesecake will bake evenly and remain luxuriously creamy.
Cooling and Chilling the Cheesecake
After baking, cooling your cheesecake correctly is just as important as the baking process.
- Cool Gradually: Turn off the oven and leave the cheesecake inside with the door open for one hour. This prevents cracking.
- Refrigerate: Once cooled to room temperature, transfer the cheesecake to the fridge for at least 4 hours or overnight.
This slow cooling process ensures the flavors meld together beautifully.
Tips for a Crack-Free New York Cheesecake Recipe Made in Blender Recipe
Why a Water Bath is Key for a Smooth Blender Cheesecake
A water bath isn’t optional for this New York cheesecake recipe made in a blender. The steam created during baking ensures the cheesecake bakes gently and evenly, preventing cracks on the surface.
- Even Temperature: The water bath maintains consistent heat, preventing sudden temperature changes that cause cracking.
- Moisture Retention: It keeps the environment humid, so the cheesecake doesn’t dry out.
Double-wrap the springform pan in foil for the best results to keep water from sneaking into the crust.
Avoiding Overmixing and Overbaking
- Overmixing: Too much air in the batter causes the cheesecake to rise and fall unevenly. Blend only until the batter is smooth.
- Overbaking: Bake until the center has a slight jiggle. Overbaking can make the cheesecake dry and crumbly.
By watching these details, your cheesecake will be a showstopper.
Gradual Cooling to Prevent Surface Cracks
Cooling your cheesecake gradually is key to a flawless top. Sudden temperature changes can cause cracks. After baking, let the cheesecake cool in the oven before transferring it to the fridge. This simple step makes all the difference.
For more delicious dessert inspiration, check out our Chocolate Chip Cheesecake Cookies recipe, which is a perfect complement to your cheesecake adventure.
Toppings and Serving Suggestions
Classic Toppings to Elevate Your Cheesecake
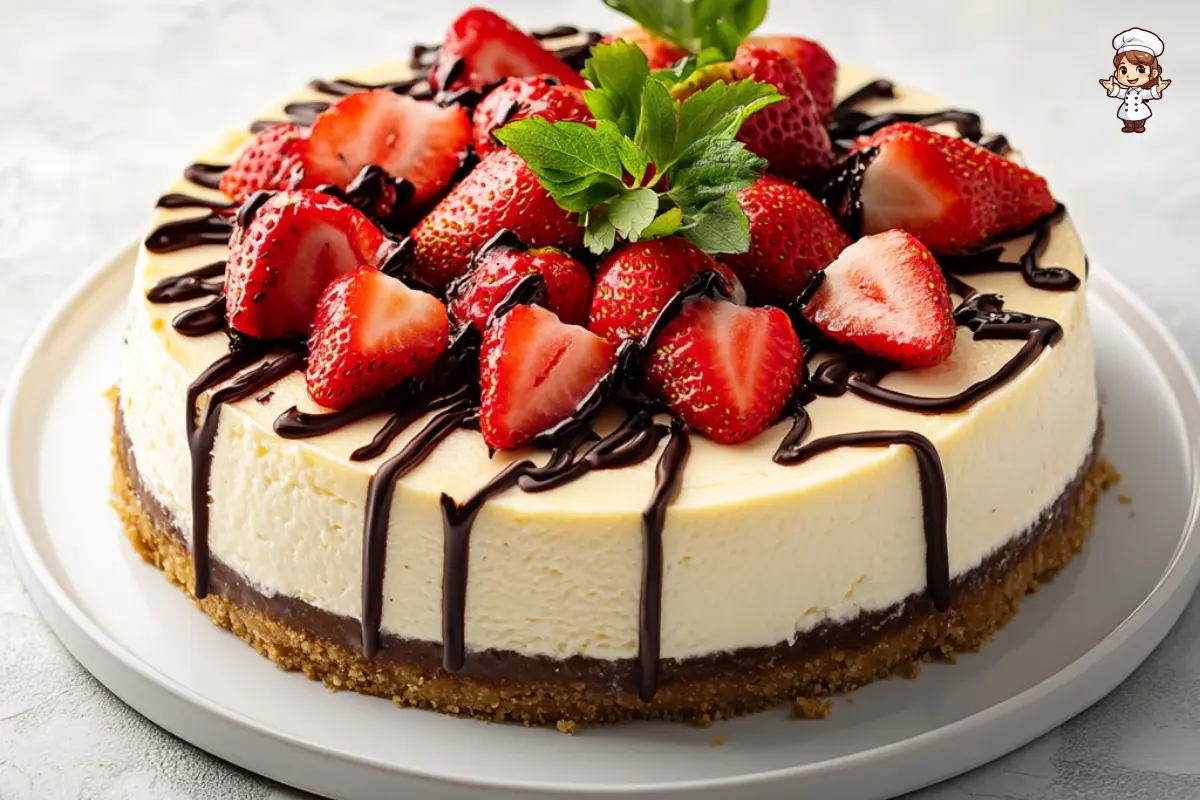
A classic New York cheesecake recipe made in a blender recipe is fantastic, but toppings can take it to the next level. Here are a few tried-and-true options to add flavor and flair:
- Fresh Fruits: Top your cheesecake with fresh strawberries, raspberries, or blueberries. Their natural sweetness and tartness beautifully balance the creamy richness.
- Whipped Cream: Add a few dollops around the edges for a light and airy touch.
- Chocolate Drizzle: Melt dark or milk chocolate and drizzle it over the top for a decadent finish.
Each topping enhances the cheesecake’s flavor while adding a pop of color to make it visually stunning.
Unique Twists for Extra Flavor
Want to get creative? These unique toppings can add a fun twist to your cheesecake:
- Fruit Compote: Cook fresh berries with sugar and lemon juice for a tangy-sweet sauce.
- Nut-Based Crumbles: Toasted almonds, pecans, or walnuts sprinkled on top add crunch and contrast.
- Caramel Sauce: A decadent caramel drizzle creates an irresistible sweet-and-salty combination.
These options let you customize your cheesecake to suit any occasion or preference.
Pairing Suggestions for the Perfect Dessert Experience
Pairing your cheesecake with the right drink or side enhances the overall experience. Try these:
- Coffee or Espresso: The bitterness cuts through the richness perfectly.
- Dessert Wine: A sweet Moscato or Riesling pairs wonderfully with creamy desserts.
- Ice Cream: A scoop of vanilla or fruit-flavored ice cream adds another layer of indulgence.
These pairings make your New York cheesecake recipe made in a blender recipe an unforgettable treat.
Storing and Freezing Your Cheesecake
Best Practices for Refrigeration
Cheesecake tastes best when properly stored. To keep it fresh:
- Cover It Well: Wrap your cheesecake tightly with plastic wrap or place it in an airtight container.
- Refrigerate: Store it in the fridge for up to five days. This keeps the texture creamy and the flavor intact.
Proper refrigeration ensures you can savor every slice without compromising quality.
Freezing Cheesecake for Later
If you have leftovers or want to prepare ahead of time, freezing is a great option:
- Chill First: Let the cheesecake cool completely in the fridge before freezing.
- Wrap It Tightly: Wrap the cheesecake in plastic wrap, then in a layer of aluminum foil to prevent freezer burn.
- Freeze: Store it in the freezer for up to two months.
To serve, thaw it overnight in the fridge. Your cheesecake will taste just as fresh as the day you made it.
Serving After Storage: Reheating and Presentation Tips
To serve stored cheesecake:
- Room Temperature: Let it sit at room temperature for about 20 minutes before serving.
- Clean Slices: Use a warm, sharp knife (wiped clean after each cut) for neat slices.
These tips ensure every bite of your New York cheesecake recipe made in blender recipe is as enjoyable as the first.
For more ideas on storing desserts, check out our guide to Cottage Cheese Cheesecake Recipe, perfect for cheesecake enthusiasts!
FAQs
What Makes New York Cheesecake Different from Regular Cheesecake?
The magic of a New York cheesecake recipe made in blender recipe is its rich and creamy texture. Unlike regular cheesecakes, which may rely on gelatin or whipped toppings, the New York style stands out with its higher cream cheese content. This makes it dense and silky. Plus, heavy cream or sour cream adds a slight tang, giving it a unique flavor that’s hard to beat.
Can Cream Cheese Be Blended Smoothly in a Blender?
Yes, blending cream cheese is not only possible but also makes the process much easier. By using a blender, you can avoid lumps and create a batter with a smooth and consistent texture. Just remember to let the cream cheese come to room temperature before blending. This ensures it mixes evenly and prevents any frustration.
Is Sour Cream or Heavy Cream Better for Cheesecake?
Both options work well, but each offers something different. Sour cream brings a tangy flavor that balances the sweetness, while heavy cream delivers a rich, velvety consistency. For this New York cheesecake recipe made in blender recipe, heavy cream is often the preferred choice to achieve that signature creamy feel.
How Do I Prevent Cracks in My Cheesecake?
Cracks can ruin the look of your cheesecake, but they’re easy to avoid. Always bake the cheesecake in a water bath, and don’t rush the cooling process. Additionally, make sure not to overmix the batter. These simple tips will keep your cheesecake smooth and flawless.
Can I Freeze a Blender Cheesecake?
Absolutely! Cheesecake freezes beautifully, making it perfect for planning ahead. To freeze, let it cool completely, then wrap it tightly in plastic wrap and foil. When you’re ready to enjoy it, thaw it overnight in the fridge. It will taste just as fresh as when you made it.
Conclusion
Why This Blender Cheesecake Recipe Works Every Time
This New York cheesecake recipe made in blender recipe is both easy and impressive. Using a blender saves time and guarantees a lump-free batter. Additionally, baking in a water bath keeps the texture creamy and prevents cracks. By following these steps, you can achieve professional results without the stress.
Encouragement to Try the Recipe with Customizations
This cheesecake is versatile and can be personalized to fit any occasion. You can add fruit toppings, drizzle it with chocolate, or try a different crust like almond flour for a gluten-free option. The recipe is simple enough for beginners and rewarding for experienced bakers.
So, don’t wait! Gather your ingredients, grab your blender, and give this recipe a try. It’s a dessert that will delight your family, impress your guests, and quickly become a favorite in your home.
For more inspiration, take a look at our Healthy Cheesecake Recipe. You’ll find plenty of ideas to make your cheesecake journey even more exciting.