
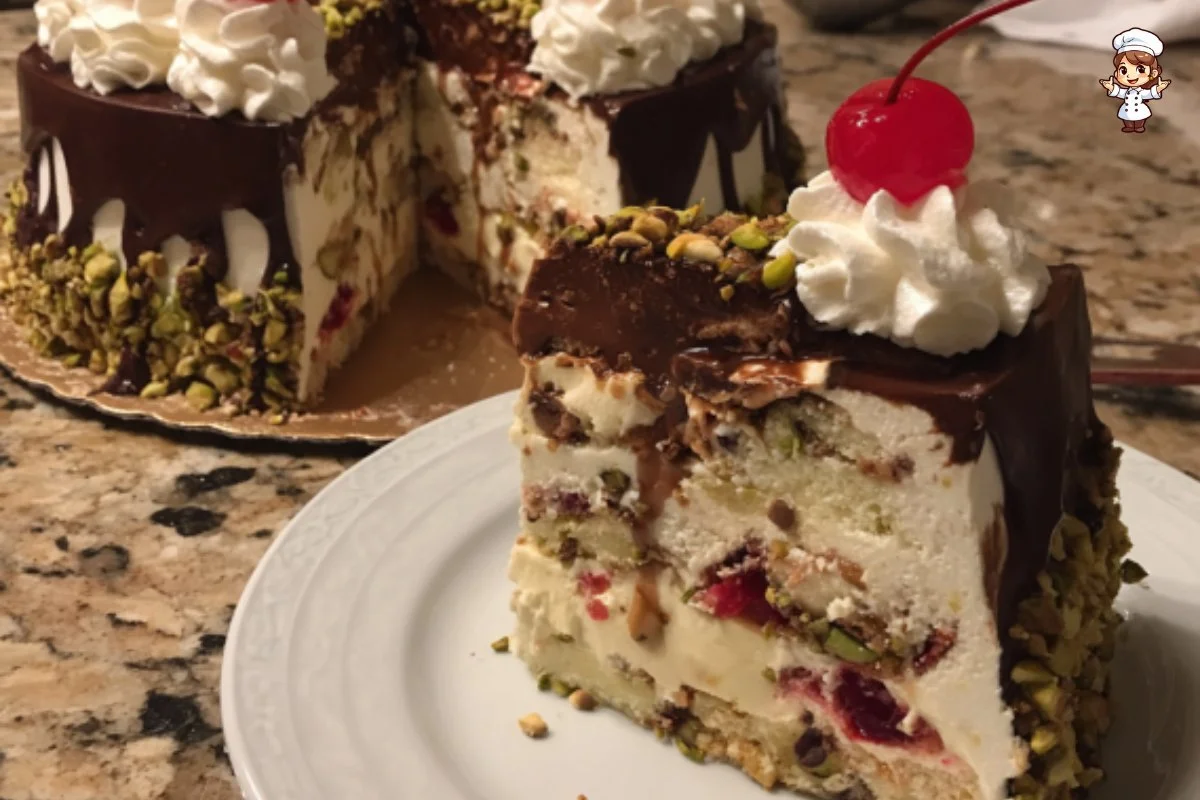
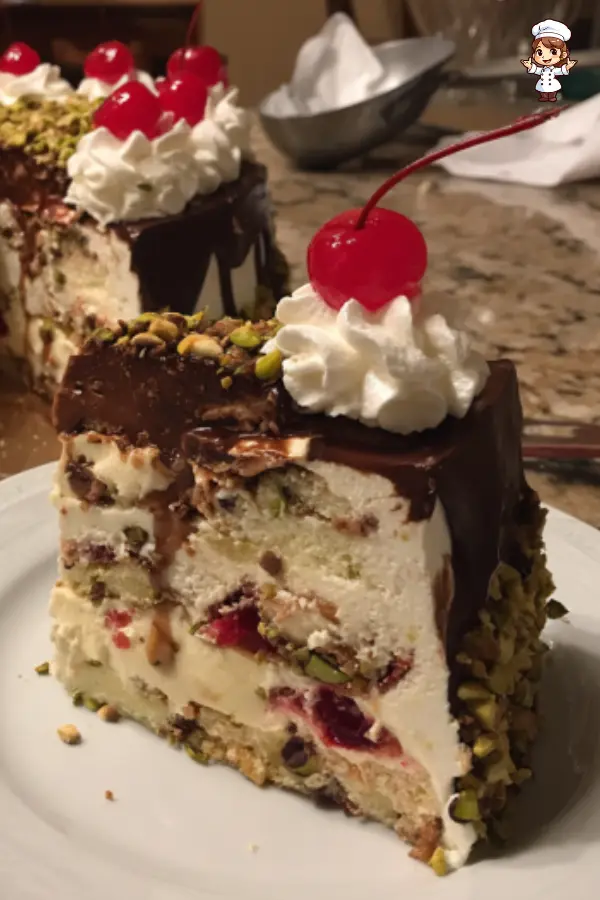
Layered Ice Cream Cake is a delightful and visually stunning dessert that combines different flavors and textures to create a heavenly treat. Imagine vibrant layers of pistachio, cherry, and chocolate ice cream nestled in a crunchy cookie crust and topped with a decadent chocolate magic shell. This cake is as pleasing to the eye as it is to the palate, making it the perfect centerpiece for celebrations, birthdays, or casual summer gatherings.
The beauty of this cake lies not just in its delicious flavors, but also in its ability to bring back fond childhood memories of ice cream trucks, summer nights, and family picnics. As you cut through the layers, the vibrant colors of the ice cream create a rainbow effect, tempting everyone to grab a slice. It’s not just a dessert; it’s an experience that combines fun and nostalgia. Whether you are an ice cream lover or just enjoy desserts that make you smile, this Layered Ice Cream Cake is bound to delight.
Ingredients about Layered Ice Cream Cake
List of ingredients with measurements
To prepare this delicious Layered Ice Cream Cake, you will need the following ingredients:
- 2 pints pistachio ice cream
- 2 pints cherry ice cream
- 2 pints chocolate ice cream
- 2/3 cup shelled roasted salted pistachios, divided
- 12 sugar cones (from a 4-ounce package), finely crushed
- 4 tablespoons melted butter
- 2 teaspoons granulated sugar
- Kosher salt
- 23 maraschino cherries without stems, divided
- 1 cup semisweet chocolate chips
- 1/4 cup refined coconut oil
- Whipped cream for garnish
Optional ingredient substitutions
You can make some substitutions based on what’s available to you or personal preferences. For example, if you don’t have pistachio ice cream, you could substitute it with any creamy nut-based ice cream like almond or hazelnut. For those who prefer a different flavor, swapping cherry for strawberry or raspberry ice cream could create a deliciously fruity twist. If you have dietary restrictions, dairy-free ice creams are widely available now, making it easy to adapt this recipe for lactose intolerance or vegan diets. You can also use gluten-free cookies for the crust if necessary.
How to Make Layered Ice Cream Cake
Step 1: Remove the ice cream from the freezer
To begin, take all your ice creams out of the freezer. Remove the lids and paper covers, and place them in the refrigerator for at least 20 minutes to soften slightly. This will make scooping the ice cream much easier. While the ice cream is softening, roughly chop 1/3 cup of the shelled pistachios. Setting them aside for later use will save time in the layering process.
Step 2: Make the crust
While the ice cream is softening, you can prepare the crust. Combine the crushed sugar cones with melted butter, granulated sugar, and a pinch of Kosher salt in a bowl. Stir the mixture until it’s well combined and resembles a wet sand texture. Next, press this mixture into a 9-inch springform pan, ensuring that it is evenly distributed across the bottom. This will serve as the base of your cake and provide a lovely crunch.
Step 3: Layer the pistachio ice cream
Once the crust is ready, use an ice cream scoop to layer both pints of pistachio ice cream onto the crust. Use an offset spatula or the back of a spoon to smooth it into an even layer. After that, tap the pan firmly on a flat surface to release any trapped air bubbles. To finish this layer, sprinkle the chopped pistachios over the ice cream and gently press them in. This not only adds flavor but also provides a delightful crunch.
Step 4: Layer the cherry ice cream
Now it’s time to add the cherry ice cream. Scoop both pints onto the pistachio layer, spreading it evenly. After smoothing it out, evenly distribute 15 maraschino cherries over the cherry ice cream. Press them in gently to make sure they are secure and will not float up in the next layer. The combination of cherries and pistachios will create a beautiful array of colors and flavors.
Step 5: Layer the chocolate ice cream
Following the cherry layer, add both pints of chocolate ice cream. Spread the final layer smoothly over the cherry layer, making it flush with the edges of the springform pan. Once again, take a piece of plastic wrap and press it onto the surface of the chocolate ice cream. This will help it freeze without developing any frost or ice crystals. Place the entire cake back into the freezer and let it freeze until very firm, about 4 hours.
Step 6: Make the magic shell topping
While your cake is freezing, it’s time to prepare the magic shell topping. In a medium microwave-safe bowl, combine the semisweet chocolate chips and coconut oil. Microwave them in 15-second intervals, stirring in between each interval, until the chocolate is completely melted and smooth. Once fully mixed, let it cool completely to room temperature. This ensures that the shell will harden perfectly when poured over the cold ice cream.
Step 7: Remove from the springform pan
When you are ready to serve, take the cake out of the freezer. Using a knife or large offset spatula, run it around the edge of the cake to loosen it from the sides of the pan. Carefully release the springform pan and remove it. To give the cake an appealing look, round out the edges slightly with the spatula. This will help the chocolate sauce flow down the sides beautifully.
Step 8: Pour the magic shell
Pour the prepared magic shell topping over the cake, allowing it to cascade down the edges. Immediately scatter the remaining chopped pistachios over the top, as the shell will begin to harden quickly. Let the shell set for about one minute to achieve the right thickness. Finally, garnish the cake with eight dollops of whipped cream, crowning each dollop with one of the remaining maraschino cherries for that classic finishing touch.
How to Serve Layered Ice Cream Cake
Best ways to serve Layered Ice Cream Cake
When it comes to serving your Layered Ice Cream Cake, presentation is key. You can slice the cake into wedges and place each slice on a colorful dessert plate. This not only makes each serving seem special but also allows the colorful layers to shine. You can add an extra drizzle of chocolate sauce or even some fresh fruit on the side for an added touch.
Serving suggestions or pairings
This cake can be enhanced with a variety of pairings. Consider serving it with freshly made coffee or tea to balance the sweetness of the cake. Another delicious pairing is fresh berries, like strawberries or raspberries, which can add a tart contrast to the creamy sweetness. You can also serve it alongside a scoop of vanilla ice cream to amplify the ice cream experience.
How to Store Layered Ice Cream Cake
Proper storage methods
To store your Layered Ice Cream Cake, simply cover it tightly with plastic wrap or aluminum foil. Alternatively, you can keep it in an airtight container. This helps to prevent ice crystals from forming and keeps the cake fresh. Store it in the freezer until you’re ready to enjoy it again. Properly stored, the cake can last for up to 2 weeks in the freezer.
Tips for reheating or freezing
Since this cake is primarily an ice cream dessert, there’s no need to reheat it. The best experience is when it’s served frozen. However, if you’ve cut into it and are saving leftovers, be sure to wrap those slices tightly. It is best to allow the cake to thaw for about 10-15 minutes at room temperature before serving to soften slightly for easier slicing and eating.
Tips to Make Layered Ice Cream Cake
Common mistakes to avoid
One common mistake is not allowing the ice cream to soften enough before scooping. If it is too hard, it will be difficult to layer evenly. Another mistake is to rush the freezing process. For the best texture and flavor, allow for sufficient freezing time after each layer. Be mindful of the balance between the flavors too; too many toppings can overwhelm the beautiful ice cream layers, so use them sparingly.
Helpful tips for better results
For the best results, use high-quality ice creams as they tend to have a creamier texture and richer flavor. Additionally, tapping the springform pan after adding each layer ensures a compact structure, reducing air pockets. Finally, allowing your magic shell to cool to room temperature before pouring is crucial; if it’s too hot, it could melt the ice cream layers underneath.
Variation of Layered Ice Cream Cake
Suggested variations or twists on the recipe
This recipe can easily be adapted to suit different tastes. For instance, you could use strawberry or vanilla ice cream in place of cherry for a different flavor profile. For an adult twist, consider adding layers of liqueur-infused ice creams or incorporating crushed cookies and candies within the layers for extra texture.
Adjustments for dietary preferences
For those with dietary restrictions, there are many options available. Lactose-free or non-dairy ice creams can replace traditional options. You can also create a gluten-free crust using ground nuts or gluten-free cookies. For a healthier version, consider using lower sugar or no-churn ice cream recipes, which can give guests a guilt-free dessert experience.
FAQs
What can I do if the dish isn’t turning out right?
If your layers aren’t staying defined, it may be because the ice cream had not softened enough or the cake did not freeze adequately between layers. Be patient, and don’t rush the freezing steps. If the cake is melting too quickly upon serving, consider placing it back in the freezer for a few minutes before cutting.
Can I make this ahead of time?
Absolutely! This cake can be made a day or two in advance. Just keep it tightly sealed in the freezer until you’re ready to serve. In fact, letting it sit for a bit in the freezer can help the flavors meld even more beautifully.
What can I substitute for ingredients?
You can switch out ice cream flavors based on preferences. Instead of chocolate, a coffee or mint flavor could add a unique twist. For the crust, crushed gluten-free cookies or Graham cracker crumbs can be used, and coconut oil can sometimes be replaced with butter or plant-based margarine. For the magic shell, dairy-free chocolate chips can make a great alternative.
Layered Ice Cream Cake is not just a dessert; it is a celebration of flavors and memories. It is fun, inviting, and loved by both children and adults. You can create your very own masterpiece by following this simple recipe. Enjoy!
Print
Layered Ice Cream Cake
- Total Time: 4 hours 30 minutes (including freezing)
- Yield: 12 servings 1x
- Diet: Gluten Free
Description
A vibrant and delicious Layered Ice Cream Cake featuring pistachio, cherry, and chocolate ice cream on a crunchy sugar cone crust, topped with chocolate magic shell.
Ingredients
- 2 pints pistachio ice cream
- 2 pints cherry ice cream
- 2 pints chocolate ice cream
- 2/3 cup shelled roasted salted pistachios, divided
- 12 sugar cones (4-ounce package), finely crushed
- 4 tablespoons melted butter
- 2 teaspoons granulated sugar
- Pinch of kosher salt
- 23 maraschino cherries without stems, divided
- 1 cup semisweet chocolate chips
- 1/4 cup refined coconut oil
- Whipped cream for garnish
Instructions
- Remove ice cream from freezer and soften in refrigerator for 20 minutes. Roughly chop 1/3 cup pistachios and set aside.
- Mix crushed sugar cones, melted butter, sugar, and salt until crumbly. Press into bottom of 9-inch springform pan to form crust.
- Spread softened pistachio ice cream evenly over crust. Sprinkle chopped pistachios and gently press in. Tap pan to remove air bubbles.
- Layer cherry ice cream evenly on top of pistachio layer. Distribute 15 maraschino cherries evenly and press lightly.
- Spread chocolate ice cream evenly over cherry layer. Smooth top, cover surface with plastic wrap, and freeze for 4 hours until firm.
- Prepare magic shell by melting chocolate chips and coconut oil in 15-second intervals, stirring until smooth. Cool to room temperature.
- Remove cake from freezer, loosen edges with a knife, release springform pan. Round edges with spatula for better chocolate flow.
- Pour cooled magic shell over cake, letting it drip down sides. Sprinkle remaining chopped pistachios on top.
- Garnish with whipped cream dollops and top each with a maraschino cherry. Let shell set before serving.
Latest Amazon Finds


Notes
- Allow ice cream to soften properly before layering for easy spreading.
- Tap pan after each layer to reduce air pockets.
- Cool magic shell to room temperature before pouring to avoid melting ice cream layers.
- Store cake tightly wrapped in freezer to prevent ice crystals.
- Let slices thaw 10-15 minutes before serving for easier cutting.
- Use quality ice creams for best flavor and texture.
- Prep Time: 30 minutes
- Cook Time: 0 minutes
- Category: Dessert, Ice Cream Cake
- Method: No-bake (freezing and assembling)
- Cuisine: American
Nutrition
- Serving Size: 1 slice
- Calories: 380
- Sugar: 28g
- Sodium: 110mg
- Fat: 25g
- Saturated Fat: 10g
- Unsaturated Fat: 12g
- Trans Fat: 0g
- Carbohydrates: 30g
- Fiber: 2g
- Protein: 5g
- Cholesterol: 55mg
Keywords: Layered Ice Cream Cake, Pistachio Cherry Chocolate Ice Cream Cake, No-Bake Ice Cream Cake, Gluten-Free Ice Cream Cake, Summer Dessert Cake