

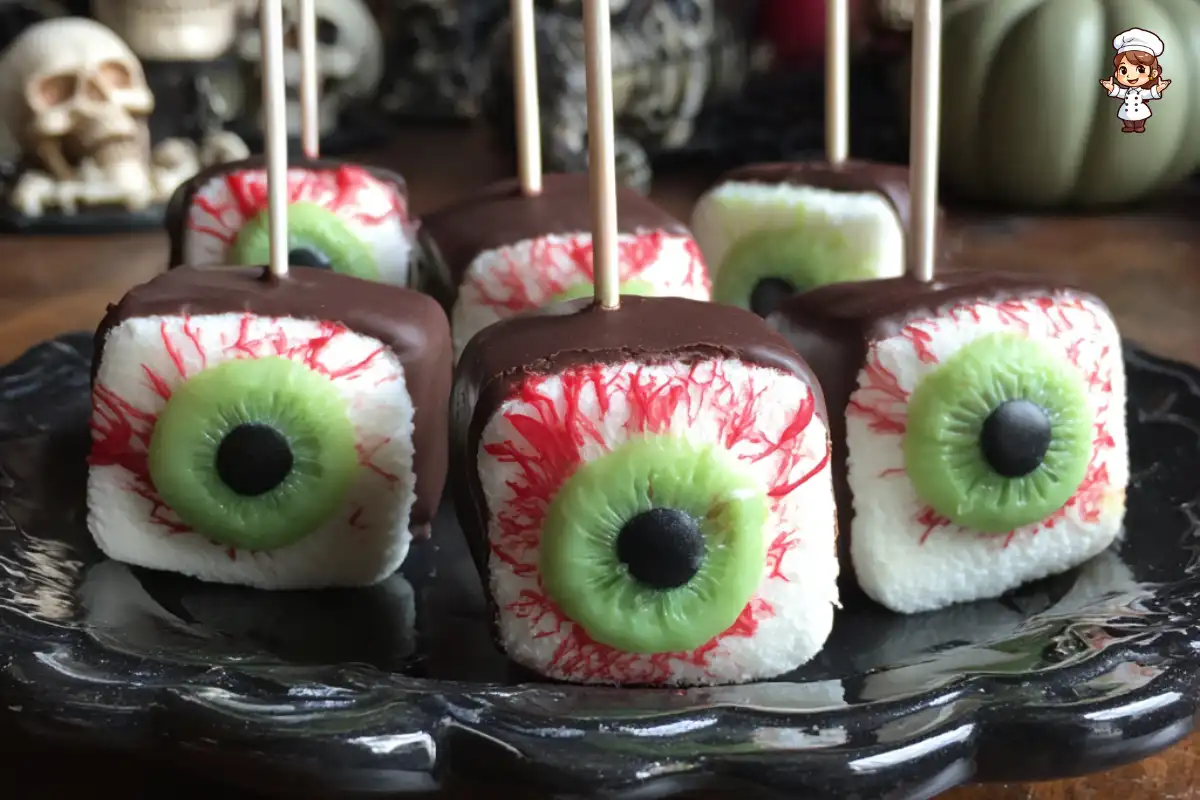
Eyeball Marshmallow Pops are a delightful and spooky treat perfect for Halloween or any fun gathering. These whimsical snacks combine the sweetness of marshmallows with the creamy richness of chocolate. They are not just tasty; they also look fantastic! Each pop resembles a creepy eyeball, making them a hit at parties.
These treats are easy to make and can be customized in many ways. You can use different colors for the eyeballs or even add unique designs. The combination of flavors and textures makes them a fun dessert for kids and adults alike. Plus, they are a great way to get creative in the kitchen!
In this recipe, you will learn how to create these fun eyeball pops step by step. With just a few ingredients and some imagination, you can whip up a batch of these spooky delights. So, gather your supplies and get ready to impress your friends and family with your culinary skills!
Ingredients for Eyeball Marshmallow Pops Recipe
To create your Eyeball Marshmallow Pops, you will need a few simple ingredients. Each item plays a crucial role in making these treats both delicious and visually appealing. Here’s what you’ll need:
- Large marshmallows: 12 pieces – These will serve as the base of your pops.
- White chocolate chips: 1 cup – This will coat the marshmallows and give them a creamy texture.
- Green candy melts: 1/2 cup – These will create the vibrant iris of the eyeball.
- Red candy melts: 1/4 cup – Use these to add spooky veins around the iris.
- Lollipop sticks: 12 pieces – These will hold your marshmallows and make them easy to eat.
- Black edible marker or chocolate: for pupils – This will add the finishing touch to your eyeballs.
- Sprinkles (optional): for added decoration – Use these to make your pops even more festive.
- Cooking oil or shortening: 1 teaspoon – This helps to thin the chocolate for easier coating.
With these ingredients on hand, you’re ready to start making your Eyeball Marshmallow Pops. Each component contributes to the overall look and taste, ensuring that your treats will be a hit at any gathering. Now, let’s move on to the preparation steps!


Step-by-Step Preparation of Eyeball Marshmallow Pops Recipe

Step 1: Gather Your Ingredients
Before you start, it’s essential to gather all your ingredients. This makes the process smoother and more enjoyable. Make sure you have everything listed in the ingredients section. Having your workspace organized will help you focus on creating these fun treats. Lay out your marshmallows, chocolate, candy melts, and tools. A clean, clutter-free area is key to a successful cooking experience!
Step 2: Melt the Chocolate
Now, let’s melt the white chocolate. Take a microwave-safe bowl and add your white chocolate chips. Heat them in the microwave in 30-second intervals. Stir the chocolate after each interval to ensure it melts evenly. If the chocolate seems too thick, add a teaspoon of cooking oil or shortening. This will help it become smooth and easy to work with. Once melted, set it aside to cool slightly before dipping the marshmallows.
Step 3: Dip the Marshmallows
Next, it’s time to dip the marshmallows! Take a lollipop stick and insert it into each marshmallow. This will make them easy to hold. Now, dip each marshmallow into the melted white chocolate. Make sure to coat it completely. Allow any excess chocolate to drip off before placing it on the lined baking sheet. This step is crucial for achieving that perfect eyeball shape!
Step 4: Create the Eyeball Design
While the white chocolate is still wet, it’s time to get creative! Melt the green candy melts in a separate bowl. Use a small spoon or piping bag to drizzle a circle onto the white chocolate coating. This will form the iris of your eyeball. Next, melt the red candy melts and use a piping bag or toothpick to create vein-like designs around the iris. This adds a spooky touch to your pops!
Step 5: Let Them Set
After decorating, it’s important to let your marshmallow pops set. Allow them to sit at room temperature until the chocolate hardens completely. This usually takes about 30 minutes. Once set, your Eyeball Marshmallow Pops will be ready for the final touch. You can add pupils using a black edible marker or melted chocolate. Just place a small dot in the center of the green iris. This will bring your eyeballs to life!
Tips for Perfect Eyeball Marshmallow Pops Recipe
Choosing the Right Chocolate
When making your Eyeball Marshmallow Pops, the type of chocolate you choose can make a big difference. For the best results, opt for high-quality white chocolate chips. They melt smoothly and create a lovely coating. If you prefer, you can also use candy melts, which come in various colors and flavors. They are easy to work with and set nicely.
Remember, if your chocolate is too thick, it can be challenging to dip the marshmallows. Adding a teaspoon of cooking oil or shortening can help thin it out. This little trick ensures a smooth and even coating. Also, consider using different types of chocolate for the pupils. Dark chocolate or even colored candy melts can add a fun twist to your eyeball design!
Storing Your Eyeball Marshmallow Pops
Once your Eyeball Marshmallow Pops are ready, you might wonder how to store them. These treats can be made a day in advance, which is perfect for party planning. To keep them fresh, place the pops in an airtight container. Store them at room temperature, away from direct sunlight. This will help maintain their texture and flavor.
Avoid refrigerating them, as this can cause the chocolate to sweat and lose its shine. If you have leftover pops, they can last for up to a week when stored properly. Just make sure to keep them in a cool, dry place. With these tips, your Eyeball Marshmallow Pops will stay delicious and eye-catching for your guests!
Fun Variations of Eyeball Marshmallow Pops Recipe
Different Chocolate Coatings
While the classic white chocolate coating is delicious, you can experiment with different chocolate coatings to make your Eyeball Marshmallow Pops even more exciting! For instance, consider using milk chocolate or dark chocolate for a richer flavor. These options can add a delightful contrast to the sweetness of the marshmallows.
If you want to get creative, try using colored candy melts in various shades. You can create a rainbow of eyeballs by using blue, purple, or even orange candy melts. This not only makes your pops visually appealing but also adds a fun twist to the traditional recipe. Just remember to melt the chocolate or candy melts in short intervals, stirring frequently to achieve a smooth consistency.
Alternative Marshmallow Shapes
Another fun way to switch things up is by using different marshmallow shapes. Instead of the standard large marshmallows, you can use mini marshmallows for bite-sized treats. These mini pops are perfect for kids and can be made in larger batches for parties.
For a more whimsical approach, consider using marshmallow shapes like ghosts or pumpkins. These can be found in stores around Halloween. By using themed marshmallows, you can create a variety of spooky treats that will delight your guests. Just follow the same steps for coating and decorating, and you’ll have a unique twist on the classic Eyeball Marshmallow Pops!
FAQs About Eyeball Marshmallow Pops Recipe
Can I use different colors for the eyeballs?
Absolutely! One of the best parts of making Eyeball Marshmallow Pops is the chance to get creative. You can use any color of candy melts for the iris. For example, blue, purple, or even pink can make your eyeballs stand out. Feel free to mix and match colors to create a fun assortment. The more colorful, the better!
How long do Eyeball Marshmallow Pops last?
When stored properly, your Eyeball Marshmallow Pops can last up to a week. Keep them in an airtight container at room temperature. Avoid placing them in the fridge, as this can cause the chocolate to lose its shine. If you plan to make them ahead of time, just remember to store them in a cool, dry place to maintain their freshness.
Are there any allergy-friendly options for this recipe?
Yes, there are allergy-friendly options available! If you need to avoid certain ingredients, consider using dairy-free chocolate chips and candy melts. Many brands offer vegan options that taste great. Additionally, check the labels for any allergens. You can also use gluten-free marshmallows to ensure everyone can enjoy these spooky treats!
Can I make Eyeball Marshmallow Pops in advance?
Definitely! Making Eyeball Marshmallow Pops in advance is a great idea, especially for parties. You can prepare them a day or two ahead of time. Just store them in an airtight container at room temperature. This way, you can save time on the day of your event and still impress your guests with these fun treats!
Print
Eyeball Marshmallow Pops Recipe
- Total Time: 30 minutes
- Yield: 12 pops
- Diet: Vegetarian
Description
Eyeball Marshmallow Pops are a delightful and spooky treat perfect for Halloween or any fun gathering. These whimsical snacks combine the sweetness of marshmallows with the creamy richness of chocolate.
Ingredients
- Large marshmallows: 12 pieces
- White chocolate chips: 1 cup
- Green candy melts: 1/2 cup
- Red candy melts: 1/4 cup
- Lollipop sticks: 12 pieces
- Black edible marker or chocolate: for pupils
- Sprinkles (optional): for added decoration
- Cooking oil or shortening: 1 teaspoon
Instructions
- Gather your ingredients and organize your workspace.
- Melt the white chocolate in a microwave-safe bowl in 30-second intervals, stirring after each until smooth.
- Insert lollipop sticks into each marshmallow and dip them into the melted white chocolate, allowing excess to drip off.
- While the chocolate is still wet, drizzle melted green candy melts to form the iris and use red candy melts for vein designs.
- Let the pops set at room temperature for about 30 minutes until the chocolate hardens, then add pupils with a black edible marker or melted chocolate.
Latest Amazon Finds


Notes
- Opt for high-quality chocolate for the best results.
- Store pops in an airtight container at room temperature, away from sunlight.
- Consider using different types of chocolate for the pupils.
- Mini marshmallows can be used for bite-sized treats.
- Prep Time: 20 minutes
- Cook Time: 10 minutes
- Category: Dessert
- Method: No-bake
- Cuisine: American
Nutrition
- Serving Size: 1 pop
- Calories: 150
- Sugar: 20g
- Sodium: 50mg
- Fat: 7g
- Saturated Fat: 4g
- Unsaturated Fat: 2g
- Trans Fat: 0g
- Carbohydrates: 22g
- Fiber: 0g
- Protein: 1g
- Cholesterol: 0mg
Keywords: Eyeball Marshmallow Pops, Halloween treats, spooky desserts, marshmallow recipes