


Welcome to the delightful world of Enchanted Pumpkin Pie Bars! These bars are not just a treat; they are a celebration of flavors that capture the essence of fall. With their creamy pumpkin filling and buttery crust, they are perfect for any occasion, from cozy family gatherings to festive holiday parties. If you love pumpkin pie but want something a bit different, these bars are the answer!
What Makes the Enchanted Pumpkin Pie Bars Special?
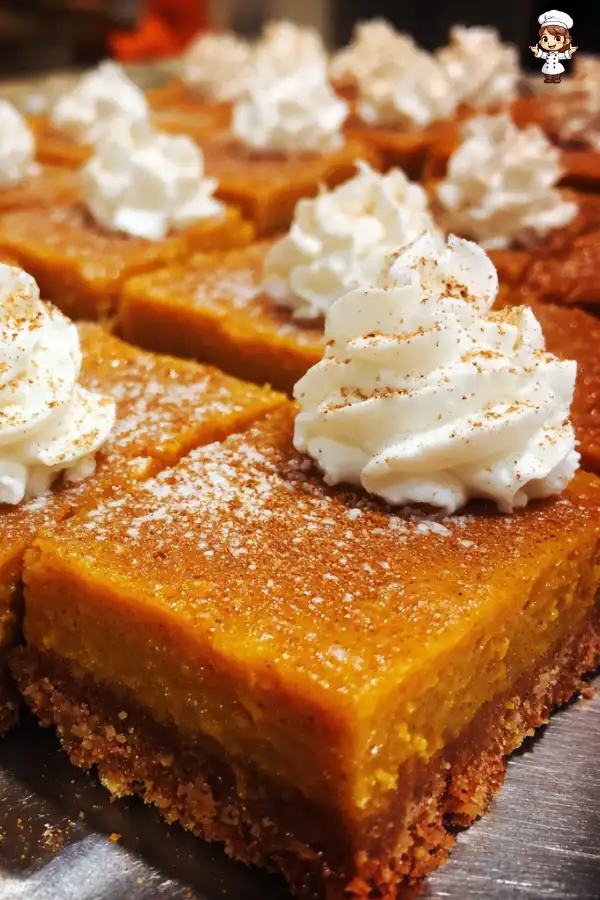
What sets these Enchanted Pumpkin Pie Bars apart? First, it’s the combination of spices that brings warmth and comfort. The blend of cinnamon, nutmeg, ginger, and cloves creates a magical aroma that fills your kitchen as they bake. Each bite is a perfect balance of sweetness and spice, making them irresistible.
Moreover, the texture is simply divine. The crust is crumbly yet sturdy, providing a perfect base for the smooth and creamy pumpkin filling. This delightful contrast makes every bite a joy. Plus, they are easy to make! With just a few simple steps, you can whip up a batch that will impress your family and friends.
These bars are also versatile. You can enjoy them chilled or at room temperature, and they pair wonderfully with whipped cream or a sprinkle of cinnamon. Whether you’re serving them at a potluck or enjoying them as a cozy dessert at home, they are sure to be a hit!
So, roll up your sleeves and get ready to create a dessert that will enchant everyone who tries it. Let’s dive into the ingredients and get started on this delicious journey!
Ingredients for Enchanted Pumpkin Pie Bars Recipe
To create your own batch of Enchanted Pumpkin Pie Bars, you’ll need a few simple ingredients. Each one plays a vital role in crafting the perfect balance of flavors and textures. Here’s what you’ll need:
- 1 1/2 cups all-purpose flour
- 1/2 cup unsalted butter, softened
- 1/4 cup granulated sugar
- 1/4 teaspoon salt
- 1/2 teaspoon ground cinnamon
- 1/4 teaspoon ground nutmeg
- 1 can (15 oz) pumpkin puree
- 1 cup sweetened condensed milk
- 2 large eggs
- 1 teaspoon vanilla extract
- 1/2 teaspoon ground ginger
- 1/4 teaspoon ground cloves
- Whipped cream (for topping)
- Ground cinnamon (for garnish)
These ingredients are easy to find at your local grocery store. The combination of spices, especially the cinnamon and nutmeg, gives the bars their enchanting flavor. The pumpkin puree adds a rich creaminess, while the sweetened condensed milk ensures a delightful sweetness. Together, they create a dessert that is both comforting and delicious.
Now that you have your ingredients ready, it’s time to move on to the preparation steps. Let’s get cooking!


Step-by-Step Preparation of Enchanted Pumpkin Pie Bars Recipe
Now that you have gathered all your ingredients, it’s time to dive into the step-by-step preparation of your Enchanted Pumpkin Pie Bars. Follow these simple steps to create a delicious dessert that will surely impress!
Step 1: Preparing the Crust
First, let’s focus on the crust. In a mixing bowl, combine the softened butter, granulated sugar, all-purpose flour, salt, and ground cinnamon. Use a fork or your fingers to mix the ingredients until they resemble coarse crumbs. This texture is key for a crumbly yet sturdy crust.
Next, press this mixture evenly into the bottom of your greased or parchment-lined 9×13 inch baking dish. Make sure to spread it out evenly, as this will be the base for your pumpkin filling. Once you’ve pressed it down, it’s time to bake!
Step 2: Making the Pumpkin Filling
While the crust is baking, let’s prepare the pumpkin filling. In a large bowl, whisk together the pumpkin puree, sweetened condensed milk, eggs, vanilla extract, ground ginger, ground cloves, ground nutmeg, and a pinch of salt. Whisk until the mixture is smooth and well combined. This filling is what makes your bars so creamy and delicious!
Make sure there are no lumps in the mixture. A smooth filling will ensure that every bite is delightful. Once it’s ready, set it aside while the crust finishes baking.
Step 3: Assembling the Enchanted Pumpkin Pie Bars
After the crust has baked for about 15 minutes and is lightly golden, remove it from the oven. Allow it to cool slightly, but don’t let it cool completely. Carefully pour the prepared pumpkin filling over the warm crust. Use a spatula to spread it evenly across the surface.
This step is crucial, as an even layer of filling will help the bars bake uniformly. Make sure to cover the crust completely, leaving no gaps. Now, it’s time to bake the assembled bars!
Step 4: Baking the Bars
Return the baking dish to the oven and bake for an additional 25-30 minutes. You’ll know the bars are done when the filling is set and a toothpick inserted in the center comes out clean. Keep an eye on them to avoid overbaking, as you want that creamy texture to remain intact.
As they bake, your kitchen will fill with the enchanting aroma of spices, making it hard to wait for them to cool!
Step 5: Cooling and Serving
Once baked, remove the bars from the oven and let them cool completely in the baking dish. This cooling step is important, as it allows the filling to set properly. After they have cooled, refrigerate the bars for at least 2 hours. This will help them firm up even more.
When you’re ready to serve, cut the bars into squares or rectangles. Top each piece with a dollop of whipped cream and a sprinkle of ground cinnamon for that extra touch of flavor and presentation. Enjoy your Enchanted Pumpkin Pie Bars chilled or at room temperature!
Tips for Perfecting Your Enchanted Pumpkin Pie Bars Recipe
Creating the perfect Enchanted Pumpkin Pie Bars is all about attention to detail. Here are some tips to help you avoid common pitfalls and ensure your bars turn out delicious every time!
Common Mistakes to Avoid
Even the best bakers can make mistakes. Here are a few common ones to watch out for:
- Overmixing the crust: When mixing the crust ingredients, stop as soon as they resemble coarse crumbs. Overmixing can lead to a tough crust.
- Not cooling the crust: Allow the crust to cool slightly before adding the filling. This helps prevent the filling from becoming too runny.
- Skipping the refrigeration: Don’t skip the chilling step after baking. This helps the bars set properly and makes them easier to cut.
- Using expired ingredients: Always check the expiration dates on your baking supplies, especially the baking powder and spices. Fresh ingredients make a big difference!
By avoiding these common mistakes, you’ll be on your way to creating the best Enchanted Pumpkin Pie Bars!
Storage Tips for Enchanted Pumpkin Pie Bars
Proper storage is key to keeping your Enchanted Pumpkin Pie Bars fresh and tasty. Here are some helpful tips:
- Refrigerate: Store the bars in an airtight container in the refrigerator. They can last up to a week, making them perfect for meal prep or holiday treats.
- Freezing: If you want to keep them longer, you can freeze the bars. Wrap them tightly in plastic wrap and then place them in a freezer-safe container. They can last up to three months in the freezer.
- Thawing: To enjoy frozen bars, simply transfer them to the refrigerator overnight to thaw. They’ll taste just as delicious as when they were freshly made!
With these storage tips, you can enjoy your Enchanted Pumpkin Pie Bars for days to come. Now, let’s explore some fun variations to make this recipe even more exciting!
Variations of Enchanted Pumpkin Pie Bars Recipe
While the classic Enchanted Pumpkin Pie Bars are delicious on their own, there are many fun variations you can try! Whether you have dietary restrictions or just want to mix things up, these variations will keep your dessert game strong. Let’s explore two popular options: gluten-free and vegan versions of these delightful bars.
Gluten-Free Enchanted Pumpkin Pie Bars
If you or someone you know is gluten-sensitive, you can still enjoy these tasty bars! To make gluten-free Enchanted Pumpkin Pie Bars, simply swap out the all-purpose flour for a gluten-free flour blend. Many blends work well, but look for one that includes xanthan gum for better texture.
Here’s how to adjust the recipe:
- Flour: Use 1 ½ cups of a gluten-free flour blend instead of all-purpose flour.
- Check other ingredients: Ensure that your baking powder and any spices are gluten-free as well.
Follow the same preparation steps as the original recipe. You’ll still get that wonderful creamy filling and crumbly crust, but now everyone can enjoy them!
Vegan Enchanted Pumpkin Pie Bars
For those following a vegan diet, you can easily make these bars without any animal products. Here’s how to create vegan Enchanted Pumpkin Pie Bars:
- Butter: Replace the unsalted butter with a vegan butter alternative or coconut oil.
- Eggs: Use flax eggs instead of regular eggs. To make one flax egg, mix 1 tablespoon of ground flaxseed with 2.5 tablespoons of water. Let it sit for a few minutes until it thickens.
- Sweetened condensed milk: Substitute with a can of coconut milk or a homemade vegan sweetened condensed milk made from coconut milk and sugar.
With these simple swaps, you can create a delicious vegan version of the Enchanted Pumpkin Pie Bars that everyone will love. The flavors will remain rich and satisfying, making them a perfect dessert for any gathering!
Now that you know how to make these variations, you can enjoy the magic of pumpkin pie bars in a way that suits your dietary needs. Let’s move on to some frequently asked questions about this enchanting recipe!
FAQs
Can I use fresh pumpkin instead of canned for the Enchanted Pumpkin Pie Bars Recipe?
Absolutely! You can use fresh pumpkin instead of canned pumpkin puree. To do this, start by selecting a sugar pumpkin, which is sweeter and has a smoother texture than regular pumpkins. First, cut the pumpkin in half and remove the seeds. Then, roast the halves in the oven at 350°F (175°C) for about 45 minutes or until tender. Once cooled, scoop out the flesh and blend it until smooth. This fresh pumpkin puree can be used in the same quantity as the canned version. Just remember, fresh pumpkin may have a slightly different flavor and moisture content, so adjust your spices accordingly!
How long do Enchanted Pumpkin Pie Bars last?
When stored properly, your Enchanted Pumpkin Pie Bars can last up to a week in the refrigerator. Make sure to keep them in an airtight container to maintain their freshness. If you want to enjoy them longer, consider freezing them. They can last up to three months in the freezer. Just remember to thaw them in the refrigerator overnight before serving. This way, you can savor the deliciousness of these bars for weeks to come!
Can I freeze Enchanted Pumpkin Pie Bars?
Yes, you can freeze Enchanted Pumpkin Pie Bars! To do this, allow the bars to cool completely after baking. Then, cut them into squares or rectangles. Wrap each piece tightly in plastic wrap, and place them in a freezer-safe container. This will help prevent freezer burn and keep them fresh. When you’re ready to enjoy them, simply transfer the bars to the refrigerator to thaw overnight. They’ll taste just as delightful as when they were freshly made!
What can I serve with Enchanted Pumpkin Pie Bars?
Enchanted Pumpkin Pie Bars are delicious on their own, but you can elevate them even further with some tasty accompaniments. Here are a few ideas:
- Whipped Cream: A dollop of whipped cream on top adds a creamy texture and sweetness.
- Ice Cream: Serve with a scoop of vanilla or cinnamon ice cream for a delightful contrast.
- Caramel Sauce: Drizzle some caramel sauce over the bars for an extra touch of sweetness.
- Chopped Nuts: Sprinkle crushed pecans or walnuts for added crunch and flavor.
- Fresh Fruit: Pair with slices of apple or pear for a refreshing balance.
These serving suggestions will enhance your Enchanted Pumpkin Pie Bars and make them even more enjoyable for your guests. Now that you have all the answers, you’re ready to create and share this magical dessert!
Print
Enchanted Pumpkin Pie Bars Recipe
- Total Time: 1 hour 5 minutes
- Yield: 12 servings 1x
- Diet: Vegetarian
Description
Delightful Enchanted Pumpkin Pie Bars with creamy pumpkin filling and buttery crust, perfect for fall celebrations.
Ingredients
- 1 1/2 cups all-purpose flour
- 1/2 cup unsalted butter, softened
- 1/4 cup granulated sugar
- 1/4 teaspoon salt
- 1/2 teaspoon ground cinnamon
- 1/4 teaspoon ground nutmeg
- 1 can (15 oz) pumpkin puree
- 1 cup sweetened condensed milk
- 2 large eggs
- 1 teaspoon vanilla extract
- 1/2 teaspoon ground ginger
- 1/4 teaspoon ground cloves
- Whipped cream (for topping)
- Ground cinnamon (for garnish)
Instructions
- Preheat the oven and prepare the crust by mixing butter, sugar, flour, salt, and cinnamon until crumbly.
- Press the mixture into a greased 9×13 inch baking dish and bake for 15 minutes.
- Prepare the pumpkin filling by whisking together pumpkin puree, sweetened condensed milk, eggs, vanilla, ginger, cloves, nutmeg, and salt until smooth.
- Pour the pumpkin filling over the warm crust and spread evenly.
- Bake for an additional 25-30 minutes until the filling is set.
- Let the bars cool completely, then refrigerate for at least 2 hours before serving.
- Cut into squares, top with whipped cream and cinnamon, and enjoy!
Latest Amazon Finds


Notes
- Store in an airtight container in the refrigerator for up to a week.
- Can be frozen for up to three months; thaw in the refrigerator overnight.
- For gluten-free, use a gluten-free flour blend.
- For vegan, substitute butter with vegan butter and eggs with flax eggs.
- Prep Time: 20 minutes
- Cook Time: 45 minutes
- Category: Dessert
- Method: Baking
- Cuisine: American
Nutrition
- Serving Size: 1 bar
- Calories: 200
- Sugar: 15g
- Sodium: 150mg
- Fat: 8g
- Saturated Fat: 4g
- Unsaturated Fat: 3g
- Trans Fat: 0g
- Carbohydrates: 30g
- Fiber: 2g
- Protein: 3g
- Cholesterol: 40mg
Keywords: pumpkin pie bars, fall dessert, pumpkin recipe, holiday treats