
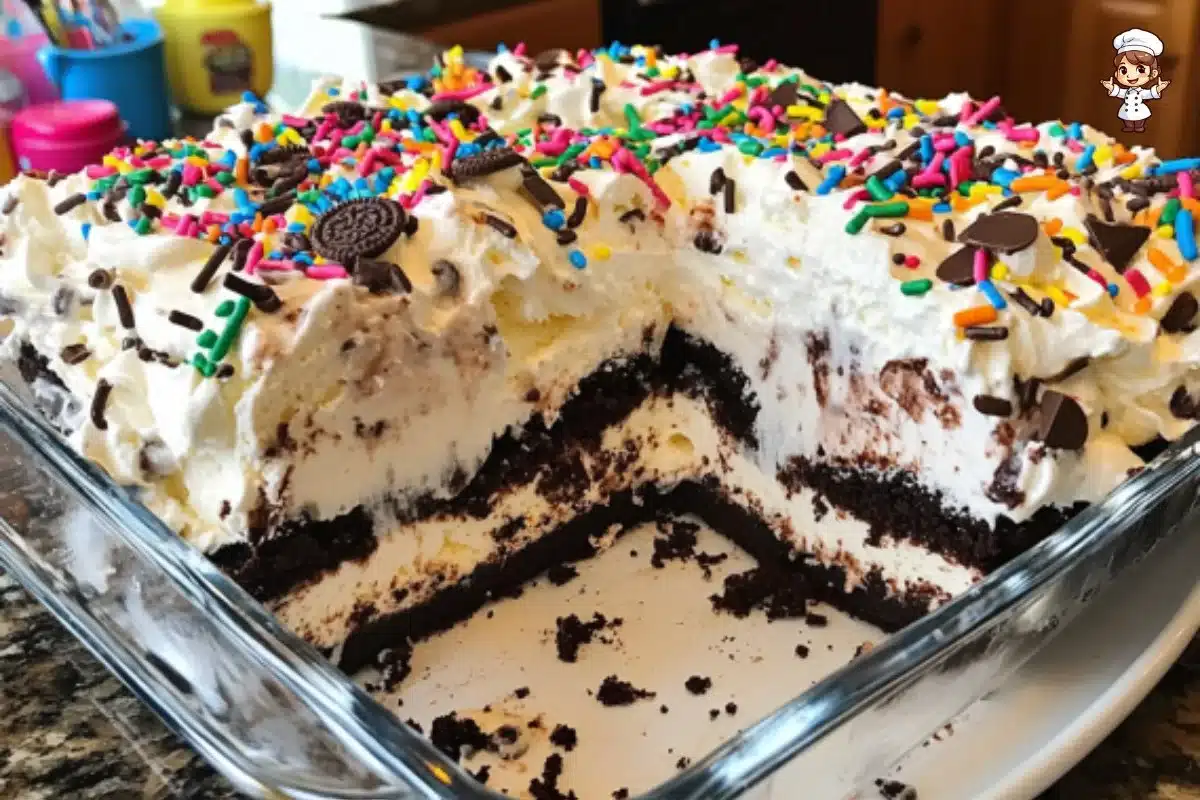
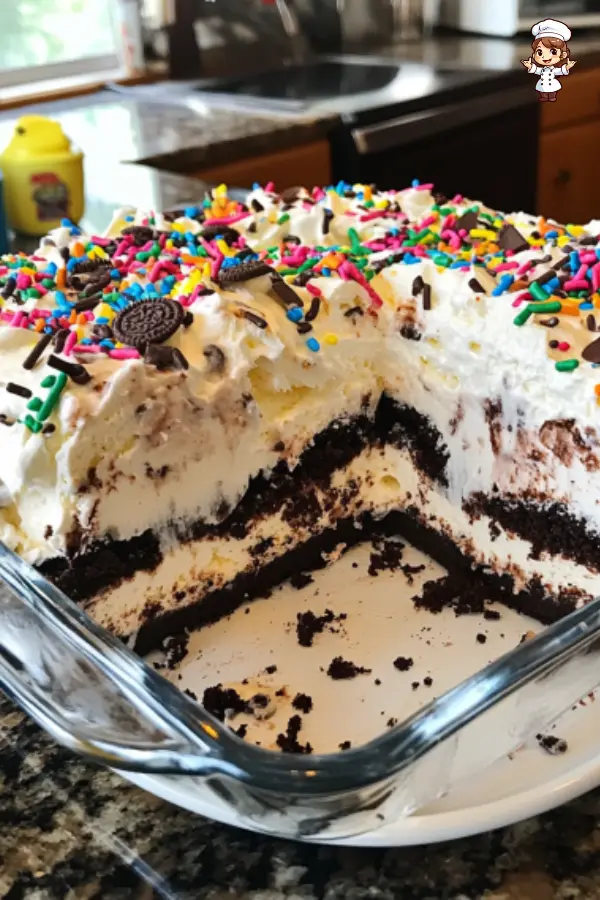
Ice cream cake is one of those beloved desserts that bring back memories of special occasions—birthdays, summer picnics, or just a hot day when you crave something cool and creamy. Among the many variations of this delicious dessert, the Easy 5 Layer Ice Cream Cake stands out for its delightful blend of flavors, ease of preparation, and stunning visual appeal. Picture a tall, mouthwatering cake with rich layers of chocolate and your favorite ice cream, all topped with whipped cream, sprinkles, and a drizzle of hot fudge. This cake not only looks impressive but also tastes divine, making it the perfect centerpiece for any gathering. Let’s dive into the details of this delightful treat that will satisfy ice cream lovers of all ages.
Ingredients about Easy 5 Layer Ice Cream Cake
List of ingredients with measurements
To create this tempting Easy 5 Layer Ice Cream Cake, you’ll need the following ingredients:
- 30 regular Oreos
- 1/2 cup unsalted butter, melted
- 1 quart chocolate ice cream, softened
- 1 quart of your choice flavor ice cream (vanilla, strawberry, mint, etc.), softened
- 1 and 1/2 cups hot fudge
- Whipped Cream made from:
- 1 cup heavy cream
- 2 tablespoons confectioners sugar
- 1/2 teaspoon pure vanilla extract
- Sprinkles to garnish
Optional ingredient substitutions
You can customize this recipe with some alternative ingredients based on your preferences or dietary restrictions. For example:
- Instead of Oreos, you can use any chocolate cookie or a gluten-free cookie for a gluten-free version.
- Choose any flavor of ice cream that you love—vanilla, strawberry, or even cookie dough!
- For a lighter whipped topping, you can use store-bought whipped topping instead of the homemade version, or try coconut cream for a dairy-free option.
How to Make Easy 5 Layer Ice Cream Cake
Step 1: Make the crust
Begin by preparing the Oreo crust. Use a food processor or a blender to pulse the 30 Oreos until they turn into fine crumbs. Pour these cookie crumbs into a large mixing bowl and add the melted butter. Stir well until the crumbs are evenly coated with butter. Once mixed, transfer the cookie mixture into an ungreased 9×13 inch pan. Press the crumbs firmly into the bottom of the pan to create a solid layer. Once you have a compact crust, place the pan into the freezer for about 15 minutes to help it set.
Step 2: Add the first ice cream layer
After the crust is set, it’s time to add the first layer of ice cream. Take the softened chocolate ice cream and place it in a large bowl. Stir it gently to make it easier to spread. Once it’s creamy, take it out of the bowl and spread it evenly over the frozen Oreo crust. After you have an even layer, put the pan back in the freezer for another 15-30 minutes to allow the chocolate ice cream to firm up.
Step 3: Add the second ice cream layer
Next, pick your choice flavor of ice cream for the second layer. Just like you did with the chocolate ice cream, place it in a bowl and stir it until smooth. After stirring, carefully spread this layer over the chocolate ice cream. Make sure that it is even and covers the entire chocolate layer. Put the pan back in the freezer for another 15-30 minutes to let it set.
Step 4: Spread the hot fudge
Now it’s time to add the rich hot fudge layer! Take the hot fudge sauce and spread it generously over the top layer of ice cream. This will create a delightful balance of flavors and add an extra layer of sweetness. After spreading the fudge, put the cake back in the freezer for another 15-30 minutes to let the fudge layer chill and set.
Step 5: Make the whipped cream
While the cake is in the freezer, you can whip up some homemade whipped cream for the final layer. In a mixing bowl, pour in 1 cup of heavy cream. Add 2 tablespoons of confectioners sugar and 1/2 teaspoon of pure vanilla extract. Using an electric mixer, beat the mixture until stiff peaks form. This homemade whipped cream will provide a light and airy finish to your cake.
Step 6: Top and freeze
Once the hot fudge layer is set, spread the whipped cream on top of the hot fudge layer. Make sure it’s even and smooth. To finish off your Easy 5 Layer Ice Cream Cake, sprinkle colorful sprinkles over the whipped cream. Now, cover the cake tightly with aluminum foil and place it in the freezer for at least 12 hours to ensure all the layers are perfectly frozen before serving.
How to Serve Easy 5 Layer Ice Cream Cake
Best ways to serve Easy 5 Layer Ice Cream Cake
When it’s time to serve your Easy 5 Layer Ice Cream Cake, remove it from the freezer. The best way to slice it is to use a very sharp knife. You may want to run the knife under hot water for a few seconds to make cutting easier. Once sliced, serve the cake pieces on dessert plates, allowing each guest to enjoy their portion of this delightful treat.
Serving suggestions or pairings
This ice cream cake can stand alone as a fabulous dessert, but you can take it to the next level by pairing it with additional toppings or sides. Consider serving each slice with a drizzle of extra hot fudge or chocolate syrup. Fresh fruit—like sliced strawberries or raspberries—also pairs wonderfully with the rich layers of ice cream. For an added crunch, some crushed nuts can provide an enjoyable texture contrast.
How to Store Easy 5 Layer Ice Cream Cake
Proper storage methods
To ensure your Easy 5 Layer Ice Cream Cake maintains its deliciousness, it is essential to store it correctly. Keep the cake covered in the freezer, tightly wrapped in aluminum foil or stored in an airtight container. This will help to prevent freezer burn and keep the flavors intact. The cake can last in the freezer for up to 2 weeks, although it’s likely it will be enjoyed long before then!
Tips for reheating or freezing
It’s best to serve the cake directly from the freezer without reheating it, as freezing keeps the layers intact. If you do have leftovers, ensure they are well covered to prevent them from absorbing any odors in the freezer. If you have added sprinkles, remember that they may lose their crispness in the freezer over time, so add them just before serving.
Tips to Make Easy 5 Layer Ice Cream Cake
Common mistakes to avoid
A few common mistakes can make it difficult to achieve a perfectly layered cake. Firstly, be sure to let the layers of ice cream soften slightly before spreading them on the crust; this will make them much easier to work with. Additionally, do not skip the freezing steps in between layers—this step is crucial in achieving a firm cake that holds together well.
Helpful tips for better results
For the best results, choose high-quality ice cream. The creaminess and flavor can make a significant difference to your overall dessert. Also, consider letting the cake sit at room temperature for about 5 to 10 minutes before slicing; this slight softening will make cutting easier and improve the ease of enjoyment for your guests.
Variation of Easy 5 Layer Ice Cream Cake
Suggested variations or twists on the recipe
While the original recipe is delicious, you can easily make variations to cater to different tastes. Instead of using chocolate and another flavor of ice cream, consider a fun mix of fruity flavors like mango, raspberry, and vanilla for a refreshing twist. You could also experiment with different layers, such as adding crushed candies, nuts, or even cookie dough layers for extra texture and flavor.
Adjustments for dietary preferences
If you need to adjust this recipe for dietary reasons, there are plenty of options. Use dairy-free ice cream and coconut cream for whipped topping to make this treat vegan. For those with gluten allergies, stick to gluten-free cookies for the base. Additionally, sugar-free versions of the ingredients can help cut down on sugar content while still allowing you to enjoy this delightful cake.
FAQs
What can I do if the dish isn’t turning out right?
If your ice cream cake isn’t turning out as hoped, first check that you’ve followed the freezing times closely. Lack of proper freezing can lead to a cake that is too soft or difficult to slice. If your whipped cream isn’t whipping, it could be due to the cream being warm or not enough fat content in the cream being used.
Can I make this ahead of time?
Absolutely! The Easy 5 Layer Ice Cream Cake is perfect for making ahead of time. It can be prepared and then frozen at least 12 hours before serving. This makes it an excellent choice for parties, celebrations, or any occasion where you want a stunning dessert without the stress of last-minute preparation.
What can I substitute for ingredients?
You can substitute many of the ingredients based on your preferences and dietary needs. As mentioned earlier, use a different variety of cookies for the crust, try different flavors of ice cream, or use coconut cream instead of regular whipped cream to make it dairy-free. The possibilities are endless, allowing you to tailor this cake to your liking.
Whether you’re making it for a birthday party, a holiday gathering, or just as a delightful treat for yourself, the Easy 5 Layer Ice Cream Cake is sure to impress everyone. The combination of flavors and textures will have everyone coming back for seconds. Enjoy creating this standout dessert that is both simple and satisfying!
Print
Easy 5 Layer Ice Cream Cake
- Total Time: 12 hours 20 minutes (includes freezing)
- Yield: 12 servings 1x
- Diet: Vegetarian
Description
An easy no-bake 5 layer ice cream cake featuring an Oreo crust, two layers of ice cream, hot fudge, and homemade whipped cream topping.
Ingredients
- 30 regular Oreos
- 1/2 cup unsalted butter, melted
- 1 quart chocolate ice cream, softened
- 1 quart ice cream of your choice (vanilla, strawberry, mint, etc.), softened
- 1 1/2 cups hot fudge
- 1 cup heavy cream
- 2 tablespoons confectioners sugar
- 1/2 teaspoon pure vanilla extract
- Sprinkles to garnish
Instructions
- Pulse Oreos in a food processor until fine crumbs form. Mix crumbs with melted butter.
- Press mixture into bottom of ungreased 9×13 inch pan. Freeze 15 minutes.
- Spread softened chocolate ice cream evenly over crust. Freeze 15-30 minutes.
- Spread softened choice flavor ice cream evenly over chocolate layer. Freeze 15-30 minutes.
- Spread hot fudge sauce over ice cream layer. Freeze 15-30 minutes.
- Whip heavy cream with confectioners sugar and vanilla until stiff peaks form.
- Spread whipped cream over fudge layer. Sprinkle with sprinkles.
- Cover tightly and freeze at least 12 hours before serving.
- To serve, slice with a sharp knife warmed under hot water for easy cutting.
Latest Amazon Finds


Notes
- Use gluten-free cookies for a gluten-free version.
- Choose any ice cream flavor to customize.
- Store-bought whipped topping or coconut cream can substitute homemade whipped cream.
- Freeze layers between additions to maintain structure.
- Let cake sit 5-10 minutes at room temperature before slicing for easier cutting.
- Store cake tightly wrapped in freezer to prevent freezer burn.
- Prep Time: 20 minutes
- Cook Time: 0 minutes
- Category: Dessert
- Method: No-Bake, Freezing
- Cuisine: American
Nutrition
- Serving Size: 1 slice (1/12 of cake)
- Calories: 350
- Sugar: 30g
- Sodium: 150mg
- Fat: 22g
- Saturated Fat: 13g
- Unsaturated Fat: 7g
- Trans Fat: 0g
- Carbohydrates: 30g
- Fiber: 1g
- Protein: 4g
- Cholesterol: 60mg
Keywords: Easy 5 Layer Ice Cream Cake, Oreo Ice Cream Cake, No-Bake Ice Cream Cake, Layered Frozen Dessert, Chocolate Ice Cream Cake