


There’s something timeless about a cherry pie, isn’t there? The sweet and tart filling, nestled inside a golden, flaky crust, is a treat enjoyed for generations. But what if you don’t have fresh cherries or don’t feel like spending hours preparing them? That’s where the cherry pie recipe with canned cherries comes to the rescue! Canned cherries are not only a convenient option, but they make the pie just as delicious, with a fraction of the work. Whether you’re an experienced baker or a beginner, this recipe is simple to follow and yields a mouthwatering pie perfect for any occasion. From gathering your ingredients to serving that perfect slice, this article will walk you through everything you need to know about making a cherry pie with canned cherries.
Why Choose Canned Cherries for Your Cherry Pie?
The Convenience and Flavor of Canned Fruit
When it comes to making a cherry pie, canned cherries are a game changer. They’re not only more accessible, but they also provide a shortcut that doesn’t skimp on flavour. You might be wondering, “But aren’t fresh cherries better?” While fresh cherries have their own charm, using canned cherries for your pie has some distinct advantages.
First, canned cherries are available year-round, so you can make this dessert no matter the season. Whether it’s the dead of winter or summer, canned cherries are always ready to go, saving you the hassle of hunting down fresh fruit. Moreover, canned cherries are pre-pitted and preserved in their own syrup, which adds a level of sweetness and richness to the pie filling. Plus, they’re much easier to work with, especially when you don’t want to spend time removing pits or worrying about the fruit going bad before you can use it.
Another perk? Canned cherries cook down beautifully, releasing their juices and creating a thick, luscious filling. This consistency is often harder to achieve with fresh cherries, which can sometimes be too watery or inconsistent in sweetness. So, by choosing canned cherries, you’re ensuring that your cherry pie is as flavorful and satisfying as it is simple to prepare.
Perfect for Busy Bakers
In addition to the convenience, cherry pie recipes with canned cherries are also a great option for anyone short on time or energy. If you’re crunched for time but still want to create a delicious homemade dessert, using canned cherries allows you to skip a few steps without sacrificing quality. Whether you’re hosting a dinner party, making a pie for a family gathering, or just indulging in a sweet treat on a rainy day, this shortcut ensures you can enjoy the cherry pie experience without the extra effort.


What You’ll Need for the Best Cherry Pie
Ingredients for the Cherry Pie Filling
To start with, let’s talk about what goes into the cherry pie recipe with canned cherries. The beauty of using canned cherries is that the fruit is already prepped and ready to go, so you won’t have to do any tedious work. Here’s what you’ll need:
- 1 can (about 21 oz) of canned cherries – You’ll want to pick a can with no added artificial sweeteners or preservatives for the best flavour.
- One cup of sugar – This will sweeten the filling and balance the tartness of the cherries. You can adjust the amount based on your sweetness preference.
- Two tablespoons of cornstarch – This helps thicken the filling, giving it that perfect consistency.
- One teaspoon of lemon juice – A dash of lemon juice brightens up the filling and complements the cherries’ natural flavours.
- 1/2 teaspoon of almond extract – This is optional, but it adds a lovely nutty note that pairs wonderfully with the cherries.
- One tablespoon of butter – Just a bit of butter will help create a rich, flavorful filling.
With these ingredients, you’re set for a cherry pie recipe with canned cherries that’s simple to make and full of flavour!
Essential Tools for Baking a Perfect Pie
Having the right tools can make a big difference in the success of your cherry pie. Here’s what you’ll need:
- Pie dish – A standard 9-inch pie dish works best.
- Rolling pin – For rolling out your pie crust. If you’re using pre-made dough, you can skip this step.
- Sharp knife or pastry cutter – If you’re making a lattice crust, these tools will help you cut your dough strips.
- Pastry brush – Use this to lightly brush the crust with egg wash before baking for a golden, crispy finish.
- Baking sheet – Place your pie on a baking sheet to catch any drips during baking.
With these tools, you’re ready to create a cherry pie that will be the star of any meal!
How to Make Cherry Pie with Canned Cherries
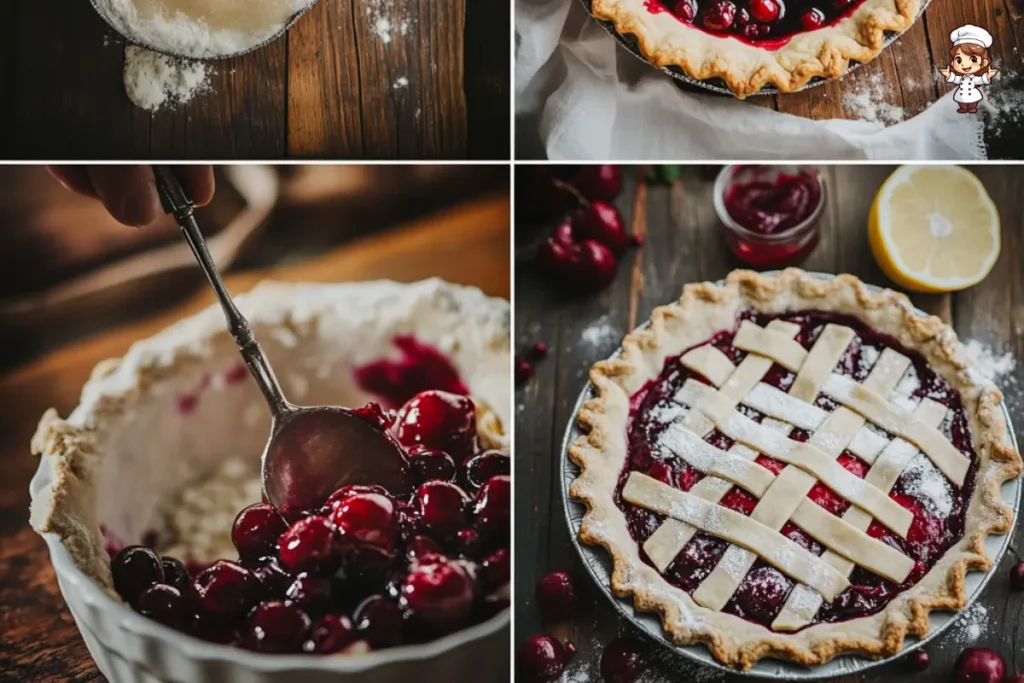
Preparing the Canned Cherries for the Filling
Now, let’s dive into the fun part: making your cherry pie! First, you’ll need to prepare your canned cherries. Open the can and pour the cherries into a bowl, draining off the syrup into a separate container. This syrup can be used in other recipes, so don’t toss it out!
Next, give the cherries a quick stir to break them up a bit. If you’d like, you can even slice some of the cherries into smaller pieces for a more textured filling. Combine the cherries with the sugar, cornstarch, lemon juice, and almond extract. Stir it all together until the cherries are well-coated and the ingredients are evenly mixed. Let the filling sit for about 10 minutes, giving the cornstarch time to activate and thicken the filling.
Creating the Pie Crust from Scratch or Using Pre-Made
While the filling is resting, it’s time to focus on your pie crust. If you’re feeling ambitious, you can make your own from scratch with simple ingredients like flour, butter, salt, and water. But if you’re short on time or just want to keep things easy, pre-made pie dough will do just fine!
To roll out your dough, lightly flour your countertop and roll the dough into a large circle. It should be big enough to fit your pie dish and have a little extra for the edges. Once rolled out, gently place the dough in the pie dish, pressing it into the bottom and sides. Trim any excess dough hanging over the edges, leaving about 1 inch for crimping.
If you’re using a pre-made crust, simply unroll it and place it in your pie dish, just like you would with homemade dough. This is a great shortcut if you want to save time but still enjoy a fresh, delicious cherry pie recipe with canned cherries.
Assembling and Baking the Cherry Pie
Now comes the fun part—assembling your pie! Pour the cherry filling into the prepared pie crust, spreading it evenly. If you’re using a lattice crust, roll out the second piece of dough, slice it into strips, and arrange them in a crisscross pattern over the filling. Alternatively, you can just cover the pie with a full top crust. Once the top is in place, trim the edges and crimp them to seal the pie.
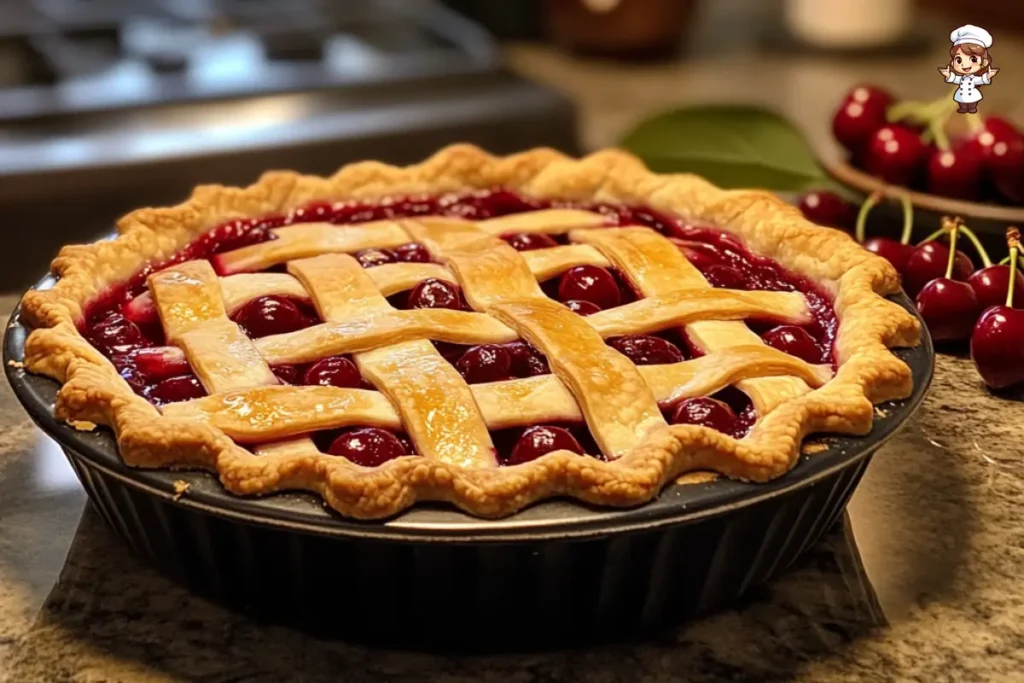
Don’t forget to cut a few slits in the top crust to allow the steam to escape while baking. For a beautiful golden finish, brush the top with a light coating of egg wash.
Place your pie on a baking sheet to catch any drips, and bake it at 375°F (190°C) for about 45-50 minutes. Keep an eye on it—if the crust starts to get too dark, cover the edges with aluminium foil to prevent burning. When the filling is bubbling, and the crust is golden brown, your cherry pie is ready to come out of the oven.
For more delicious recipes, explore other ideas on the website.
Print
Cherry Pie Recipe with Canned Cherries
- Total Time: 1 hour 10 minutes – 1 hour 20 minutes
- Yield: 8 servings (1 pie) 1x
- Diet: Vegetarian
Description
Enjoy your delicious cherry pie with canned cherries! Perfect for any occasion, this pie is easy to make and will satisfy your sweet tooth.
Ingredients
- For the filling:
- 1 can (about 21 oz) of canned cherries (with syrup)
- 1 cup of sugar (adjust to taste)
- 2 tablespoons of cornstarch
- 1 teaspoon of lemon juice
- 1/2 teaspoon of almond extract (optional)
- 1 tablespoon of butter (optional)
- For the crust:
- 2 pie crusts (homemade or store-bought)
- 1 egg (for egg wash)
- 1 tablespoon of water (for egg wash)
Instructions
1. Prepare the Cherry Filling:
- Open the can of canned cherries and drain the syrup into a separate bowl. You can save the syrup for use in smoothies or other recipes.
- In a large mixing bowl, combine the cherries, sugar, cornstarch, lemon juice, and almond extract. Stir until everything is well combined. Let it sit for about 10 minutes to allow the cornstarch to thicken and the juices to come together.
2. Prepare the Pie Crust:
- If using store-bought pie dough, unroll one of the crusts and gently fit it into a 9-inch pie dish. If making your own dough, roll it out into a 12-inch circle and place it in the pie dish.
- Trim the excess dough, leaving about 1 inch around the edges. If using two crusts, roll out the second piece of dough for the top.
3. Assemble the Pie:
- Pour the cherry filling into the prepared bottom crust, spreading it evenly.
- If making a lattice crust, cut the second dough into strips and arrange them over the top of the filling in a crisscross pattern. Alternatively, you can place a full top crust over the filling and cut a few slits to allow steam to escape.
- Crimp the edges of the pie crust together to seal it.
4. Egg Wash and Bake:
- Beat the egg and water together in a small bowl to make an egg wash.
- Brush the egg wash over the top of the pie crust to give it a golden, shiny finish.
- Place the pie on a baking sheet to catch any drips and bake at 375°F (190°C) for 45-50 minutes. The crust should be golden brown, and the filling should be bubbling.
5. Cool and Serve:
- Remove the pie from the oven and let it cool for at least 2 hours to allow the filling to set. Serve warm or at room temperature with whipped cream or vanilla ice cream.
Latest Amazon Finds


Notes
- For an extra golden crust, add a sprinkle of sugar on top of the egg wash before baking.
- If the crust edges begin to brown too quickly, cover them with foil to prevent burning.
- You can adjust the sweetness of the filling by adding more or less sugar based on your preference.
- Prep Time: 20-30 minutes
- Cook Time: 45-50 minutes
- Category: Dessert, Pie
- Method: Baking
- Cuisine: American
Nutrition
- Serving Size: 1 slice (1/8 of the pie)
- Calories: 320-350 kcal
- Sugar: 40-45 g
- Sodium: 150-200 mg
- Fat: 15-20 g
- Saturated Fat: 5-7 g
- Unsaturated Fat: 6-8 g
- Trans Fat: 0g
- Carbohydrates: 45-50 g
- Fiber: 1-2 g
- Protein: 2-3 g
- Cholesterol: 25-40 mg
Tips for Perfecting Your Cherry Pie
How to Achieve a Flaky, Golden Crust
A flaky, golden crust can make or break a cherry pie recipe with canned cherries. The key to achieving that perfect texture is all about the dough. First, make sure your butter or shortening is cold when you mix it into the flour. This helps create those delicious, flaky layers. If you’re making the crust from scratch, don’t overwork the dough—just mix it until the ingredients come together. Overworking can result in a tough crust.
Once your dough is ready, roll it out on a lightly floured surface, making sure it’s evenly thick. When placing it into your pie dish, avoid stretching the dough, as it can shrink during baking. For a crispy golden finish, brush the crust with a bit of egg wash (an egg mixed with water) before baking. This will give it that lovely sheen and colour.
Adjusting Sweetness and Tartness of the Filling
One of the beauties of making cherry pie with canned cherries is that you have complete control over the filling’s sweetness and tartness. If you prefer a sweeter pie, simply add a bit more sugar. On the other hand, if you like a tart kick, increase the lemon juice or even add a touch of sour cherries to the mix.
Another way to balance the sweetness is by adjusting the consistency of the filling. If the filling seems too watery, add a bit more cornstarch to thicken it up. Just be sure to let the pie cool before slicing it, as the filling will continue to set as it cools, ensuring that it is perfectly sliced when serving.
Variations of Cherry Pie with Canned Cherries
Adding a Lattice Crust or Full Covering
A fun way to personalize your cherry pie recipe with canned cherries is by getting creative with the crust. A classic lattice crust not only looks beautiful but also allows the filling to peek through, giving your pie that rustic, homemade charm. To make a lattice, roll out the second portion of your dough and slice it into strips. Lay them out in a crisscross pattern over the filling, weaving them to create the signature lattice design. If you’re not feeling fancy, a full top crust will work just as well—just remember to cut a few slits to let the steam escape while baking.
Incorporating Almonds or Other Flavor Additions
Another variation you can try is adding a little almond extract or ground almonds to the cherry filling. This pairs wonderfully with the sweet and tart cherries, creating a subtle nutty flavour that complements the pie beautifully. You could also experiment with other flavours, like vanilla or cinnamon, to enhance the overall taste.
For a more luxurious twist, add a few spoonfuls of chocolate chips to the filling, giving the pie a rich, indulgent layer. The possibilities are endless! Whether you’re sticking with the classic recipe or experimenting with fun additions, your cherry pie with canned cherries will always be a crowd-pleaser.
Gluten-Free Cherry Pie Option
For those who need a gluten-free option, fear not! You can easily make your cherry pie crust gluten-free by using a gluten-free flour blend in place of regular flour. Many pre-made gluten-free crusts are available as well, which can save you time while still giving you a delicious result. The cherry pie recipe with canned cherries remains just as delightful, even with the gluten-free twist.
For more delicious recipes, explore other ideas on the website.
Cherry Pie Storage and Serving Suggestions
How to Store Leftover Cherry Pie
After enjoying your delicious cherry pie recipe with canned cherries, you might find yourself with some leftovers. No worries—storing cherry pie is easy, and it will stay fresh for a few days. Simply cover the pie with plastic wrap or aluminium foil and store it in the refrigerator. It will keep for up to 3-4 days. Just be sure to let it cool completely before refrigerating to avoid any sogginess.
If you’d like to keep your pie for longer, you can freeze it as well. After baking, allow the pie to cool completely, then wrap it tightly in plastic wrap and aluminium foil before placing it in the freezer. It will last up to 2-3 months. When you’re ready to enjoy it, thaw it in the refrigerator overnight and reheat it in the oven to restore that crispy, golden crust.
Serving Ideas: Ice Cream, Whipped Cream, or Other Toppings
What’s a cherry pie without the perfect topping? While it’s amazing on its own, adding a little extra flair can elevate your cherry pie with canned cherries even more. Try topping your slice with a generous scoop of vanilla ice cream, or go for freshly whipped cream for that classic dessert combo.
For something a bit different, you could even drizzle some warm chocolate sauce or add a sprinkle of cinnamon for an extra touch of flavour. The sweet and tart cherries pair beautifully with these additions, and it’s the perfect way to serve your pie on a special occasion or just as a treat for yourself!
FAQs About Cherry Pie with Canned Cherries
Can I Use Frozen Cherries Instead of Canned Cherries?
While this recipe specifically uses canned cherries, you can certainly experiment with frozen cherries if you prefer. Just be aware that frozen cherries release more juice than canned ones, which could make your pie filling a bit runnier. To avoid this, you may need to increase the cornstarch or let the filling simmer on the stovetop to thicken before adding it to the pie crust. The texture and flavour will still be delicious, but canned cherries offer a more consistent filling that’s easier to work with.
How Can I Thicken the Cherry Pie Filling?
If your filling seems too watery, don’t worry! One of the best tricks to thicken a cherry pie recipe with canned cherries is adding a bit more cornstarch. You can start with two tablespoons, but if the filling still looks runny after mixing it with the cherries, try adding one more. Some people also use arrowroot powder as a thickening agent, which works just as well and is gluten-free!
How Do I Know When My Cherry Pie is Done Baking?
The best way to tell when your cherry pie with canned cherries is done is by looking for a golden, crispy crust and a bubbling filling. If the filling is bubbling through the crust slits, that’s a good sign that it’s fully cooked. Additionally, you can insert a knife into the filling to check if it’s thickened up to your liking. If the knife comes out clean and the crust is beautifully browned, you’re good to go!
Conclusion
Final Thoughts on Making Cherry Pie with Canned Cherries
When it comes to comfort food, there’s nothing quite like a fresh slice of cherry pie with canned cherries. Using canned cherries as a shortcut not only saves time but also ensures a rich, flavorful filling that’s easy to prepare. Whether you’re a seasoned baker or just trying your hand at pie-making for the first time, this recipe provides a fuss-free way to enjoy a delicious homemade dessert. Plus, with the ability to adjust the sweetness and texture to your liking, you’re guaranteed a pie that will please everyone at the table.
Why You’ll Love This Simple, Delicious Recipe
The best part of this cherry pie recipe with canned cherries is that it’s so easy to make without sacrificing any flavour. You can quickly throw it together, pop it in the oven, and have a beautiful dessert ready in no time. So, next time you’re in the mood for something sweet, try this recipe—your taste buds will thank you!
For more delicious recipes, explore other ideas on the website.
Ready to Bake Your Own Cherry Pie?
Now that you’ve learned how to make a cherry pie recipe with canned cherries, it’s time to get baking! Gather your ingredients, follow the simple steps, and enjoy a homemade dessert that’s sure to impress. Don’t forget to share your cherry pie creations with us on social media and tag us in your photos—we’d love to see your delicious results!
For more recipe ideas, baking tips, and mouthwatering desserts, be sure to check out our other articles. Happy baking!