


Tombstone Marshmallow Pops are a delightful and spooky treat perfect for Halloween celebrations. These fun desserts combine the sweetness of large marshmallows with rich dark chocolate, creating a deliciously indulgent snack. Each pop is designed to resemble a tombstone, making them a hit at any Halloween party or gathering.
These treats are not only tasty but also visually appealing. With a sprinkle of edible black glitter and creative icing designs, they bring a festive touch to your dessert table. Kids and adults alike will enjoy the playful nature of these pops, making them a great addition to any Halloween-themed event.
Making Tombstone Marshmallow Pops is a simple process that requires just a few ingredients. The recipe is easy to follow, allowing even novice bakers to create these spooky delights. Plus, they can be customized with various decorations, making them versatile for different occasions beyond Halloween.
In this article, we will guide you through the ingredients, preparation steps, and tips for perfecting your Tombstone Marshmallow Pops. Whether you’re hosting a Halloween party or looking for a fun activity to do with the kids, this recipe is sure to bring smiles and excitement. So, let’s dive into the world of Tombstone Marshmallow Pops and get ready to create some deliciously spooky treats!
Ingredients for Tombstone Marshmallow Pops Recipe
To create your own Tombstone Marshmallow Pops, you’ll need a few simple ingredients. Each item plays a crucial role in making these treats both delicious and visually appealing. Here’s what you’ll need:
- Large marshmallows: 12 pieces. These will serve as the base of your pops, giving them a fluffy texture.
- Dark chocolate chips: 1 cup (about 170g). This rich chocolate will coat the marshmallows, adding a decadent flavor.
- White icing: 1/2 cup. You can use store-bought or homemade icing for decorating your tombstones.
- Edible black glitter: 2 tablespoons. This will give your pops a spooky sparkle, perfect for Halloween.
- Lollipop sticks: 12 pieces. These will act as handles for your marshmallow pops, making them easy to hold.
- Candy pumpkins: 1 cup. These cute decorations will enhance the Halloween theme when arranged around your pops.
- Parchment paper: for cooling. This will prevent the chocolate from sticking as it hardens.
Gathering these ingredients is the first step in your fun and creative journey to making Tombstone Marshmallow Pops. Each component contributes to the overall look and taste of your spooky treats. Now that you have everything you need, let’s move on to the preparation steps!


Step-by-Step Preparation of Tombstone Marshmallow Pops Recipe

Step 1: Gather Your Ingredients
Before you start making your Tombstone Marshmallow Pops, it’s essential to gather all your ingredients. Having everything ready will make the process smoother and more enjoyable. Make sure you have:
- 12 large marshmallows
- 1 cup of dark chocolate chips
- 1/2 cup of white icing
- 2 tablespoons of edible black glitter
- 12 lollipop sticks
- 1 cup of candy pumpkins
- Parchment paper for cooling
Once you have all your ingredients in one place, you’re ready to start creating these spooky treats!
Step 2: Melt the Chocolate
The next step is to melt the dark chocolate chips. This is a crucial part of the process, as the chocolate will coat your marshmallows. Here’s how to do it:
- Take a microwave-safe bowl and add the dark chocolate chips.
- Microwave the bowl in 30-second intervals. Stir the chocolate after each interval.
- Continue until the chocolate is completely melted and smooth. Be careful not to overheat it, as this can cause the chocolate to seize.
Once your chocolate is melted, it’s time to move on to the next step!
Step 3: Dip the Marshmallows
Now comes the fun part! You’ll dip the marshmallows into the melted chocolate. Follow these steps:
- Take a lollipop stick and insert it into the bottom of each marshmallow, pushing it about halfway through.
- Carefully dip each marshmallow into the melted chocolate, ensuring it is fully coated.
- Allow any excess chocolate to drip off before placing the coated marshmallow on the parchment paper.
This step is where your pops start to take shape, so make sure each marshmallow is well-coated for the best flavor!
Step 4: Decorate the Tombstones
Once your marshmallows are coated in chocolate, it’s time to add some spooky decorations. Here’s how:
- While the chocolate is still wet, sprinkle edible black glitter over the top of each marshmallow pop.
- After that, use the white icing to write fun and spooky designs or phrases on each marshmallow. You can write “RIP,” “Beware,” or even draw little skulls and crossbones.
This is where your creativity shines! Feel free to get imaginative with your designs.
Step 5: Allow to Set
After decorating, it’s important to let the chocolate fully harden. You have two options:
- Let the pops cool at room temperature until the chocolate is set.
- For a quicker option, place the pops in the refrigerator for about 15-20 minutes.
Once the chocolate is hard, your Tombstone Marshmallow Pops are ready to be arranged and served!
Tips for Perfecting Your Tombstone Marshmallow Pops Recipe
Choosing the Right Chocolate
Selecting the right chocolate is key to making delicious Tombstone Marshmallow Pops. Dark chocolate is a popular choice because it adds a rich flavor that pairs well with the sweetness of marshmallows. However, you can also experiment with other types of chocolate. Milk chocolate offers a creamier taste, while white chocolate provides a sweet and buttery flavor.
When choosing chocolate, look for high-quality brands. They melt better and provide a smoother coating. If you prefer a colorful twist, consider using candy melts. These come in various colors and are easy to work with, making your pops even more festive. Just remember, the type of chocolate you choose will affect the overall taste, so pick one that you love!
Best Marshmallow Types to Use
Not all marshmallows are created equal! For your Tombstone Marshmallow Pops, large marshmallows are the best option. They provide a sturdy base and a fluffy texture that complements the chocolate coating. You can find these in most grocery stores, often labeled as “jumbo marshmallows.”
If you want to add a fun twist, consider using flavored marshmallows. Options like strawberry or vanilla can add a unique taste to your pops. Additionally, mini marshmallows can be used for smaller treats, but they may require more effort to coat and decorate. Stick with large marshmallows for the best results, and you’ll have a delightful treat that everyone will enjoy!
Creative Variations of Tombstone Marshmallow Pops Recipe
Halloween-Themed Variations
While the classic Tombstone Marshmallow Pops are already a hit, you can take them to the next level with some fun Halloween-themed variations. Here are a few ideas to inspire your creativity:
- Ghostly Pops: Instead of tombstones, dip your marshmallows in white chocolate. Use chocolate chips for eyes and a small piece of black licorice for a mouth. These ghost pops will add a spooky yet cute touch to your Halloween spread.
- Monster Pops: Use colored candy melts to create vibrant monster faces. Add candy eyes, gummy worms, or even sprinkles to give each pop a unique personality. Kids will love these playful treats!
- Spider Web Pops: After coating your marshmallows in dark chocolate, use melted white chocolate to drizzle a spider web design on top. Add a small plastic spider for an extra creepy effect.
These variations not only enhance the visual appeal but also allow you to explore different flavors and textures. Feel free to mix and match ideas to create your own spooky masterpieces!
Alternative Decorations for Different Occasions
Tombstone Marshmallow Pops can be adapted for various celebrations beyond Halloween. Here are some alternative decoration ideas for different occasions:
- Birthday Parties: Use colorful candy melts and sprinkles to create festive birthday pops. Write fun birthday messages with icing, and add colorful candles on top for a celebratory touch.
- Valentine’s Day: Dip marshmallows in pink or red chocolate and decorate with heart-shaped sprinkles. You can write sweet messages like “Be Mine” or “Love You” with icing.
- Christmas Treats: Coat marshmallows in white chocolate and sprinkle with crushed peppermint candies. Use green icing to create Christmas trees or red icing for Santa hats.
By changing the colors and decorations, you can easily transform your Tombstone Marshmallow Pops into delightful treats for any occasion. Let your imagination run wild, and enjoy creating these fun desserts!
FAQs About Tombstone Marshmallow Pops Recipe
How long do Tombstone Marshmallow Pops last?
Tombstone Marshmallow Pops can last up to a week when stored properly. Keep them in an airtight container at room temperature. This will help maintain their freshness and prevent them from becoming stale. However, if you live in a warm climate, it’s best to store them in the refrigerator to avoid melting the chocolate coating. Just remember to let them come to room temperature before serving for the best taste!
Can I use different types of chocolate for the recipe?
Absolutely! You can use various types of chocolate for your Tombstone Marshmallow Pops. While dark chocolate is a classic choice, milk chocolate and white chocolate can also work wonderfully. Each type of chocolate brings its unique flavor. If you want to add a pop of color, consider using colored candy melts. They are easy to melt and come in many fun shades, making your pops even more festive!
Are Tombstone Marshmallow Pops suitable for kids?
Yes, Tombstone Marshmallow Pops are perfect for kids! They are fun to make and even more enjoyable to eat. The process of dipping and decorating allows children to get creative. Just be sure to supervise younger kids when using the microwave and handling melted chocolate. These pops are a great way to engage kids in the kitchen while creating a delicious treat for Halloween or any festive occasion!
What other decorations can I use for Tombstone Marshmallow Pops?
The decoration possibilities for Tombstone Marshmallow Pops are endless! Besides edible black glitter and white icing, you can use various candies and sprinkles. Consider adding:
- Candy Eyes: These can give your pops a fun, spooky look.
- Gummy Worms: Place them on top for a creepy effect.
- Chocolate Sprinkles: These can add texture and a bit of extra sweetness.
- Colored Icing: Use different colors to create unique designs or messages.
Feel free to mix and match these decorations to create your own spooky masterpieces. The more creative you get, the more fun your Tombstone Marshmallow Pops will be!
Print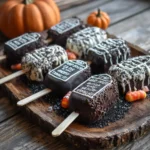
Tombstone Marshmallow Pops Recipe
- Total Time: 30 minutes
- Yield: 12 pops
- Diet: Vegetarian
Description
Tombstone Marshmallow Pops are a delightful and spooky treat perfect for Halloween celebrations, combining large marshmallows with rich dark chocolate and creative decorations.
Ingredients
- Large marshmallows: 12 pieces
- Dark chocolate chips: 1 cup (about 170g)
- White icing: 1/2 cup
- Edible black glitter: 2 tablespoons
- Lollipop sticks: 12 pieces
- Candy pumpkins: 1 cup
- Parchment paper: for cooling
Instructions
- Gather all your ingredients.
- Melt the dark chocolate chips in a microwave-safe bowl.
- Dip the marshmallows into the melted chocolate and allow excess to drip off.
- While the chocolate is wet, sprinkle edible black glitter and decorate with white icing.
- Allow the pops to set at room temperature or refrigerate for quicker setting.
Latest Amazon Finds


Notes
- Store in an airtight container for up to a week.
- Use high-quality chocolate for better melting and coating.
- Experiment with different types of chocolate for varied flavors.
- Prep Time: 20 minutes
- Cook Time: 10 minutes
- Category: Dessert
- Method: No-bake
- Cuisine: American
Nutrition
- Serving Size: 1 pop
- Calories: 150
- Sugar: 20g
- Sodium: 30mg
- Fat: 7g
- Saturated Fat: 4g
- Unsaturated Fat: 2g
- Trans Fat: 0g
- Carbohydrates: 22g
- Fiber: 0g
- Protein: 1g
- Cholesterol: 0mg
Keywords: Tombstone Marshmallow Pops, Halloween treats, spooky desserts, marshmallow pops