

Ice cream cake is the quintessential dessert that brings joy to any celebration or warm summer day. The Ice Cream Cake with Chocolate Cookie Crunch Layer is a delectable creation that perfectly blends the creamy richness of ice cream with a delightful crunch from a chocolate cookie layer. This cake stands out not just for its taste but also for its beautiful presentation, making it a fantastic centerpiece for birthdays, picnics, or any get-together.
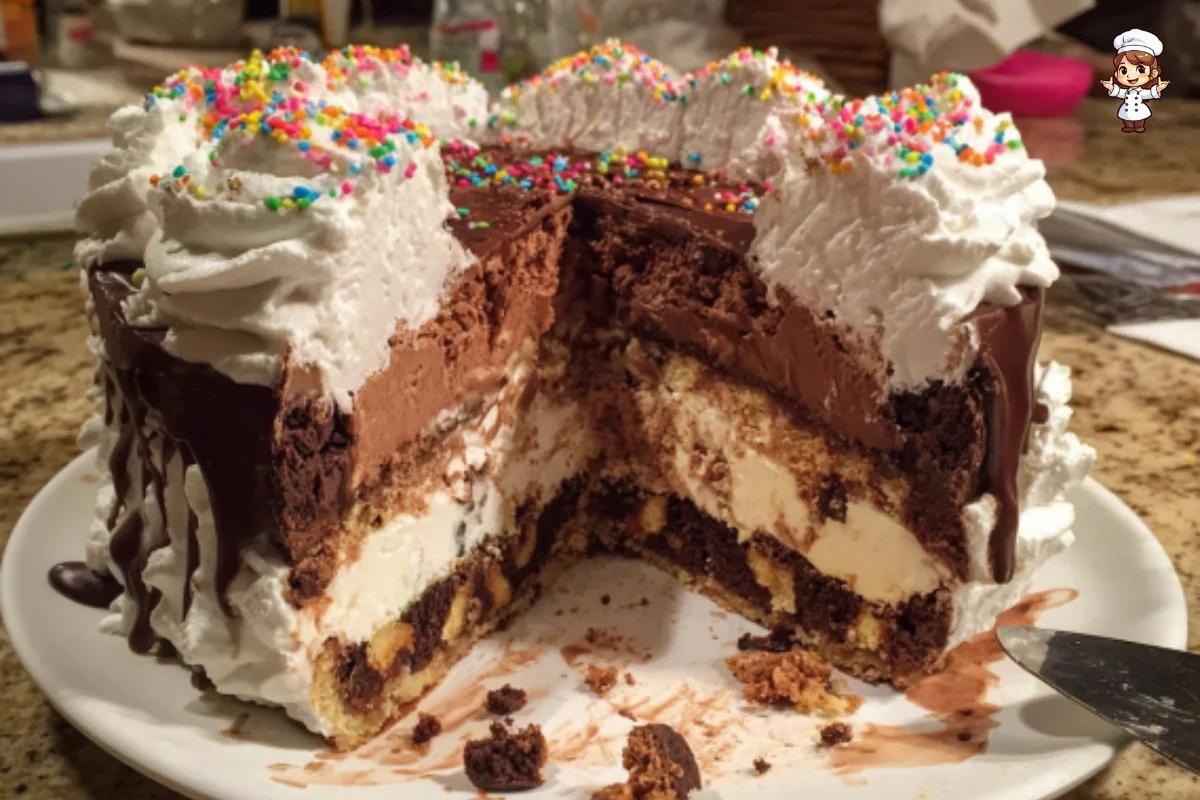
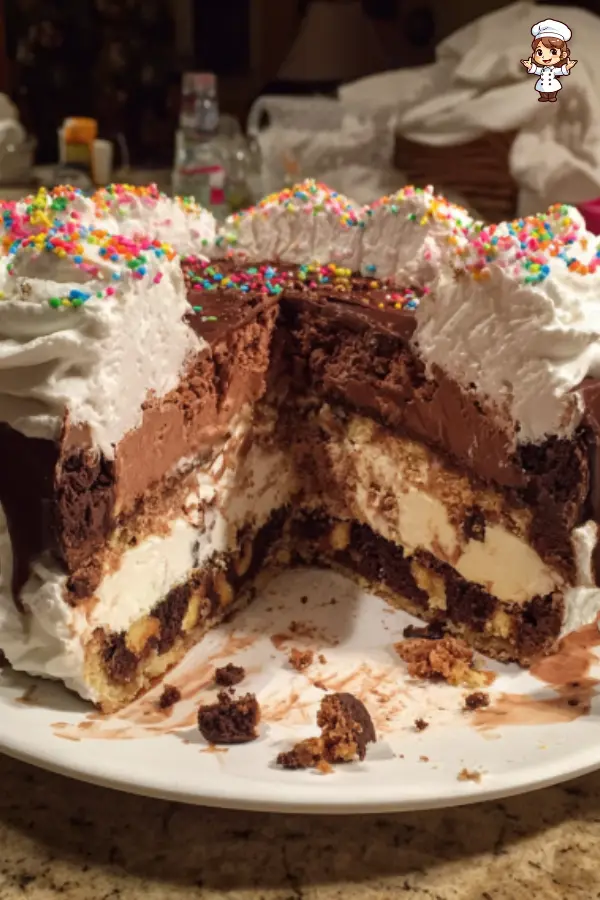
Imagine the contrast of the soft, creamy vanilla and chocolate ice cream layered with the crunchy texture of chocolate-dipped Oreo cookies. The hot fudge topping adds a warm and gooey element that complements the cold ice cream beautifully. This cake is not just a treat for the taste buds; it looks stunning when garnished with whipped cream and colorful sprinkles. It’s sure to impress your family and guests!
In the following sections, we will dive deeper into this tasty recipe, covering everything from ingredients and step-by-step preparation to tips, variations, and serving suggestions to enhance your experience of making and enjoying this delightful dessert.
Ingredients about Ice Cream Cake with Chocolate Cookie Crunch Layer
List of ingredients with measurements
To create the delicious Ice Cream Cake with Chocolate Cookie Crunch Layer, you will need the following ingredients:
- 15 Oreo cookies
- 3 tablespoons unsalted butter, melted
- 1/2 cup semisweet chocolate chips
- 1 tablespoon refined coconut oil or vegetable shortening
- 1 1/2 quarts vanilla ice cream
- 1 (15-ounce) jar hot fudge topping
- 1 1/2 quarts chocolate ice cream
- 1 1/2 cups heavy whipping cream
- 1/4 cup confectioners sugar
- 1 1/2 teaspoons pure vanilla extract
- Sprinkles for decorating
Optional ingredient substitutions
Your pantry might not always be stocked with all the ingredients, but that’s okay! Here are some suggested substitutions to ensure you can still whip up this delectable cake:
- Instead of using Oreo cookies, you can substitute with any chocolate wafer cookies or even graham crackers for an entirely different flavor.
- If you don’t have coconut oil, vegetable shortening can work just as well. However, you can also use butter as an alternative for a richer flavor.
- For dietary preferences, try using dairy-free ice creams or whipped cream alternatives to make this cake suitable for vegans.


How to Make Ice Cream Cake with Chocolate Cookie Crunch Layer
Step 1: Preparing the Chocolate Cookie Crunch Layer
Begin by preheating your oven to 350 degrees Fahrenheit (175 degrees Celsius). Line a baking sheet with parchment paper to prevent sticking. Chop the 15 Oreo cookies into small pieces. In a mixing bowl, combine the chopped Oreo cookies with 3 tablespoons of melted unsalted butter. Mix until the cookie pieces are well-coated with the butter. Spread this mixture evenly on the prepared baking sheet. Baking the cookies will help them become crispier, so place the baking sheet in the oven for about 5 to 8 minutes. Keep an eye on them to ensure they don’t burn.
Step 2: Melting the Chocolate
While the cookie mixture is baking, it’s time to melt the semisweet chocolate chips for the crunchy layer. Place 1/2 cup of chocolate chips in a microwave-safe bowl. Microwave the chocolate chips in 30-second intervals, stirring between each interval, until the chocolate is completely melted and smooth. Once melted, stir in 1 tablespoon of refined coconut oil or vegetable shortening to give the chocolate a nice glossy finish.
Step 3: Combining the Chocolate and Cookies
Take the Oreo cookie mixture out of the oven and let it cool for a minute. Once cooled, add the cookie crumbs to the melted chocolate and toss them together until all the crumbs are coated evenly. Spread this chocolate cookie crunch mixture back onto the parchment paper in a flat layer. Place the baking sheet in the refrigerator for about 30 minutes to allow the layer to harden. Once set, chop the chocolate cookie crunch into small pieces and set aside.
Step 4: Layering the Ice Cream
Now, it’s time to begin assembling your cake! Start by lining a 9-inch springform pan with plastic wrap, leaving some overhang to make it easier to remove the cake later. Next, take the vanilla ice cream and stir it until it’s spreadable. Spread the softened vanilla ice cream evenly in the bottom of the pan. Cover the pan with a lid or plastic wrap and place it in the freezer for about 30 minutes to firm up.
While the vanilla layer is firming up, prepare the hot fudge topping. Microwave the jar of hot fudge until it is warm and spreadable. Once the vanilla ice cream is firm, take the pan out, scatter the chocolate cookie crunch layer on top, and then drizzle the warmed fudge topping over it evenly. Spread it out to cover the cookie layer as evenly as possible. Return the pan to the freezer for another 15 to 30 minutes.
Next, take the chocolate ice cream out of the freezer and let it soften for a few minutes. Stir it until it’s spreadable, then spoon it over the fudge layer. Spread the chocolate ice cream evenly to create the final layer of your cake. Cover with plastic wrap and freeze it for at least 4 hours, or if desired, up to a week to ensure it’s fully set.
Step 5: Finishing Touches
Once the ice cream cake has fully frozen, take it out of the freezer and carefully peel off the top layer of plastic wrap. Invert the cake onto a serving platter while gently removing the sides of the springform pan. Carefully peel off any remaining plastic wrap. At this point, your cake is beautifully set and ready for decorating!
Step 6: Whipping the Cream
Now, let’s make the whipped cream topping. In a large mixing bowl, beat 1 1/2 cups of heavy whipping cream, 1/4 cup of confectioners’ sugar, and 1 1/2 teaspoons of pure vanilla extract together until stiff peaks form. This will take a few minutes, so keep an eye on the mixture as it thickens.
Step 7: Decorating the Cake
Transfer a portion of the whipped cream to a piping bag fitted with a decorative tip for creating a beautiful border around the cake. Spread the remaining whipped cream evenly over the entire top of the cake. If you wish, pipe a decorative border along the edge. Return the decorated cake to the freezer uncovered for 1 to 2 hours to firm everything up before serving.
Step 8: Serving the Cake
Before serving, take the cake out of the freezer and let it sit at room temperature for about 5 minutes to soften slightly. Just before slicing, sprinkle some colorful sprinkles over the top for a fun and festive look.
How to Serve Ice Cream Cake with Chocolate Cookie Crunch Layer
Best ways to serve Ice Cream Cake with Chocolate Cookie Crunch Layer
Serving your Ice Cream Cake with Chocolate Cookie Crunch Layer can be both simple and impressive. Start by using a sharp knife that you can warm in hot water for easy slicing through the layers. This way, you won’t disrupt the structure of the cake. Serve the slices on individual plates, giving each person a colorful, crunchy piece of cake drizzled with any leftover hot fudge if desired.
Serving suggestions or pairings
This ice cream cake is a delightful standalone dessert, but pairing it with a few scrumptious extras can take it to the next level. Consider serving it with fresh fruit, like strawberries or raspberries, that adds a yummy contrast in flavors. A dollop of whipped cream on the side can also be lovely. For the chocolate lovers, a scoop of chocolate or vanilla ice cream can complement the cake itself, enhancing its rich taste.
How to Store Ice Cream Cake with Chocolate Cookie Crunch Layer
Proper storage methods
The Ice Cream Cake with Chocolate Cookie Crunch Layer can be stored in the freezer for several days. Make sure to keep it covered in plastic wrap or aluminum foil to avoid freezer burn. If you have any leftovers, ensure the slices are tightly wrapped, or placed in an airtight container before returning to the freezer.
Tips for reheating or freezing
When it comes to ice cream cakes, you generally don’t reheat them, as they are best served cold. However, if the cake becomes too hard in the freezer, let it sit at room temperature for just a few minutes before cutting. This will help soften it slightly and make slicing easier.
Tips to Make Ice Cream Cake with Chocolate Cookie Crunch Layer
Common mistakes to avoid
One of the common mistakes people make when preparing an ice cream cake is not letting the layers freeze properly. Be sure to allow adequate freezing time between each layer to achieve a well-structured cake. Another mistake is over-mixing the whipped cream, which can lead to a grainy texture instead of the desired light and fluffy result.
Helpful tips for better results
To elevate your ice cream cake, consider adding a layer of nuts, like chopped pecans or almonds, between the ice cream and hot fudge layers for an unexpected crunch. Always check the consistency of your ice cream before layering; it should be soft enough to spread easily but firm enough to keep its shape.
Variation of Ice Cream Cake with Chocolate Cookie Crunch Layer
Suggested variations or twists on the recipe
You can customize this ice cream cake recipe in many ways. For instance, substitute the vanilla ice cream with other flavors such as strawberry, mint chocolate chip, or even cookie dough for a fun twist. Consider adding fruit layers, like sliced bananas or strawberries, to enhance the cake’s flavor profile and add some freshness.
Adjustments for dietary preferences
If you’re looking to make the cake gluten-free, use gluten-free cookie alternatives in place of regular Oreos. For a dairy-free option, you can employ almond or coconut-based ice creams and dairy-free whipped cream to suit vegan diets.
FAQs
What can I do if the dish isn’t turning out right?
If your ice cream cake doesn’t come out right, start by checking the layers. If it’s too soft, it may not have been frozen long enough at each stage. Likewise, ensure your whipped cream has been beaten properly to create the right texture. If you run into issues, don’t hesitate to take a pinch of initiative and adjust the cooking times or the freezing intervals.
Can I make this ahead of time?
Yes, absolutely! You can prepare this ice cream cake up to a week in advance. Just make sure to store it properly in the freezer, covered well to prevent freezer burn.
What can I substitute for ingredients?
Many ingredients can be substituted based on personal preference. As mentioned, you can swap Oreo cookies for different varieties of cookies or crusts, use a different type of ice cream, or use alternative sweeteners to adjust the sweetness. There is a lot of flexibility in this recipe, allowing you to get creative!
The Ice Cream Cake with Chocolate Cookie Crunch Layer is a delightful treat that blends flavors and textures to create something truly special. With its layers of delicious ice cream and crunchy cookie, it’s sure to be a hit wherever you take it. Enjoy making this cake, sharing it with loved ones, and creating unforgettable memories around the dessert table!
Print
Ice Cream Cake with Chocolate Cookie Crunch Layer
- Total Time: 6 hours (including freezing time)
- Yield: 12 servings 1x
- Diet: Vegetarian
Description
A rich and festive ice cream cake layered with vanilla and chocolate ice cream, hot fudge, and a crunchy chocolate cookie layer, perfect for summer celebrations and birthdays.
Ingredients
- 15 Oreo cookies
- 3 tablespoons unsalted butter, melted
- 1/2 cup semisweet chocolate chips
- 1 tablespoon refined coconut oil or vegetable shortening
- 1 1/2 quarts vanilla ice cream
- 1 (15-ounce) jar hot fudge topping
- 1 1/2 quarts chocolate ice cream
- 1 1/2 cups heavy whipping cream
- 1/4 cup confectioners sugar
- 1 1/2 teaspoons pure vanilla extract
- Sprinkles for decorating (optional)
Instructions
- Preheat oven to 350°F (175°C) and line a baking sheet with parchment paper.
- Chop Oreo cookies and mix with melted butter. Spread on baking sheet and bake for 5–8 minutes. Cool slightly.
- Melt chocolate chips in microwave-safe bowl in 30-second intervals. Stir in coconut oil until smooth and glossy.
- Mix the baked cookie crumbs with melted chocolate. Spread on parchment and refrigerate for 30 minutes until hardened. Chop into chunks.
- Line a 9-inch springform pan with plastic wrap. Soften vanilla ice cream and spread into the bottom of the pan. Freeze for 30 minutes.
- Warm the hot fudge topping. Spread the cookie crunch layer over vanilla ice cream and drizzle with fudge. Freeze for another 15–30 minutes.
- Soften chocolate ice cream and spread over the fudge layer. Cover and freeze for at least 4 hours or up to 1 week.
- Remove from pan and plastic wrap. Invert onto serving platter.
- Beat heavy cream, sugar, and vanilla until stiff peaks form. Spread whipped cream over cake and pipe decorative border. Freeze uncovered for 1–2 hours.
- Before serving, let sit at room temperature for 5 minutes. Add sprinkles before slicing.
Latest Amazon Finds


Notes
- Let each ice cream layer freeze properly for structure.
- Use a warm knife for clean slicing.
- Customize with different ice cream flavors or add fruit layers.
- Store tightly wrapped in freezer to prevent freezer burn.
- Use dairy-free alternatives for a vegan version.
- Prep Time: 45 minutes
- Cook Time: 8 minutes
- Category: Dessert
- Method: No-Bake / Freeze
- Cuisine: American
Nutrition
- Serving Size: 1 slice
- Calories: 420
- Sugar: 32g
- Sodium: 180mg
- Fat: 26g
- Saturated Fat: 15g
- Unsaturated Fat: 9g
- Trans Fat: 0g
- Carbohydrates: 42g
- Fiber: 1g
- Protein: 5g
- Cholesterol: 70mg
Keywords: Ice Cream Cake with Chocolate Cookie Crunch, Oreo ice cream cake, summer dessert, no-bake cake, birthday cake, frozen dessert