

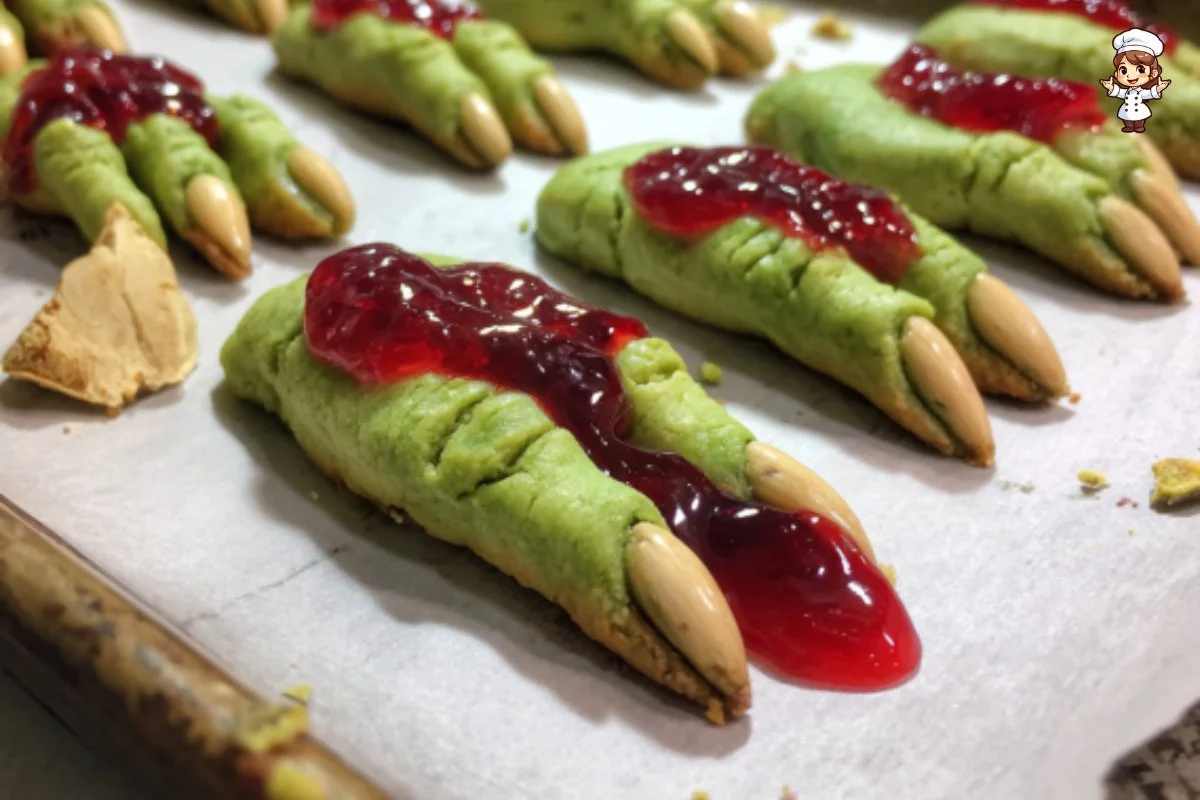
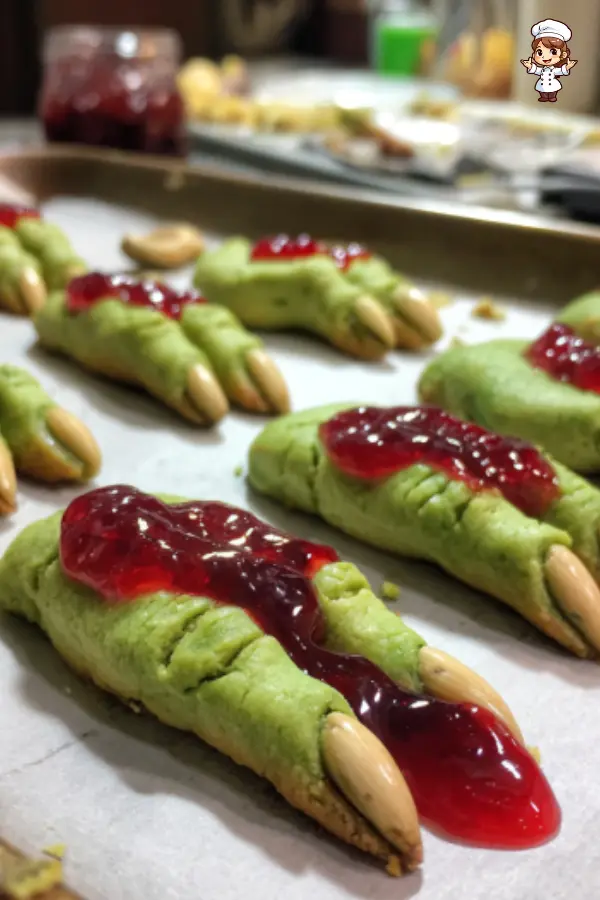
Witch Finger Cookies are a fun and spooky treat that is perfect for Halloween or any monster-themed party. These cookies are shaped like fingers, complete with almond “nails” and pistachio “warts,” making them look delightfully creepy yet tasty. The vibrant green color, thanks to a little food coloring, adds to their ghoulish appearance. Not only are they appealing to the eye, but they are also delicious, with a rich buttery flavor and a hint of almond and vanilla. The sticky cherry or raspberry jam adds a nice contrast, making each bite a combination of textures and flavors that is simply irresistible.
These cookies are more than just a visual treat; they bring smiles and laughter to any gathering. Whether you are baking them for Halloween, a themed party, or just for fun, the kids and adults alike will love these whimsical confections. Making Witch Finger Cookies can be a delightful family activity, allowing everyone to join in the fun of shaping and decorating the cookies. Plus, baking together creates lasting memories, all while enjoying the delightful aroma of cookies wafting through your kitchen.
Now, let’s dive into the ingredients and the step-by-step process of making these bewitchingly good Witch Finger Cookies.
Ingredients about Witch Finger Cookies
List of ingredients with measurements
- 1 1/4 cups confectioners sugar
- 1 cup unsalted butter, softened
- 1 large egg
- 1 tsp almond extract
- 1 tsp pure vanilla extract
- 5 to 6 drops green food coloring
- 2 3/4 cups all-purpose flour
- 1 tsp kosher salt
- 1/2 cup finely chopped pistachios (plus more for decorating)
- 3/4 cup sliced almonds
- 1/2 cup cherry (or strawberry or raspberry) jam
Optional ingredient substitutions
For those who may not have all the ingredients on hand, here are some substitutions you can consider:
- Instead of almond extract, you can use hazelnut extract for a different nutty flavor.
- You can substitute butter with margarine or a dairy-free alternative if you’re looking for a dairy-free version.
- If you don’t have confectioners sugar, granulated sugar can be ground down into a powder for a makeshift version.


How to Make Witch Finger Cookies
Step 1: Detailed instruction
Start by gathering all your ingredients in a large mixing bowl. Begin the process by beating the confectioners sugar and softened butter together on medium speed for about two minutes until the mixture is pale and fluffy. This step is crucial because it helps incorporate air into the mixture, making the cookies light and airy.
Step 2: Detailed instruction
Next, add in the large egg and continue to beat the mixture for an additional minute. You want to ensure the egg is well incorporated and adds to the fluffiness of the dough. Then pour in the almond extract, vanilla extract, and the green food coloring. Beat everything together until fully combined, which will give your cookie dough its signature color.
Step 3: Detailed instruction
In a separate small bowl, whisk together the all-purpose flour and kosher salt. This mixture ensures that the salt is evenly distributed throughout the flour. Gradually add this dry mixture to the buttery concoction. Beat on low speed until the ingredients are just blended. Be careful not to overmix, as this could lead to tough cookies.
Step 4: Detailed instruction
Once combined, gently fold in the finely chopped pistachios, which will add a nice crunch and depth to the cookies. Wrap the dough in plastic wrap and pop it into the refrigerator for at least 30 minutes. This chilling step is important because it makes the dough easier to handle and helps the flavors blend.
Step 5: Preheat the oven
While your dough is chilling, preheat your oven to 375°F (190°C) and line your baking sheets with parchment paper. This will help prevent the cookies from sticking and make cleanup a breeze.
Step 6: Shape the cookies
After the dough has chilled, remove it from the fridge and get ready to shape your witch fingers! Scoop out portions of the dough and roll them into finger-like logs. Make sure to press a slice of almond into one end of each log to create the “nail.”
Step 7: Carve and decorate
To give your cookies a more realistic look, shape the dough to form knuckles by pinching the logs as needed. Take a knife and gently carve lines to create the creases of the knuckles, and if you want to make them even more gross, you can press in small pieces of pistachios to make warts.
Step 8: Chill again
Place the shaped cookies on a baking sheet and pop them into the freezer for another 30 minutes. This additional chill helps them retain their shape while baking.
Step 9: Bake
Once the cookies have been frozen, bake them in the preheated oven for 7 to 9 minutes, or until the edges are firm and they are lightly golden. Keep an eye on them to prevent overbaking.
Step 10: Finish with jam
After baking, allow the cookies to cool slightly on the baking sheet. Carefully remove the almond nails from each finger, add a dab of cherry jam for a “blood” effect, and then replace the almond slices. For an extra touch, spread some jam on the bottom of the cookies while allowing them to cool completely before serving.
How to Serve Witch Finger Cookies
Best ways to serve Witch Finger Cookies
Witch Finger Cookies can be presented in various creative ways. Platter-style is always a hit, where cookies are arranged on a Halloween-themed platter surrounded by fake spider webs or little plastic spiders for a festive touch. You could also incorporate them into a dessert table alongside other Halloween treats like pumpkin cookies, ghost-shaped cupcakes, or creepy candy.
Serving suggestions or pairings
These cookies pair wonderfully with a variety of beverages. Serving them with hot apple cider or pumpkin spice lattes enhances the autumn vibe. For something more playful, set them out next to a bowl of spooky punch or a Halloween-themed cocktail. They also go well with a side of whipped cream or vanilla ice cream for a delightful dessert experience.
How to Store Witch Finger Cookies
Proper storage methods
Once your Witch Finger Cookies are cool and fully decorated, it’s essential to store them properly to retain their freshness. Place the cookies in an airtight container, separating layers with parchment paper if necessary to avoid sticking. Store them at room temperature for up to a week, though they are best enjoyed fresh.
Tips for reheating or freezing
If you want to store them longer, consider freezing the cookies. Layer them in an airtight container and freeze for up to three months. To reheat, simply let them come to room temperature, or warm them in a preheated oven at 300°F (150°C) for about 5 minutes to freshen them up.
Tips to Make Witch Finger Cookies
Common mistakes to avoid
One common mistake is not chilling the dough enough. Skipping the refrigeration steps can lead to cookies that spread too much during baking, losing their finger-like shape. Additionally, overbaking cookies can make them hard instead of soft and chewy. Always keep an eye on the baking time.
Helpful tips for better results
Be patient when shaping the cookies. Take your time to create defined knuckles and a realistic nail. This will enhance the spooky aesthetics! Also, remember not to overmix the dough when adding the dry ingredients. The less you mix, the softer your cookies will be.
Variation of Witch Finger Cookies
Suggested variations or twists on the recipe
Feel free to experiment with flavors! You can add cocoa powder for a chocolatey version of the cookies or incorporate spices like cinnamon or nutmeg for a seasonal twist. For a fun variation, try using colored icing to create different “nail” designs or even make edible glitter dust for a sparkle effect.
Adjustments for dietary preferences
For healthier versions, consider substituting some of the butter with unsweetened applesauce or using whole wheat flour instead of all-purpose flour. For those looking for gluten-free options, there are gluten-free all-purpose flour blends that work well in this recipe. Adjust sugar levels for a less sweet cookie if preferred.
FAQs
What can I do if the dish isn’t turning out right?
If your cookie dough is too crumbly, it might need a bit more moisture. Try adding an extra tablespoon of softened butter or a small splash of milk. Conversely, if your dough is too sticky, a little more flour can help. Always remember that the dough should be workable for shaping.
Can I make this ahead of time?
Yes, you can prepare the dough ahead of time. After mixing, wrap the dough tightly in plastic wrap and store it in the refrigerator for 2 to 3 days before baking. You can also shape the cookies and freeze them before baking, allowing for a quick bake whenever you’re ready to serve.
What can I substitute for ingredients?
You can substitute almond extract with vanilla or hazelnut extract for different flavors. If you don’t have pistachios, try walnuts or pecans instead. If you want a nut-free cookie, feel free to omit the nuts and use coated chocolate pieces or candy sprinkles to decorate instead.
Witch Finger Cookies not only require simple ingredients and easy instructions, but they also provide the perfect way to engage in festive baking fun. Whether for Halloween or simply to enjoy a treat, these cookies are sure to be a hit with everyone. Happy baking!
Print
Witch Finger Cookies
- Total Time: 1 hour 30 minutes (including chilling)
- Yield: 36 cookies 1x
- Diet: Vegetarian
Description
Witch Finger Cookies are spooky green treats shaped like fingers, complete with almond nails and pistachio warts. Perfect for Halloween!
Ingredients
- 1 1/4 cups confectioners sugar
- 1 cup unsalted butter, softened
- 1 large egg
- 1 tsp almond extract
- 1 tsp pure vanilla extract
- 5 to 6 drops green food coloring
- 2 3/4 cups all-purpose flour
- 1 tsp kosher salt
- 1/2 cup finely chopped pistachios (plus more for decorating)
- 3/4 cup sliced almonds
- 1/2 cup cherry, strawberry, or raspberry jam
Instructions
- Beat the confectioners sugar and butter together on medium speed until pale and fluffy (about 2 minutes).
- Add the egg and beat for 1 more minute until well combined.
- Mix in almond extract, vanilla extract, and green food coloring until the dough is evenly tinted.
- In a separate bowl, whisk together the flour and salt. Gradually add it to the butter mixture, beating on low until just combined.
- Fold in chopped pistachios. Wrap dough in plastic wrap and chill for 30 minutes.
- Preheat the oven to 375°F (190°C) and line baking sheets with parchment paper.
- Shape dough into finger-sized logs. Press a sliced almond into one end for the nail.
- Pinch to form knuckles and carve lines to resemble creases. Add chopped pistachios as warts if desired.
- Freeze shaped cookies for 30 minutes.
- Bake for 7–9 minutes, until edges are set and lightly golden.
- Cool slightly, remove almonds, dab jam for ‘blood’, and replace almond nails. Spread jam on bottom ends if desired.
Latest Amazon Finds


Notes
- Chill dough thoroughly before shaping to avoid spreading.
- Use parchment to keep cookies from sticking to the tray.
- Don’t overbake — you want the cookies slightly soft.
- Decorate creatively using pistachios, icing, or edible glitter.
- Use gloves or a spoon to shape if the dough gets too warm.
- Prep Time: 30 minutes
- Cook Time: 9 minutes
- Category: Dessert
- Method: Baking
- Cuisine: American
Nutrition
- Serving Size: 1 cookie
- Calories: 110
- Sugar: 7g
- Sodium: 40mg
- Fat: 6g
- Saturated Fat: 3g
- Unsaturated Fat: 2g
- Trans Fat: 0g
- Carbohydrates: 12g
- Fiber: 0.5g
- Protein: 1g
- Cholesterol: 15mg
Keywords: Witch Finger Cookies, Halloween cookies, spooky treats, almond cookies, green cookie fingers, monster party dessert