

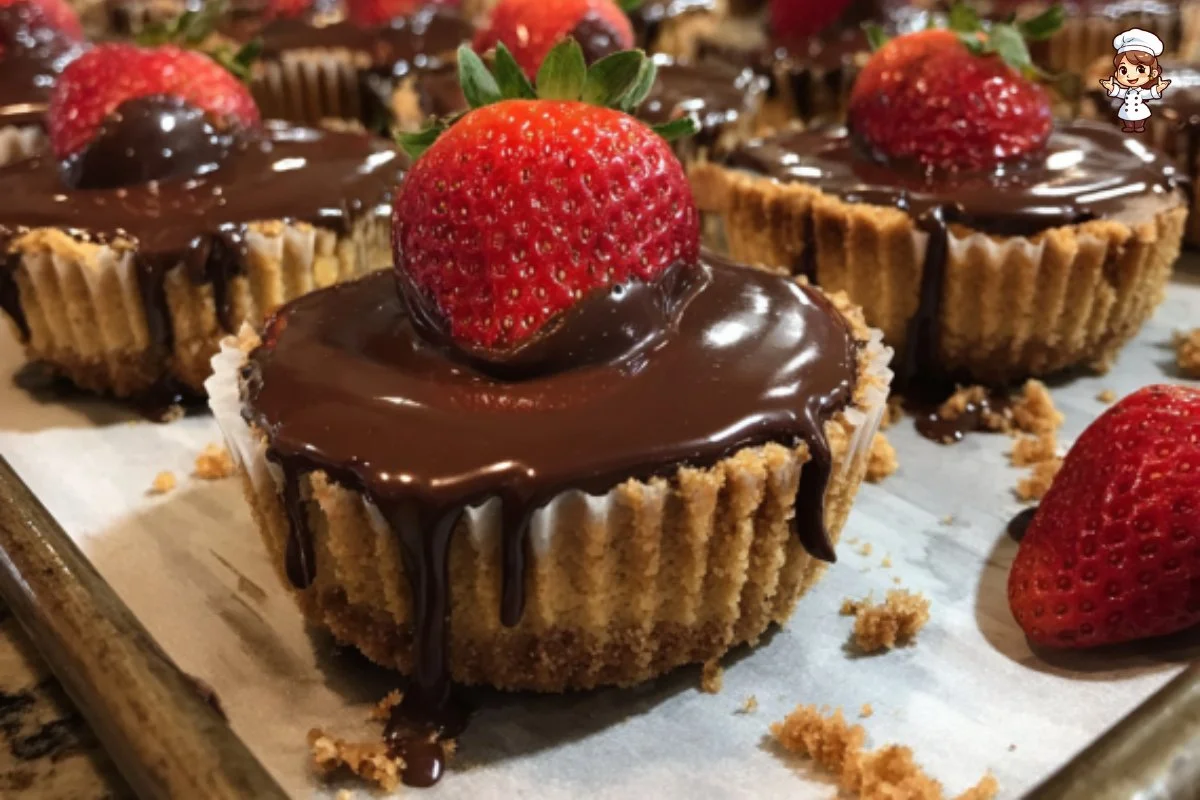
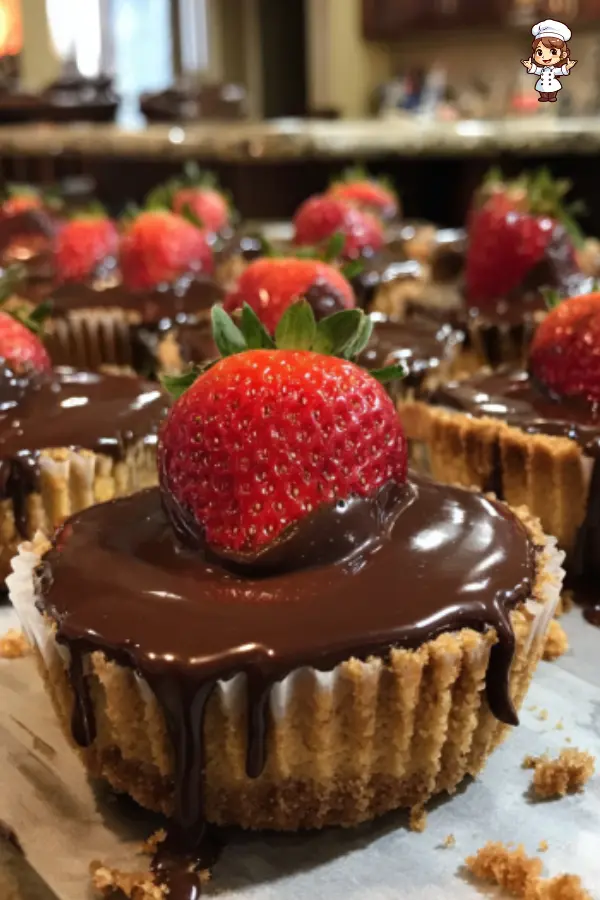
Chocolate Covered Strawberry Cheesecake Cups are a delightful twist on two classic desserts: cheesecake and chocolate-covered strawberries. These individual servings combine the creamy richness of cheesecake with the irresistible sweetness of chocolate and the fresh, juicy taste of strawberries, creating a treat that is sure to impress. These mini desserts are perfect for special occasions, parties, or just a sweet indulgence at home. The layers of graham cracker crust, smooth cheesecake filling, and luscious chocolate-covered strawberries make every bite a delightful experience. Each cup is a perfect balance of creamy, crunchy, and fruity flavors that will leave your taste buds wanting more.
Whether you serve them during a romantic dinner, at family gatherings, or simply as a personal indulgence, these cheesecake cups are as enjoyable to make as they are to eat. They’re an excellent way to present a favorite dessert in a fun and elegant way, appealing to both children and adults alike.
If you’re ready to make them, you can easily follow along with the simple ingredients and step-by-step instructions to whip these delicious treats up in no time!
Ingredients about Chocolate Covered Strawberry Cheesecake Cups
List of ingredients with measurements
- 14 graham crackers, crushed
- 4 tablespoons melted butter
- 1/4 teaspoon kosher salt
- 2 blocks cream cheese, softened
- 2 large eggs
- 1/2 cup sour cream
- 1/4 cup sugar
- 1 teaspoon vanilla extract
- Pinch of salt
- 1 cup melted semisweet chocolate
- 12 fresh strawberries
Optional ingredient substitutions
If you are looking for substitutions, consider using coconut oil instead of melted butter for a dairy-free option. You can swap out the semisweet chocolate for dark chocolate if you prefer a richer flavor. Additionally, Greek yogurt can take the place of sour cream for a healthier twist. If you’re allergic to gluten, you can use gluten-free graham crackers.


How to Make Chocolate Covered Strawberry Cheesecake Cups
Step 1: Prepare the muffin tin and crust
Start by preheating your oven to 325 degrees Fahrenheit. Line a 12-cup muffin tin with paper liners and spray the liners with non-stick cooking spray. In a large mixing bowl, combine the crushed graham crackers, melted butter, and kosher salt. Mix the ingredients together until the graham cracker crumbs are fully moistened. Once mixed, press this mixture firmly into the bottom of each paper liner to form the crust. Make sure that the crust is even in thickness. This layer is key to providing the crunch that balances the creamy cheesecake filling.
Step 2: Make the cheesecake filling
In another large bowl, beat the softened cream cheese using an electric mixer on medium speed until it becomes light and fluffy. This should take about 2 to 3 minutes. Once the cream cheese is fluffy, add the eggs one at a time, mixing well after each addition. Then, add the sour cream, sugar, vanilla extract, and a pinch of salt. Continue to mix until all ingredients are well combined and you have a smooth cheesecake batter.
Step 3: Pour the filling into crusts
Carefully pour the cheesecake filling over the prepared graham cracker crusts in each muffin tin. Use a spatula to smooth the tops and ensure an even layer of cheesecake filling across all cups. The filling will rise a little while baking, so don’t worry if it appears close to the top.
Step 4: Bake and cool
Place the muffin tin in the preheated oven and bake the cheesecake cups for about 20 minutes. The centers should be slightly jiggly but not liquid. After baking, remove the muffin tin from the oven and allow the cups to cool in the tin itself for about 15 to 20 minutes. Once cooled, transfer them to the refrigerator to chill for at least 2 hours. Chilling allows the cheesecakes to set properly and enhances the flavors.
Step 5: Top with chocolate and strawberries
After the cheesecake cups have chilled, it’s time to add the finishing touches. Melt the semisweet chocolate in a microwave-safe bowl or over a double boiler until smooth. Spoon the melted chocolate generously over the top of each cheesecake cup, allowing some to pour down the sides for a beautiful presentation. Then, dip each strawberry in the melted chocolate, letting any excess drip off before placing them on top of the chocolate-covered cheesecake cups. Ensure that the chocolate sets completely, which may take a little time in the refrigerator.
How to Serve Chocolate Covered Strawberry Cheesecake Cups
Best ways to serve Chocolate Covered Strawberry Cheesecake Cups
These delicious cheesecake cups can be served directly from the muffin tin or transferred to a beautiful serving platter for a more formal presentation. They look charming when arranged neatly, and you can garnish them with extra chocolate drizzle, fresh mint leaves, or a sprinkle of crushed graham crackers for added appeal.
Serving suggestions or pairings
To enhance the dessert experience, consider serving these cheesecake cups with a dollop of whipped cream or a side of raspberry sauce. The tartness of raspberries will provide a lovely contrast to the sweetness of the cheesecake and chocolate. Pairing these cups with a glass of dessert wine or a rich coffee can also elevate the dessert to another level.
How to Store Chocolate Covered Strawberry Cheesecake Cups
Proper storage methods
To store any leftover cheesecake cups, first ensure they are completely set and chilled. You can store them in an airtight container in the refrigerator for up to 5 days. If you notice any condensation forming inside the container, consider placing a paper towel inside to absorb moisture and keep the cheesecake fresh.
Tips for reheating or freezing
It’s best to enjoy these cheesecake cups cold, but if you find yourself wanting to reheat them, do so gently in the microwave for about 10 to 15 seconds, ensuring not to overheat. Unfortunately, freezing these cups can alter their texture; therefore, they are best enjoyed fresh. However, if you must freeze them, do so without the chocolate topping, and after thawing, add the chocolate just before serving.
Tips to Make Chocolate Covered Strawberry Cheesecake Cups
Common mistakes to avoid
One common mistake to avoid is overbaking the cheesecake cups. Keep an eye on them; they should only just be slightly jiggly in the center when you take them out of the oven. If you bake them until they are fully set, they’ll end up dry and crumbly. Additionally, be sure that your cream cheese is at room temperature before mixing, as this helps to achieve a smooth and creamy texture.
Helpful tips for better results
For a smoother filling, you can beat the cream cheese and sugar together before adding the eggs—this way, you avoid any lumps. Make sure to mix the filling just until combined after each addition, as overmixing can incorporate too much air and result in cracks in your cheesecake. Lastly, always allow each layer to cool properly before adding the next; this will help maintain their distinct layers.
Variation of Chocolate Covered Strawberry Cheesecake Cups
Suggested variations or twists on the recipe
You can easily customize these cheesecake cups by experimenting with different flavors. For instance, consider adding a layer of peanut butter to the filling or mixing in some lemon zest for a citrusy zing. You could also swap out the strawberries for other fruits like blueberries or raspberries—just make sure they’re fresh for the best flavor.
Adjustments for dietary preferences
If you or your guests have dietary restrictions, there are several ways to adapt this recipe. Use dairy-free cream cheese and swap in coconut cream for a completely dairy-free option. For a gluten-free version, simply use gluten-free graham crackers. Additionally, reduce the sugar for a lower-sugar dessert, or opt for a sugar substitute that can handle baking.
FAQs
What can I do if the dish isn’t turning out right?
If your cheesecake cups are not setting properly or appear too liquidy, they likely need more baking time. Make sure the center is just slightly jiggly, as it will firm up while cooling. If they cracked on the top, reduce the mixing speed while blending the filling to incorporate less air.
Can I make this ahead of time?
Absolutely! These cheesecake cups can be made ahead of time and stored in the refrigerator. They taste even better after chilling, so preparing them a day or two in advance is a great idea. Just remember to add the chocolate strawberries right before serving for the best presentation.
What can I substitute for ingredients?
You can use alternative ingredients based on availability and preferences. For example, Greek yogurt can replace sour cream, and coconut oil can substitute for butter. If you don’t have graham crackers, crushed cookies can work—or try making a crust with ground nuts or oats for a different texture and flavor. Always feel free to get creative with swaps that suit your taste!
With these detailed instructions and helpful tips, you are now fully equipped to create your own Chocolate Covered Strawberry Cheesecake Cups. Enjoy making them for yourself or sharing with friends and family!
Print
Chocolate Covered Strawberry Cheesecake Cups
- Total Time: 2 hours 45 minutes (including chilling)
- Yield: 12 cups 1x
- Diet: Vegetarian
Description
Chocolate Covered Strawberry Cheesecake Cups combine the richness of cheesecake, fresh strawberries, and chocolate in individual servings.
Ingredients
- 14 graham crackers, crushed
- 4 tablespoons melted butter
- 1/4 teaspoon kosher salt
- 2 blocks cream cheese, softened
- 2 large eggs
- 1/2 cup sour cream
- 1/4 cup sugar
- 1 teaspoon vanilla extract
- Pinch of salt
- 1 cup melted semisweet chocolate
- 12 fresh strawberries
Instructions
- Preheat the oven to 325°F (163°C). Line a 12-cup muffin tin with paper liners and spray with non-stick cooking spray.
- In a bowl, mix crushed graham crackers, melted butter, and salt. Press mixture firmly into the bottom of each muffin cup to form crusts.
- In a separate bowl, beat softened cream cheese until fluffy. Add eggs one at a time, mixing after each addition.
- Add sour cream, sugar, vanilla extract, and a pinch of salt. Mix until smooth and well combined.
- Pour cheesecake mixture over each crust, smoothing the tops with a spatula.
- Bake for 20 minutes, until centers are slightly jiggly. Cool in the tin for 15–20 minutes, then refrigerate for at least 2 hours.
- Melt the semisweet chocolate. Spoon it over each chilled cheesecake cup.
- Dip each strawberry in melted chocolate and place on top of each cheesecake cup.
- Chill again until chocolate sets, then serve.
Latest Amazon Finds


Notes
- Use room-temperature cream cheese for a smooth filling.
- Don’t overbake the cheesecakes—centers should jiggle slightly.
- Chill thoroughly before adding chocolate and strawberries.
- Add toppings just before serving for best presentation.
- Prep Time: 25 minutes
- Cook Time: 20 minutes
- Category: Dessert
- Method: Baking
- Cuisine: American
Nutrition
- Serving Size: 1 cup
- Calories: 280
- Sugar: 18g
- Sodium: 170mg
- Fat: 18g
- Saturated Fat: 10g
- Unsaturated Fat: 6g
- Trans Fat: 0g
- Carbohydrates: 23g
- Fiber: 1g
- Protein: 4g
- Cholesterol: 55mg
Keywords: chocolate covered strawberry cheesecake, mini cheesecake cups, strawberry cheesecake bites, chocolate strawberry dessert, no crust cheesecake muffins