

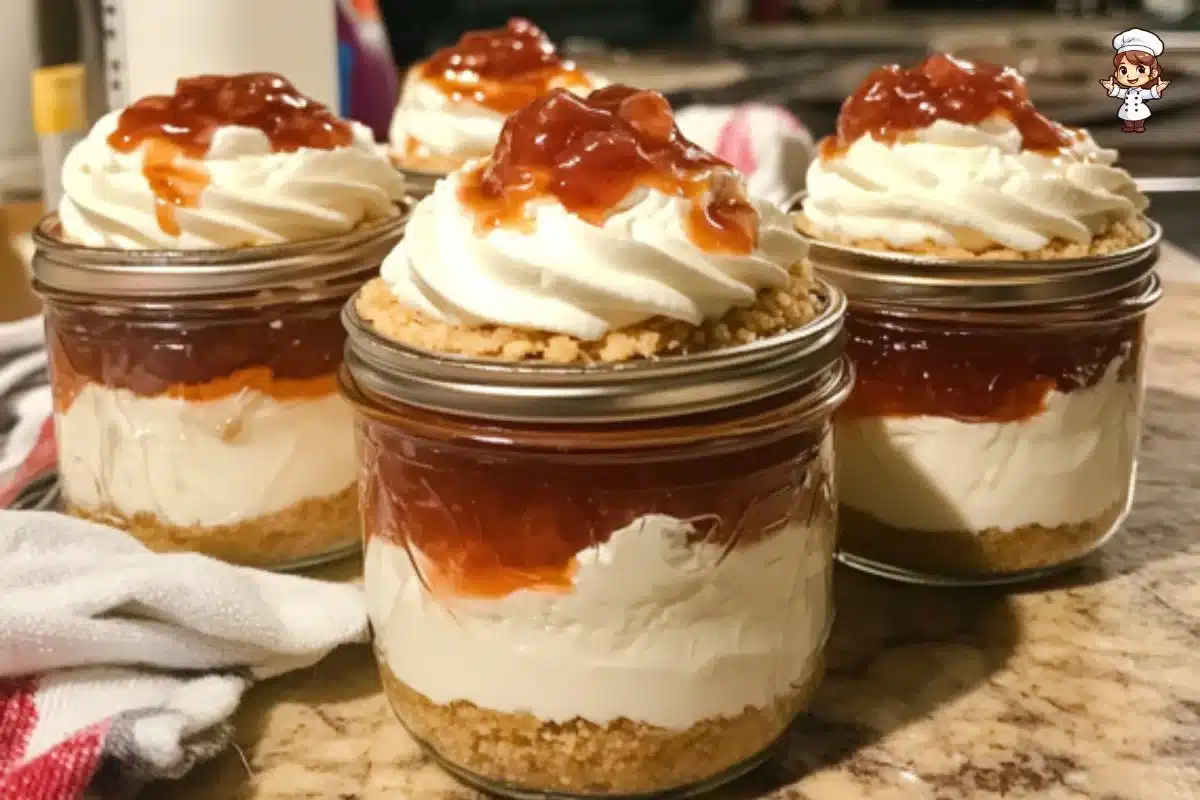
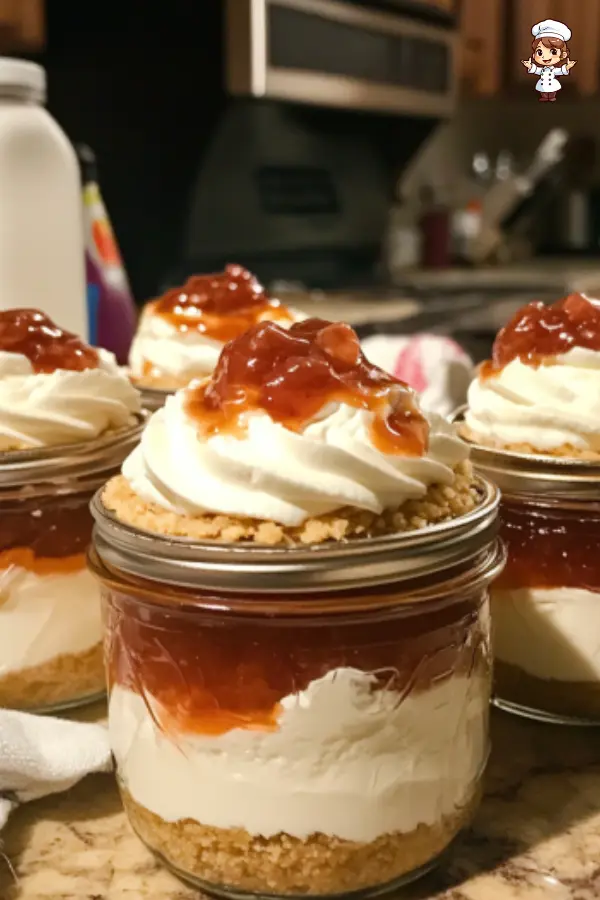
When it comes to desserts, few can rival the simple elegance of cheesecake. No Bake Cheesecake Jars take this beloved treat to the next level, packaging it in cute, individual servings. Not only are these jars a feast for the eyes, but they are also incredibly easy to assemble, making them a perfect choice for gatherings, parties, or simply enjoying at home. The creamy filling layered over a buttery graham cracker crust creates a delightful texture contrast that is bound to please any palate.
Imagine reaching for a jar and encountering the rich, creamy filling that melts in your mouth, topped with your choice of decadent sauces or fresh fruit. The versatility these jars offer is unmatched; you can customize them with various toppings to suit every mood or occasion. Plus, there’s no baking involved! All you need is a handful of simple ingredients and some jars. The no-fuss nature of this recipe ensures that anyone, regardless of their baking skills, can create a stunning dessert that tastes like it came from a five-star restaurant.
Get ready to dive into the world of No Bake Cheesecake Jars and impress everyone with this delightful dessert that is as fun to make as it is to eat!
Ingredients about No Bake Cheesecake Jars
To create your No Bake Cheesecake Jars, you will need a few basic ingredients. Below is a list of everything you need and some substitutions in case you want to make adjustments.
List of ingredients with measurements
- 2 Tablespoons unsalted butter, melted
- 1 cup graham cracker crumbs
- 1 cup heavy cream, cold
- 8 ounces full-fat brick cream cheese, softened
- 1/3 cup granulated sugar
- 2 Tablespoons sour cream, at room temperature
- 1 teaspoon lemon juice
- 1/2 teaspoon pure vanilla extract
- Toppings and garnishes (e.g., chocolate ganache, strawberry topping, blueberry sauce, whipped cream, cherry pie filling, lemon curd, salted caramel)
Optional ingredient substitutions
If you don’t have some of these ingredients on hand, don’t worry! Here are some substitutions you can use:
- Graham cracker crumbs: Use crushed cookies such as digestive biscuits, vanilla wafers, or even oat biscuits as an alternative.
- Unsalted butter: Coconut oil or vegetable oil can be used instead, but the texture may vary slightly.
- Heavy cream: Whipping cream can be substituted, but ensure it is chilled for best results.
- Cream cheese: Neufchâtel cheese is a lighter option, offering a similar flavor.
- Granulated sugar: You can use honey, maple syrup, or a sugar substitute if you want to cut down on sugar intake.


How to Make No Bake Cheesecake Jars
Making No Bake Cheesecake Jars is straightforward and quick. Just follow these steps, and you will have delicious jars ready for chilling.
Step 1: Have your jars ready
Before starting your recipe, gather all the ingredients and have your jars ready. You can use small mason jars, dessert cups, or any glassware you prefer. Make sure they are clean and dry, as this will be where your delicious cheesecake layers will go.
Step 2: Prepare the crust
To make the crust, melt the unsalted butter in a small bowl. Once melted, stir in the graham cracker crumbs until fully combined. The mixture should resemble wet sand. Next, spoon a generous amount of this crumb mixture into each jar, pressing it down gently with the back of a spoon to create an even layer. Once done, set these jars aside while preparing the filling.
Step 3: Make the cheesecake filling
In a mixing bowl, whip the heavy cream until stiff peaks form. This process usually takes about 3-5 minutes with an electric mixer on medium speed. Once whipped, set the cream aside. Next, in a large bowl, beat the softened cream cheese with granulated sugar until smooth and creamy. Add in the sour cream, lemon juice, and vanilla extract, mixing everything until well blended.
Once the cream cheese mixture is smooth, gently fold in the whipped cream. Be careful during this step; you want to maintain that light and airy texture from the whipped cream, so fold slowly until everything is combines and no white streaks remain.
Step 4: Assemble the jars
With your crust and filling ready, you can start layering them in the jars. Spoon the cheesecake filling into each jar over the graham cracker crust. Fill the jars until they’re nearly to the top, leaving some space for your chosen toppings. After you’ve filled all the jars, cover them with lids or plastic wrap and place them in the refrigerator. Chill for a minimum of 30 minutes to allow the flavors to meld together and the cheesecake to set properly.
Step 5: Add toppings when serving
When you’re ready to serve your No Bake Cheesecake Jars, it’s time to get creative with toppings! Whether you prefer a drizzle of chocolate ganache, a fresh fruit sauce, whipped cream, or more, the options are endless. Add your desired toppings on each jar just before serving to keep the crust crunchy and the flavors fresh.
Step 6: Enjoy and store
After adding your toppings, these cheesecake jars are ready to be enjoyed! They can be eaten straight from the jars, making them a convenient dessert option. If you have leftovers, cover the jars and store them in the refrigerator.
How to Serve No Bake Cheesecake Jars
Serving No Bake Cheesecake Jars is as exciting as making them! They are ideal for casual gatherings, festive parties, or even a cozy night in.
Best ways to serve No Bake Cheesecake Jars
These jars can be a delightful centerpiece on your dessert table. Serve them chilled directly from the refrigerator and allow everyone to pick and choose their favorite toppings. You can even create a ‘topping bar’ with various sauces and garnishes, enabling guests to customize their desserts. This interactive aspect makes your gathering even more fun and memorable.
Serving suggestions or pairings
Pair the cheesecake jars with a warm cup of coffee or tea for a comforting end to a meal. For gatherings, consider serving them alongside other mini desserts like brownies, fruit tartlets, or cookies, creating a dessert buffet that will impress your guests.
If you’re feeling festive, you can tailor your toppings for certain occasions – think pumpkin spice for autumn or peppermint for the winter holidays. The options are endless, and the fun lies in the presentation and creativity!
How to Store No Bake Cheesecake Jars
Storing your No Bake Cheesecake Jars properly will help keep them fresh and delicious for days.
Proper storage methods
Once the jars have been assembled, cover them tightly with lids or plastic wrap to prevent any odors from the refrigerator affecting the flavor. They can be stored in the fridge for up to 5 days, thanks to the ingredients used.
Tips for reheating or freezing
There is no need to reheat your No Bake Cheesecake Jars, as they are meant to be enjoyed cold. If you want to make them ahead of time, simply follow the recipe instructions and store them as mentioned. It’s best to avoid freezing these jars, as the texture of the cream cheese may change once thawed. Fresh is always better for this type of dessert!
Tips to Make No Bake Cheesecake Jars
Making the perfect No Bake Cheesecake Jars does have a few tricks that can help ensure your dessert is a success.
Common mistakes to avoid
One common mistake is not using room temperature cream cheese. If your cream cheese is too cold, it will be lumpy and hard to blend smoothly. Additionally, be sure not to over-whip the heavy cream; you want it fluffy and soft, not grainy or turned into butter.
Helpful tips for better results
For a richer flavor, consider adding a tablespoon of your favorite liqueur, like amaretto or Baileys Irish Cream, into the filling. This can elevate the taste and give a unique twist to your jars. Also, be sure to chill your jars for at least 30 minutes to help firm up the filling for a better texture when served.
Variation of No Bake Cheesecake Jars
One of the best things about No Bake Cheesecake Jars is their versatility! You can change them according to preferences or occasions.
Suggested variations or twists on the recipe
Consider splitting the filling base into two separate bowls after mixing it and adding different flavors to each. For instance, you can make a vanilla cheesecake filling in one bowl and a chocolate cheesecake filling in another. Layer alternating flavors in the jars for a visually striking dessert that tastes amazing.
You can also experiment with alternative toppings. Instead of the classic fruit toppings, try crushed cookies, toasted nuts, or even candy for a fun twist!
Adjustments for dietary preferences
To make the recipe gluten-free, simply use gluten-free graham crackers or another gluten-free cookie as a crust. If you’re looking for a lower-calorie or low-sugar option, consider using low-fat cream cheese and a sugar substitute. For vegan options, try using coconut cream and a dairy-free cream cheese alternative, though texture and flavor may vary.
FAQs
When making No Bake Cheesecake Jars, you may encounter some common questions. Here are some answers to guide you.
What can I do if the dish isn’t turning out right?
If your filling appears too runny, it may be because the cream wasn’t whipped enough or the cream cheese was still slightly cold. Try adding more whipped cream or chilling the jars for a little longer. If it’s too thick, gently fold in a splash of milk to loosen it up.
Can I make this ahead of time?
Absolutely! You can prepare the cheesecakes in jars at least a day in advance. Just ensure they are properly stored in the fridge to maintain freshness. If you’re worried about the toppings, consider adding them just before serving to keep the crust’s crunchiness.
What can I substitute for ingredients?
For many ingredients, you have options! As previously mentioned, graham cracker crumbs can be substituted with a variety of cookie options. Heavy cream can be replaced with a lower-fat version, and cream cheese can be exchanged for lighter alternatives. Sugar alternatives are also widely available in different forms to cater to your preferences and dietary needs.
Now you’re ready to create your own No Bake Cheesecake Jars! Dive into this lovely dessert, impressing your family and friends with your easy yet elegant creation. Enjoy every creamy, luscious bite!
Print
No Bake Cheesecake Jars
- Total Time: 50 minutes (includes chilling)
- Yield: 4–6 jars 1x
- Diet: Vegetarian
Description
These No Bake Cheesecake Jars are easy, elegant, and customizable individual desserts layered with a graham cracker crust and creamy cheesecake filling, perfect for parties or everyday indulgence.
Ingredients
- 2 tablespoons unsalted butter, melted
- 1 cup graham cracker crumbs
- 1 cup heavy cream, cold
- 8 ounces full-fat brick cream cheese, softened
- 1/3 cup granulated sugar
- 2 tablespoons sour cream, at room temperature
- 1 teaspoon lemon juice
- 1/2 teaspoon pure vanilla extract
- Toppings and garnishes (e.g., chocolate ganache, strawberry topping, blueberry sauce, whipped cream, cherry pie filling, lemon curd, salted caramel)
Instructions
- Gather clean and dry jars such as mason jars or dessert glasses.
- Melt the butter and mix it with graham cracker crumbs until the texture resembles wet sand.
- Spoon the crumb mixture into each jar and press down gently to form the crust layer.
- Whip cold heavy cream until stiff peaks form, then set aside.
- Beat the softened cream cheese and sugar together until smooth and creamy.
- Add sour cream, lemon juice, and vanilla extract to the cream cheese mixture and mix until well combined.
- Gently fold the whipped cream into the cream cheese mixture until no streaks remain.
- Spoon the cheesecake filling over the crust layer in each jar, filling almost to the top.
- Cover jars with lids or plastic wrap and refrigerate for at least 30 minutes to set.
- Before serving, add desired toppings such as fruit sauces, whipped cream, or chocolate ganache.
Latest Amazon Finds


Notes
- Use room temperature cream cheese for a smooth filling.
- Don’t overwhip the cream to avoid a grainy texture.
- Customize toppings based on the season or occasion.
- Can be made a day ahead and stored in the fridge.
- Not recommended for freezing as texture may change.
- Prep Time: 20 minutes
- Cook Time: 0 minutes
- Category: Dessert
- Method: No Bake
- Cuisine: American
Nutrition
- Serving Size: 1 jar
- Calories: 360
- Sugar: 18g
- Sodium: 210mg
- Fat: 27g
- Saturated Fat: 16g
- Unsaturated Fat: 9g
- Trans Fat: 0g
- Carbohydrates: 25g
- Fiber: 0.5g
- Protein: 4g
- Cholesterol: 75mg
Keywords: no bake cheesecake jars, individual cheesecake, mason jar dessert, mini cheesecake, easy no bake dessert