

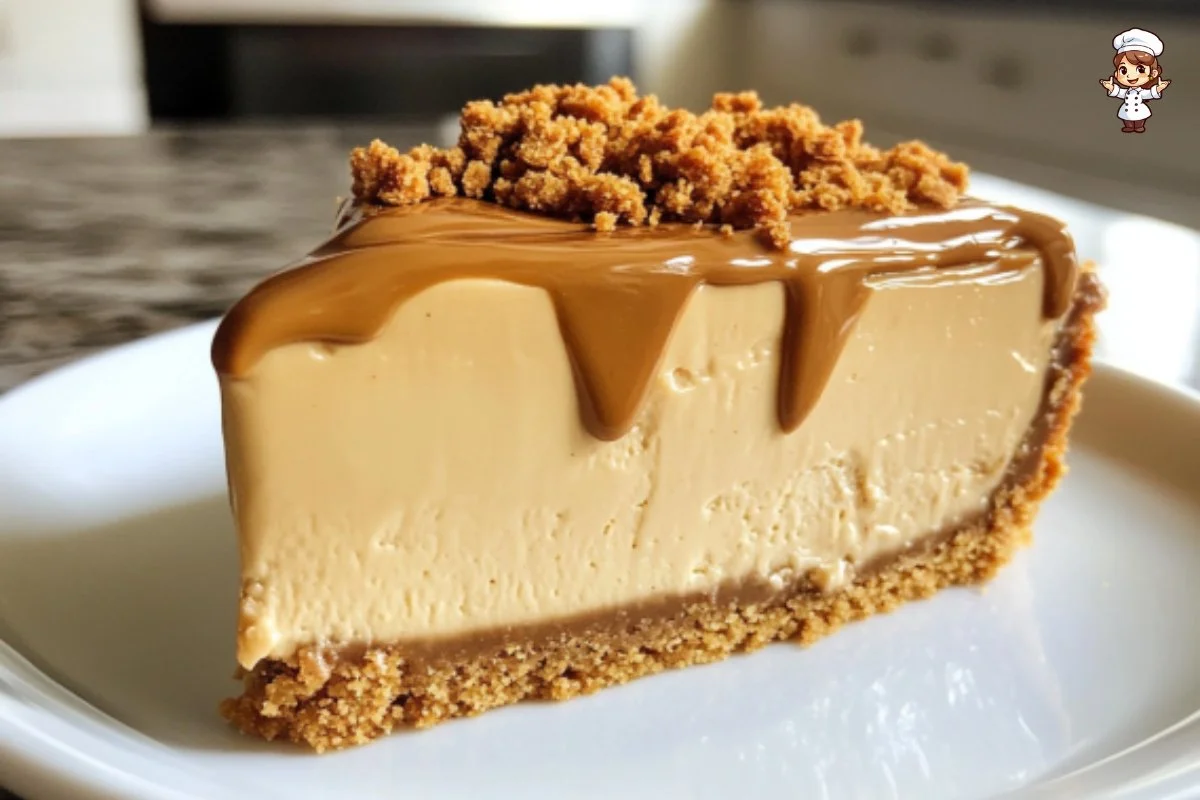
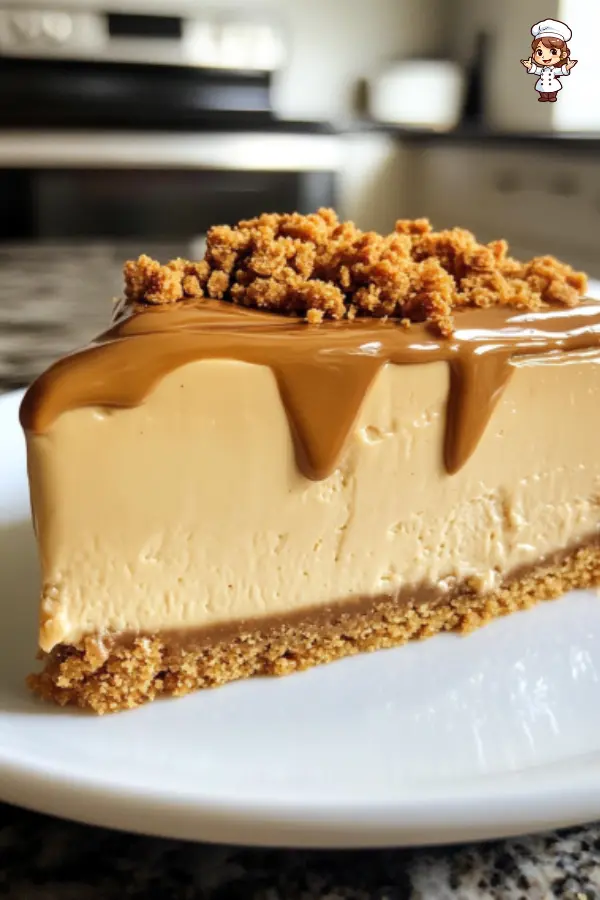
Biscoff Cheesecake is a delightful dessert that perfectly blends the creamy richness of cheesecake with the unique flavors of Biscoff cookies and spread. This no-bake cheesecake is a dream for anyone who loves the caramelized taste of these iconic biscuits. The combination of the crunchy Biscoff crust and the smooth, velvety filling creates a heavenly experience for your taste buds. Whether you’re planning a special celebration or simply want to treat yourself, Biscoff Cheesecake is sure to become a favorite dessert in your home.
The cheesecake is not only visually appealing but also incredibly simple to make. You don’t need to bake it, which means less fuss and more time to enjoy the delicious flavors. Each slice of this cheesecake is rich and creamy, topped with a luscious layer of melted Biscoff spread and garnished with crushed biscuits for added texture. It’s a showstopper that’s ideal for parties, holidays, or just an ordinary day that needs a sweet boost!
Ingredients about Biscoff Cheesecake
List of ingredients with measurements
- 200 g Biscoff biscuits (crushed)
- 80 g unsalted butter (melted)
- 300 ml double cream
- 400 g full-fat cream cheese
- 200 g Biscoff spread (divided into two portions)
- 150 g Biscoff spread (melted for the topping)
- 50 g Biscoff biscuits (for decoration, crushed)
Optional ingredient substitutions
- For a gluten-free version, use gluten-free cookies instead of Biscoff biscuits.
- If you prefer a lower-fat option, you can use low-fat cream cheese, although it may slightly change the texture.
- You can substitute double cream with heavy whipping cream if you want a lighter alternative.


How to Make Biscoff Cheesecake
Step 1: Prepare the base
Start by crushing the Biscoff biscuits into fine crumbs using a food processor or by placing them in a zip-lock bag and rolling over them with a rolling pin. Transfer the crushed biscuits into a bowl, and mix them thoroughly with the melted butter until combined. Press this mixture into the bottom of a springform tin to form an even layer. Make sure to pack it tightly. Once done, put the tin in the fridge to set while preparing the cheesecake filling.
Step 2: Make the cheesecake filling
In a large mixing bowl, pour in the double cream. Add the full-fat cream cheese and half of the Biscoff spread (100 g). Using an electric whisk, mix all the ingredients together until the mixture becomes very thick and reaches a consistency similar to ice cream. This step is crucial; the thicker the mixture, the better your cheesecake will hold its shape.
Step 3: Assemble the cheesecake
Once the cheesecake filling is ready, take the tin out of the fridge. Carefully spoon the thick cheesecake mixture over the chilled biscuit base. Use a spatula or the back of a spoon to smooth out the top evenly. To achieve a flawless finish, you can run the spatula over the top a few times. After this, cover the cheesecake with cling film and return it to the refrigerator to chill for at least 3 hours, or ideally, leave it overnight for best results.
Step 4: Add the final touches
When you are ready to serve, gently melt the remaining Biscoff spread (150 g) in a small saucepan over low heat. Be careful not to let it get too hot; you just want it to be pourable. Once melted, carefully remove the cheesecake from the fridge and pour the warm Biscoff spread over the top, smoothing it out evenly with a spoon. Finally, sprinkle the crushed Biscoff biscuits around the edge of the cheesecake for an attractive finish. Allow it to chill for at least another hour in the fridge before serving for a cleaner cut.
How to Serve Biscoff Cheesecake
Best ways to serve Biscoff Cheesecake
Biscoff Cheesecake is best served chilled straight from the fridge. When ready to serve, you can remove it from the springform tin, slice it carefully, and present it on a beautiful plate. Each slice should reveal the gorgeous layers of biscuity crust and creamy filling topped with luscious melted Biscoff.
Serving suggestions or pairings
You can enhance the dessert experience by serving it with a dollop of whipped cream on the side or a scoop of vanilla ice cream. A drizzle of caramel sauce or a sprinkle of cocoa powder adds a touch of glamour as well. Pair it with a fragrant cup of coffee or tea to complement the flavors beautifully.
How to Store Biscoff Cheesecake
Proper storage methods
Once you have made your Biscoff Cheesecake, it needs to be stored correctly to maintain its freshness. Cover the cheesecake tightly with cling film or place it in an airtight container to avoid absorbing any unwanted odors from the fridge. It’s best to keep it in the refrigerator until you are ready to eat.
Tips for reheating or freezing
Biscoff Cheesecake is a no-bake dessert, so it doesn’t require reheating. However, if you’ve made it in advance, you can freeze the cheesecake to extend its shelf life. To freeze, ensure it is well-covered, and it can last for up to 2 months. When you’re ready to enjoy it, allow it to thaw in the refrigerator overnight before serving.
Tips to Make Biscoff Cheesecake
Common mistakes to avoid
One common mistake is not letting the cheesecake set long enough. For a perfect texture, make sure to give it adequate time in the fridge, ideally overnight, before cutting it. Also, avoid over-whipping the double cream, which can turn it into butter instead of the desired creamy consistency.
Helpful tips for better results
Using room temperature cream cheese helps in blending smoothly with the other ingredients. Before adding it to the bowl, take it out of the fridge about 30 minutes before you start preparing the cheesecake. The result will be a creamier and smoother filling, which contributes to the cheesecake’s overall texture.
Variation of Biscoff Cheesecake
Suggested variations or twists on the recipe
You can get creative with your Biscoff Cheesecake by adding different flavors. Consider incorporating a layer of caramel sauce between the crust and the cheesecake filling for an extra sweet surprise. For chocolate lovers, try mixing in cocoa powder with the cheesecake filling or adding chocolate shavings on top.
Adjustments for dietary preferences
For a vegan version, you can use tofu or cashew cream blended with dairy-free cream cheese and coconut whipping cream. Look for vegan Biscoff alternatives to maintain the flavor while keeping it plant-based. Additionally, consider using a nut-based crust instead of biscuits for a gluten-free option.
FAQs
What can I do if the dish isn’t turning out right?
If your Biscoff Cheesecake isn’t setting properly, it may need more chilling time. Make sure to allow it to chill for several hours or overnight. If you have mixed the filling too aggressively, it may have become too loose, so gentle folding is key.
Can I make this ahead of time?
Absolutely! Biscoff Cheesecake is perfect for making ahead of time. In fact, the flavors only get better as it sits. You can prepare the cheesecake a day or two in advance and store it in the fridge until you are ready to serve.
What can I substitute for ingredients?
If you don’t have Biscoff spread, you can use another spread like Nutella or peanut butter for a different flavor. For the base, graham crackers or digestive biscuits can be a good substitute. Additionally, if you prefer to avoid dairy, look for dairy-free cream cheese and whipping cream alternatives.
In conclusion, Biscoff Cheesecake is a wonderfully easy and delicious dessert that combines the best of everything you love about cheesecake with the unique flavors of Biscoff. With simple steps and a few key ingredients, you’ll be able to whip up this delightful treat for any occasion and impress your friends and family with your baking skills! Enjoy!
Print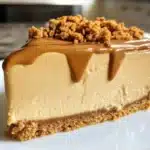
Biscoff Cheesecake
- Total Time: 3 hours 20 minutes
- Yield: 8 servings 1x
- Diet: Vegetarian
Description
Biscoff Cheesecake is a no-bake dessert that combines the creamy richness of cheesecake with the caramelized flavor of Biscoff cookies and spread. Perfect for any occasion!
Ingredients
- 200 g Biscoff biscuits (crushed)
- 80 g unsalted butter (melted)
- 300 ml double cream
- 400 g full-fat cream cheese
- 200 g Biscoff spread (divided into two portions)
- 150 g Biscoff spread (melted for the topping)
- 50 g Biscoff biscuits (for decoration, crushed)
Instructions
- Crush the Biscoff biscuits into fine crumbs. Mix with melted butter and press into the bottom of a springform tin. Chill in the fridge.
- In a large mixing bowl, combine double cream, cream cheese, and half of the Biscoff spread. Use an electric whisk to blend until thick and creamy.
- Spread the cheesecake filling over the biscuit base. Smooth the top and chill for at least 3 hours, or overnight.
- Melt the remaining Biscoff spread and pour over the chilled cheesecake. Garnish with crushed Biscoff biscuits. Chill again for 1 hour before serving.
Latest Amazon Finds


Notes
- Ensure the cheesecake chills long enough to set properly, ideally overnight.
- Avoid over-whipping the cream to prevent it from turning into butter.
- Room temperature cream cheese ensures smoother blending.
- If desired, add a layer of caramel sauce for extra flavor.
- Prep Time: 20 minutes
- Cook Time: 0 minutes
- Category: Dessert
- Method: No-bake
- Cuisine: American
Nutrition
- Serving Size: 1 slice (1/8 of the cheesecake)
- Calories: 400
- Sugar: 24g
- Sodium: 150mg
- Fat: 30g
- Saturated Fat: 15g
- Unsaturated Fat: 10g
- Trans Fat: 0g
- Carbohydrates: 35g
- Fiber: 2g
- Protein: 5g
- Cholesterol: 80mg
Keywords: Biscoff cheesecake, no-bake cheesecake, Biscoff dessert, caramel cheesecake, cheesecake recipe, easy cheesecake, Biscoff spread