

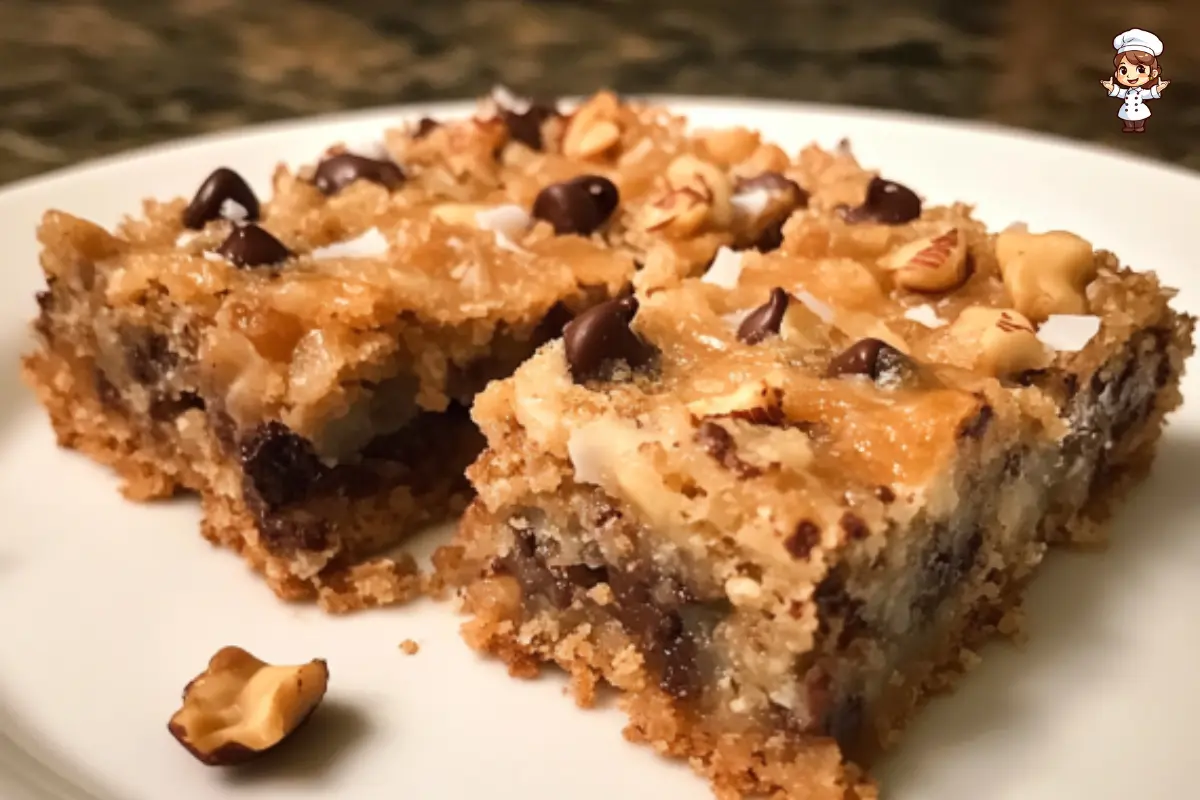
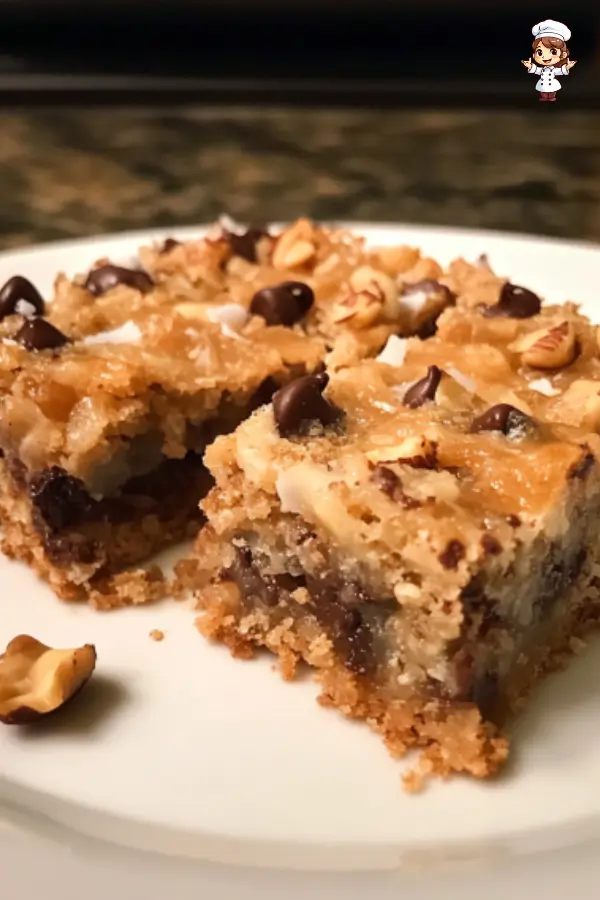
Hello Dolly Bars are a nostalgic, go-to dessert that takes almost no time to whip up but delivers big-time flavor. Whether you’re making them for a holiday party, a simple afternoon snack, or as a sweet surprise for friends and family, these gooey, chocolatey bars have become a favorite in kitchens everywhere. Made with layers of rich chocolate chips, sweetened coconut, and condensed milk, Hello Dolly Bars are simple to make but oh-so-satisfying.
In this article, we’ll dive into the sweet details of these classic bars, from their origins and key ingredients to step-by-step instructions on how to make them at home. We’ll also explore ways to customize the recipe, answer common questions, and share expert tips to make sure your Hello Dolly Bars turn out perfect every time. Ready to dive in? Let’s get started!
The Key Ingredients of Hello Dolly Bars
Graham Cracker Crumbs: Why They’re the Base of the Bars
When it comes to Hello Dolly Bars, the graham cracker crust is a must-have foundation. Why? Well, it’s not only easy to make, but it also adds a wonderful crunch that complements the gooey layers on top. The graham cracker crumbs mix perfectly with the melted butter, giving the bars their crispy, buttery base. Once baked, this crust holds everything together, acting as the perfect support for all the delicious layers.
You’ll need about 1 ½ cups of graham cracker crumbs for a 9×13-inch baking dish. The key is to press the crumbs down firmly into the pan, ensuring the crust doesn’t fall apart when you cut into it later. The butter helps everything stick together, creating that rich, crumbly texture that balances out the sweetness of the other ingredients.
Condensed Milk: The Magic That Holds Everything Together
Next up, we have sweetened condensed milk. Now, this is the secret ingredient that makes Hello Dolly Bars so irresistible. The condensed milk, when baked, caramelizes and soaks into the other ingredients, binding them together into one gooey, sweet, and sticky treat. It’s what gives the bars their signature chewiness. Without it, you’d have a collection of ingredients that would just fall apart.
You’ll want to use a full 14-ounce can of condensed milk, drizzling half of it over the graham cracker crust before layering on the chocolate, coconut, and nuts. Once you bake the bars, the milk will seep into every nook and cranny, ensuring each bite is as moist and delicious as the last. Don’t skip this ingredient—it’s a game-changer!
Chocolate Chips: The Heart of the Flavor Profile
Let’s talk chocolate. No Hello Dolly Bars would be complete without chocolate chips. You can use semi-sweet chocolate chips, which are the most popular choice, or go for dark chocolate if you prefer something a bit richer. The chocolate chips melt beautifully as the bars bake, creating little pockets of gooey, melt-in-your-mouth goodness.
If you’re a chocolate lover, feel free to get creative with your chips. Add white chocolate chips, butterscotch chips, or even peanut butter chips to create a more complex flavor profile. The beauty of Hello Dolly Bars is that they are incredibly customizable. So, no matter your chocolate preference, there’s always a way to make these bars even more delicious.


Step-by-Step Guide to Making Hello Dolly Bars
Prepping the Crust: How to Create the Perfect Graham Cracker Base
Making Hello Dolly Bars begins with the crust. To start, melt ½ cup of butter in a bowl. Once it’s melted, mix in your 1 ½ cups of graham cracker crumbs. Stir them together until the crumbs are evenly coated in butter. This is the crucial step that gives the crust its rich, buttery flavor. Next, press this mixture firmly into the bottom of a 9×13-inch baking dish. You want it to be nice and compact, so the crust holds up when the bars bake.
Once you’ve pressed the crumbs down, you’re ready for the next step. The crust should be evenly spread and free from gaps. You can use the back of a spoon to smooth it out and make sure it’s packed tight. It’s simple, but it’s the key to creating a solid base for the rest of your bars.
Layering the Ingredients: Tips on Spreading and Arranging for Best Texture
Now, it’s time for the fun part: layering the ingredients. Begin by pouring half of the condensed milk evenly over the graham cracker crust. This will help everything stick and provide that luscious, gooey texture we all love. After that, add your chocolate chips, spreading them out evenly. Don’t be shy—use a generous amount so that every bite is filled with chocolatey goodness.
Next, sprinkle on the chopped walnuts or pecans, followed by a generous layer of shredded coconut. The coconut adds a lovely chewiness that balances out the crunchy texture of the nuts and the chocolate. Finally, drizzle the remaining half of the sweetened condensed milk over the top. It’s like the final step of making a perfect sandwich—everything gets just the right amount of sweetness to tie it all together.
Baking Tips: The Importance of Timing and Temperature for the Best Results
Once everything is layered in the dish, it’s time to pop the bars into the oven. Preheat your oven to 325°F (165°C) and bake the bars for about 25 to 30 minutes. You’ll know they’re ready when the coconut on top turns golden brown and the edges of the crust start to crisp up. Don’t open the oven door too often—let the bars bake undisturbed so they can set properly.
One important tip: resist the urge to overbake. If you leave them in the oven too long, the bars could dry out, and that gooey center is part of the magic. Check them around the 25-minute mark to ensure they’re just right.
Cooling and Serving: Why You Should Refrigerate for Better Flavor and Ease
Once the bars are done, let them cool completely in the baking dish. While you might be tempted to dig in right away, you’ll get better results if you let them cool and even refrigerate them for about an hour. Refrigerating the bars helps them set, making them easier to cut into neat squares. It also intensifies the flavors, giving the chocolate and coconut a little extra time to meld together.
Once they’re chilled, slice them into squares and serve! These bars are perfect for sharing with friends and family or as a sweet treat after dinner. They also store really well, so you can keep them in an airtight container for up to 3 days (though I bet they won’t last that long).
Variations of Hello Dolly Bars
Customizing with Different Nuts: Pecans vs. Walnuts vs. Cashews
One of the best things about Hello Dolly Bars is how customizable they are. While the classic recipe calls for pecans, you can easily swap them out for other nuts to suit your tastes or what you have on hand. Walnuts are another excellent choice— they add a slightly softer, more earthy flavor compared to pecans. If you’re looking for a bit more richness, try adding cashews— their buttery texture works wonderfully in these bars.
Mixing and matching nuts is a fun way to make the recipe your own. Want to add a bit of crunch or extra texture? Try almonds or even macadamia nuts. The variety of nuts not only changes the flavor but also the texture, giving you a delightful crunch in every bite. Experiment with what you like best and make these bars even more unique!
Chocolate Chip Substitutes: White Chocolate, Butterscotch, or Peanut Butter Chips
Of course, no Hello Dolly Bars would be complete without chocolate, but you don’t have to stick to semi-sweet chocolate chips every time. Want to mix it up? Try white chocolate chips for a creamier, sweeter taste that pairs perfectly with the coconut and nuts. Or, if you love the flavor of caramel, butterscotch chips can add a lovely richness that contrasts nicely with the sweetened condensed milk.
For those who love peanut butter, peanut butter chips are another fantastic option. They add a hint of saltiness and flavor that complements the sweet coconut and chocolate layers. There’s really no wrong way to go about it—every variation will result in a deliciously decadent treat!
Making It Gluten-Free: How to Adjust for Dietary Needs
If you’re looking to make these Hello Dolly Bars gluten-free, it’s totally possible with a few easy swaps. Start by using gluten-free graham cracker crumbs or any gluten-free cookie crumbs as a base for the crust. Most gluten-free cookies will work just as well. Additionally, check the other ingredients like chocolate chips and condensed milk to make sure they are free from gluten (most brands are, but it’s always good to double-check).
With these small adjustments, you can enjoy the gooey goodness of Hello Dolly Bars without worrying about gluten. They’ll still taste just as amazing and will be loved by everyone, whether or not they follow a gluten-free diet.
For more delicious recipes, check out our other treats, like the Chocolate Chip Cheesecake Cookies.
Expert Tips and Tricks for Perfect Hello Dolly Bars
Baking Secrets: How to Avoid Soggy Crusts and Achieve That Golden Top
If you’ve ever made Hello Dolly Bars and found that the crust didn’t hold up or the top didn’t brown as you expected, don’t worry—you’re not alone! The key to a great crust is to press the graham cracker crumbs down firmly into the pan before baking. You want the crust to be compact so it doesn’t crumble apart when you cut the bars later.
When baking, make sure to keep an eye on the bars in the last 5 minutes of cooking time. The coconut on top should turn golden brown, but you don’t want to over-bake them. If you do, you might lose that gooey texture that makes Hello Dolly Bars so irresistible.
Storage and Freshness: How to Store for Maximum Flavor
The trick to keeping Hello Dolly Bars fresh is simple: refrigerate them! Once they’ve cooled, store them in an airtight container in the fridge. The cold helps the bars set and allows the flavors to develop even more. Plus, the bars are easier to cut into neat squares after they’ve been chilled.
If you’ve made a big batch and want them to last even longer, consider freezing them. Just make sure to wrap them well in plastic wrap before placing them in a freezer-safe container. When you’re ready to enjoy them, simply thaw them in the fridge for a few hours.
Presentation Ideas: Making Your Bars Look as Good as They Taste
While Hello Dolly Bars are delicious on their own, a little extra presentation can take them to the next level. For a festive touch, consider sprinkling some extra toasted coconut on top before serving or even adding a drizzle of caramel sauce. You can also top each square with a few chocolate shavings or colored sprinkles for a fun, playful look.
Presentation isn’t just about looks—it enhances the experience of enjoying the bars. Try placing them on a decorative tray or serving plate, and watch how they become the star of the show at any gathering!
Frequently Asked Questions (FAQs)
Can I Substitute the Condensed Milk with Anything Else?
While sweetened condensed milk is the heart of Hello Dolly Bars, if you’re looking for an alternative, it’s possible to make a substitution. You can try evaporated milk mixed with sugar to replicate the texture and sweetness of condensed milk, though the flavor will be slightly different. If you’re aiming for a dairy-free version, some people use coconut milk or coconut cream to mimic the richness and sweetness of condensed milk. However, the end result might have a slight coconut flavor, which can work nicely with the coconut flakes in the recipe.
That said, if you’re not constrained by dietary needs, the best choice is still good old sweetened condensed milk. It delivers the right texture and taste that makes Hello Dolly Bars so irresistible.
What If I Don’t Like Coconut? Can I Leave It Out?
Coconut is a signature ingredient in Hello Dolly Bars, contributing both texture and flavor. However, if you’re not a fan, you can absolutely leave it out! Simply increase the amount of chocolate chips or nuts to make up for the volume. You could also swap the coconut with other ingredients like toffee bits or even dried fruits like cranberries for a new twist. The bars will still be delicious—just a little different, but definitely still amazing!
How Do I Store Hello Dolly Bars? Can They Be Frozen?
Hello Dolly Bars store very well, making them perfect for prepping ahead. Once they’ve cooled, you can store them in an airtight container at room temperature for up to 3 days. If you live in a warm climate, or just prefer your treats chilled, keep them in the fridge. In fact, many people say they taste even better after a day or two in the fridge as the flavors have time to meld together.
If you need to store them for a longer period, you can freeze the bars! Simply cut them into squares, place them in an airtight container, and freeze for up to 2 months. When you’re ready to enjoy them, let them thaw in the fridge or at room temperature. They’ll still be just as delicious when they come out of the freezer.
How Can I Make Hello Dolly Bars Vegan or Dairy-Free?
Making Hello Dolly Bars vegan or dairy-free is a breeze with a few simple swaps. Start by replacing the sweetened condensed milk with a plant-based version—many brands now offer coconut-based condensed milk alternatives. For the crust, use a dairy-free butter or even coconut oil. Additionally, you can swap regular chocolate chips for dairy-free chocolate chips and choose a plant-based milk to drizzle over the bars if needed.
These small changes ensure that your Hello Dolly Bars are vegan-friendly without sacrificing flavor. You can still enjoy all the gooey, chewy goodness of the original recipe, just tailored to your dietary preferences!
Print
Hello Dolly Bars
- Total Time: 40 minutes
- Yield: 12 servings 1x
- Diet: Vegetarian
Description
Hello Dolly Bars are delicious seven-layer cookie bars made with chocolate chips, coconut, nuts, and sweetened condensed milk, all layered over a graham cracker crust.
Ingredients
- 1 ½ cups graham cracker crumbs
- ½ cup butter, melted
- 1 (14 ounce) can sweetened condensed milk
- 1 ½ cups semi-sweet chocolate chips
- 1 cup chopped walnuts
- 1 cup shredded coconut
- ½ cup white chocolate chips
Instructions
- Preheat the oven to 325°F (165°C).
- Mix graham cracker crumbs and melted butter until evenly moistened. Press into the bottom of a 9×13-inch baking dish.
- Pour half of the sweetened condensed milk over the graham cracker crust.
- Sprinkle semi-sweet chocolate chips, walnuts, shredded coconut, and white chocolate chips over the crust. Gently press into the crust.
- Drizzle the remaining half of the condensed milk over the top.
- Bake for 25-30 minutes until the coconut is golden brown and the edges of the crust are crispy.
- Cool completely before cutting into squares. Refrigerating for at least an hour helps set the bars.
Latest Amazon Finds


Notes
- You can substitute the nuts for pecans or cashews depending on your preference.
- If you’re not a fan of coconut, you can skip it or use dried fruits like cranberries for a different texture.
- Store the bars in an airtight container at room temperature for up to 3 days, or refrigerate them for a longer shelf life.
- To make them gluten-free, use gluten-free graham cracker crumbs or cookie crumbs.
- Prep Time: 10 minutes
- Cook Time: 30 minutes
- Category: Dessert
- Method: Baking
- Cuisine: American
Nutrition
- Serving Size: 1 bar
- Calories: 350
- Sugar: 28g
- Sodium: 45mg
- Fat: 22g
- Saturated Fat: 7g
- Unsaturated Fat: 12g
- Trans Fat: 0g
- Carbohydrates: 36g
- Fiber: 3g
- Protein: 3g
- Cholesterol: 20mg
Keywords: Hello Dolly Bars, Seven-layer bars, Magic cookie bars, Chocolate coconut bars, Easy dessert bars