

A cherry tart is a sweet and elegant dessert that combines a crispy crust with a smooth, creamy filling and the bright, juicy flavor of cherries. Whether you’re a seasoned baker or just getting started, making a cherry tart can be both fun and rewarding. In this guide, we’ll explore everything you need to know about creating the perfect cherry tart, from the crust to the filling and some delicious variations. Let’s get started!
Key Ingredients for Cherry Tart
Main Ingredients for the Tart Crust
The crust is the foundation of any cherry tart, and it’s just as important as the filling. For this recipe, you’ll use a simple and quick buttery tart crust that doesn’t require refrigeration or rolling, which makes the process much easier, especially for beginners. The key ingredients for the crust are unsalted butter, granulated sugar, all-purpose flour, and a pinch of salt.
A secret ingredient in this crust is ground almonds (or almond flour), which help prevent the crust from becoming soggy. The almonds also give the crust a subtle nutty flavor that pairs beautifully with the sweet cherries. This no-fuss crust is soft and easy to handle, and it bakes up into a perfectly crisp base for your cherry tart.
Cherry Filling Ingredients
Now, let’s move on to the star of the show: the cherry filling. For the best cherry tart, you’ll need fresh cherries (although you can use frozen ones too if fresh isn’t available). About 1 pound of cherries, pitted and halved, will fill your tart beautifully.
To make the filling, you’ll need a few simple ingredients: heavy cream, eggs, and sugar. The cream adds a luscious, smooth texture to the filling, while the eggs bind everything together to create a custard-like consistency. Vanilla extract adds a rich flavor that complements the cherries, and a small amount of flour helps thicken the custard filling as it bakes. The mixture is quick to make and comes together in minutes.


Preparing the Tart Crust
Making the Perfect Tart Dough
Making a perfect cherry tart starts with preparing the crust. In a large mixing bowl, combine melted butter and granulated sugar. Stir them together until they form a smooth, creamy mixture. Then, add all-purpose flour and a pinch of salt. It’s important not to overmix this dough—just stir until it forms a soft dough that is smooth but not sticky.
Once the dough is ready, it’s time to press it into your tart pan. You’ll want to spread small pieces of dough evenly across the bottom of the pan, making sure to cover the sides as well. Use your floured fingers to gently press the dough into place, starting with the edges and working your way to the center. Don’t worry if it seems like there’s not enough dough—it will work out. The dough will spread and cover the tart pan without needing to be rolled out.
Blind Baking the Tart Shell
Blind baking is a crucial step to ensure that your crust stays crispy and doesn’t become soggy when filled with the custard. To do this, simply place the tart shell in a preheated oven at 350°F (175°C) and bake for about 15-18 minutes, or until the crust starts to turn golden brown. This initial bake helps set the crust, so it holds up well once you add the cherry filling.
After blind baking, remove the tart shell from the oven and sprinkle ground almonds or almond flour over the base. This extra layer acts as a barrier, preventing the filling from making the crust soggy. Return the tart to the oven for a final 5–7 minutes to ensure the crust is fully set. Let it cool slightly before filling it with the delicious cherry filling.
Preparing the Cherry Filling
Choosing the Right Cherries for Your Tart
When making a cherry tart, selecting the right cherries is crucial for achieving the best flavor. Fresh cherries are highly recommended, as their juicy sweetness perfectly complements the creamy filling. You can use sweet cherries like Bing cherries for a more mellow flavor, or tart cherries like Montmorency cherries for a bit of tanginess.
If fresh cherries are unavailable, frozen cherries can work just as well, though you’ll need to thaw them and drain any excess moisture to prevent a soggy tart. Be sure to pit your cherries before using them in the filling—this will ensure a smooth, hassle-free eating experience.
Preparing the Cherry Filling
Once your cherries are prepped, it’s time to make the filling. The beauty of this cherry tart is that the filling is incredibly simple to prepare. In a bowl, combine heavy cream, eggs, sugar, and a bit of flour. This mixture will create a custard-like texture that will hold the cherries in place and give the tart its creamy consistency.
Whisk the ingredients together until they’re fully incorporated, but be careful not to overbeat the mixture. You want a smooth, thick filling—not too airy. Afterward, place the pitted cherries evenly into the pre-baked tart shell. Make sure there’s space between the cherries for the custard to fill in. Pour the prepared custard over the cherries, gently spreading it out so the filling covers them evenly.
Assembling and Baking the Cherry Tart
Layering the Cherry Filling
Now that you have the crust and filling ready, it’s time to assemble your cherry tart. First, pour the custard mixture over the cherries, ensuring an even distribution. You may need to gently tap the pan to make sure the custard settles into all the spaces between the cherries. Don’t overfill—leave a small gap at the top to allow the tart to bake evenly.
The key to a beautiful cherry tart is making sure the cherries are arranged nicely and the custard is poured slowly to prevent spilling. If necessary, you can gently press down on the cherries to make sure they are nestled into the custard. This will ensure that the tart holds its shape after baking.
Baking the Cherry Tart
With your tart fully assembled, it’s time to bake it! Place the tart in a preheated oven at 350°F (175°C) and bake for 40–50 minutes. During this time, the custard will set, and the cherry filling will start to bubble gently. You’ll know the cherry tart is done when the custard is barely firm and still slightly wobbly in the center. This ensures a creamy texture that will continue to set as the tart cools.
After baking, allow the tart to cool for at least 30 minutes on a wire rack. Once it’s cooled to room temperature, you can refrigerate it for about 1-2 hours to let the filling set even further. This step is crucial for getting the smooth, silky custard texture that makes this tart so irresistible.
For more delicious dessert ideas, be sure to check out our recipe for Peach Tart—another fruity delight perfect for summer gatherings!
Serving and Storing Cherry Tarts
Serving Cherry Tarts
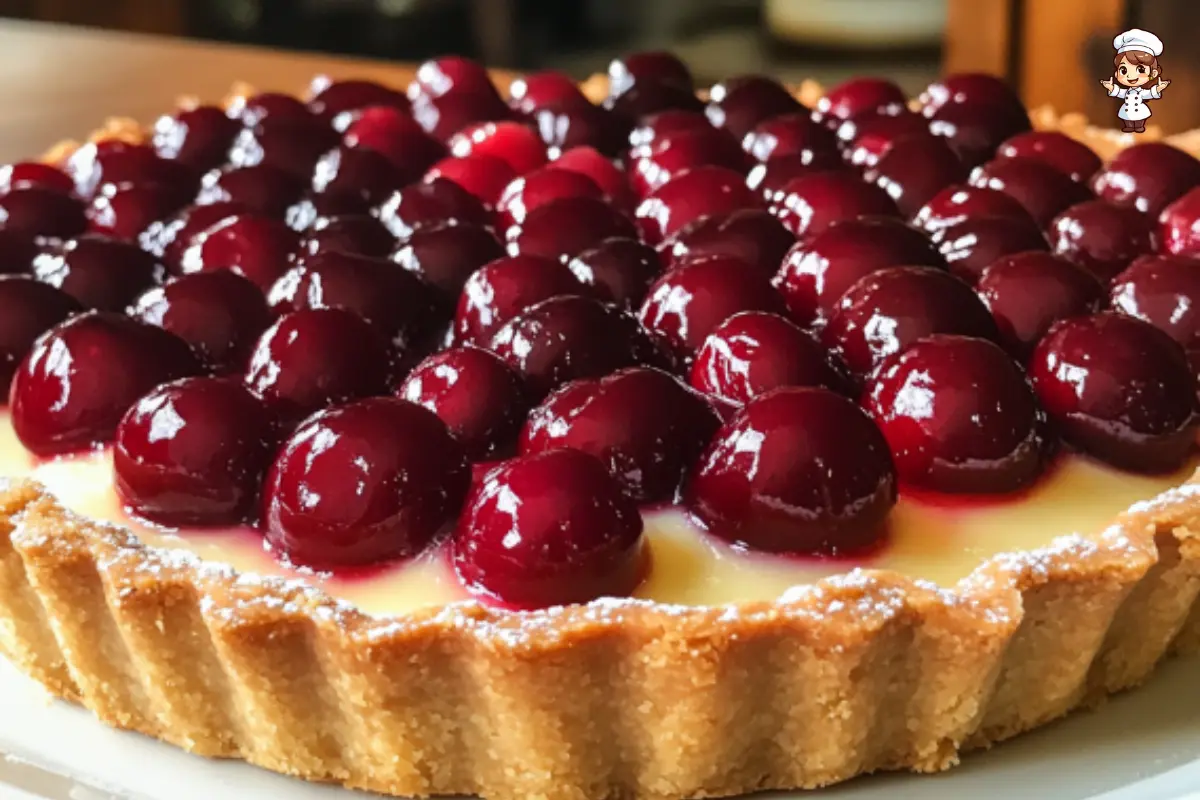
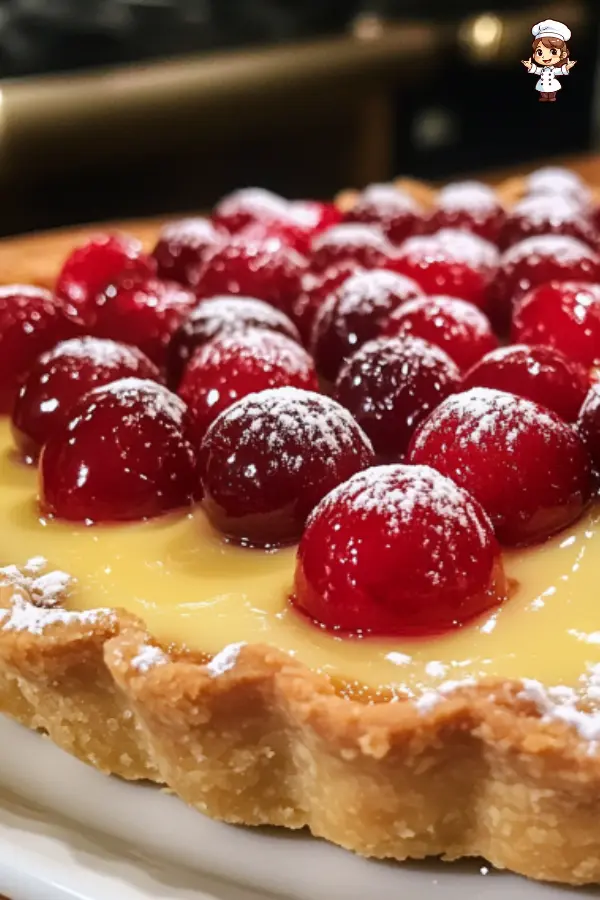
Once your cherry tart has cooled, it’s time to enjoy! The best way to serve this tart is chilled, as the filling firms up beautifully when refrigerated. Simply slice it into wedges, and for an extra touch, dust the top with some powdered sugar. This not only adds a bit of sweetness but also makes the tart look more elegant.
For a richer experience, consider serving your cherry tart with a dollop of whipped cream, a scoop of vanilla ice cream, or even a drizzle of chocolate sauce. You could also pair it with a warm cup of coffee or tea for a delightful dessert experience. The balance between the creamy filling, sweet cherries, and the crispy crust will surely impress your guests.
Storing Leftovers
If you happen to have leftovers (though that’s unlikely!), storing your cherry tart is easy. Let it cool completely, then cover it with plastic wrap or store it in an airtight container. You can refrigerate it for up to 3 days. To keep the crust from becoming soggy, it’s best to let the tart sit uncovered for a little while before storing.
For longer storage, you can freeze the tart for up to 3 months. Be sure to wrap it tightly in plastic wrap and then foil to prevent freezer burn. When you’re ready to enjoy it again, simply thaw it in the fridge overnight and reheat it in the oven for about 10–15 minutes at 300°F (150°C) to restore the crispness of the crust.
FAQs About Cherry Tarts
Can I make Cherry Tarts ahead of time?
Absolutely! You can prepare the crust and filling in advance. The tart dough can be made the day before and stored in the fridge, and the cherry filling can also be prepped ahead. Simply assemble the cherry tart the day you plan to bake it for the freshest flavor. If you’re short on time, you can even bake the tart the day before and refrigerate it overnight.
Can I use frozen cherries for my Cherry Tart?
Yes, you can use frozen cherries in this recipe. However, be sure to thaw them and drain the excess liquid before using them in the filling. This will prevent the tart from becoming too watery. The flavor of fresh cherries is ideal, but frozen cherries work perfectly fine when fresh isn’t in season.
How do I prevent the tart crust from becoming soggy?
To keep your cherry tart crust crispy, blind baking the crust is key. This process ensures the crust stays firm and golden, even when filled with juicy cherries. Another trick is to sprinkle some ground almonds or almond flour over the crust before adding the cherry filling. This forms a barrier that helps absorb excess moisture and keeps the crust crisp. Additionally, be sure to let the tart cool slightly before cutting into it to prevent the filling from seeping into the crust.
For more delightful dessert ideas, check out our recipe for Peach Tart—another sweet and fruit-filled treat!
Print
Perfect Cherry Tart
- Total Time: 1 hour 5 minutes
- Yield: 8 servings 1x
- Diet: Vegetarian
Description
A delicious *cherry tart* made with a buttery, flaky crust, fresh cherries, and a creamy filling. Perfect for any occasion or as a special treat.
Ingredients
- ½ cup unsalted butter, melted and cooled
- 7 tablespoons sugar (scant ½ cup)
- 1 ¼ cups all-purpose flour
- Pinch of salt
- 2 tablespoons finely ground almonds or almond flour
- ¾ cup heavy cream
- 2 eggs (fresh, at room temperature)
- 1 teaspoon vanilla extract
- 3 tablespoons granulated sugar
- 2 tablespoons all-purpose flour
- 1 pound cherries, pitted (fresh preferred)
Instructions
- Preheat the oven to 350°F (180°C). Prepare a 9-inch round tart pan with a removable bottom.
- Pit the cherries and set them aside.
- For the crust, stir together melted butter and sugar in a large mixing bowl. Add flour, a pinch of salt, and ground almonds or almond flour. Mix until dough is formed.
- Press the dough into the tart pan, covering the base and sides evenly. Bake for 15-18 minutes until golden brown.
- For the filling, whisk together heavy cream, eggs, vanilla extract, sugar, and flour until smooth. Pour this custard mixture evenly over the baked crust.
- Arrange the pitted cherries evenly over the filling.
- Return the tart to the oven and bake for 40-50 minutes until the custard is firm but slightly jiggly in the center.
- Remove the tart from the oven and let it cool completely on a wire rack. Chill in the fridge for 1-2 hours before serving.
- Optional: Dust the cooled tart with powdered sugar and top with extra cherries before serving.
Latest Amazon Finds


Notes
- Fresh cherries are highly recommended for the best flavor.
- For a richer tart, you can add a few teaspoons of *almond extract* to the filling.
- To make individual tarts, divide the crust and filling among four mini tart pans.
- If you use frozen cherries, ensure to thaw and drain them to avoid excess moisture.
- Prep Time: 20 minutes
- Cook Time: 45 minutes
- Category: Dessert
- Method: Baking
- Cuisine: French
Nutrition
- Serving Size: 1 slice
- Calories: 300
- Sugar: 22g
- Sodium: 150mg
- Fat: 16g
- Saturated Fat: 7g
- Unsaturated Fat: 9g
- Trans Fat: 0g
- Carbohydrates: 36g
- Fiber: 3g
- Protein: 3g
- Cholesterol: 35mg
Keywords: Cherry tart, cherry dessert, cherry custard tart, easy cherry tart, homemade cherry tart, tart with fresh cherries