


Peach tarts are the ultimate summer dessert, offering a perfect combination of flaky pastry, sweet peaches, and a smooth, creamy filling. Whether you’re celebrating a special occasion, hosting a dinner party, or simply craving something delicious, a peach tart is sure to impress. This guide will take you through the essential ingredients, preparation steps, and some fun variations to elevate your tart. By the end of it, you’ll be able to make a perfect peach tart that will steal the spotlight at any gathering!
Key Ingredients for Peach Tart
Main Ingredients for the Tart Crust
To make the perfect peach tart, the crust is just as important as the filling. For a flaky, buttery texture, we’ll use puff pastry. This is a fantastic choice because it puffs up beautifully in the oven, creating those crisp, delicate layers that contrast perfectly with the juicy peaches. You’ll need one sheet of frozen puff pastry for this recipe, which you can easily find in most grocery stores.
If you’re feeling ambitious, you can opt to make your own tart crust, but the store-bought puff pastry works perfectly well and saves you time. Just be sure to let it thaw before rolling it out. Once it’s rolled into the right shape, it will provide a wonderfully crisp foundation for your peach tart.
Peach Filling Ingredients
For the peach filling, it’s best to use fresh peaches—either freestone or clingstone varieties. While both will work, freestone peaches are easier to pit and slice. You’ll need about 4-5 peaches, peeled and sliced into thin pieces. Their natural sweetness pairs beautifully with the spices we’ll add.
To enhance the peach flavor, we’ll need a bit of white sugar and lemon juice. The sugar helps draw out the juices from the peaches, while the lemon juice adds a touch of tartness that balances the sweetness. A pinch of cinnamon or nutmeg can also be added for that warm, comforting flavor. For an extra smooth finish, a glaze made from apricot or peach preserves can be drizzled on top after baking.


Preparing the Tart Crust
Making the Perfect Tart Dough
While peach tarts are easy to make, the crust plays a vital role in ensuring it turns out perfect. If you’re using store-bought puff pastry, simply unroll the sheet and place it in your tart pan. The goal is to create a crisp, golden base to support the filling. Gently press the dough into the corners and edges of the tart pan, ensuring there are no gaps.
If there’s any excess dough, trim it away with a sharp knife to create a neat, even edge. If you’re feeling fancy, you can also crimp the edges of the dough with a fork to give it a decorative look. To make sure your peach tart crust doesn’t become soggy from the filling, it’s important to blind bake it.
Blind Baking the Tart Shell
Blind baking is a simple yet crucial step for achieving a crispy crust. Begin by lining the tart shell with parchment paper or aluminum foil. Add pie weights or dried beans on top to prevent the crust from puffing up while it bakes. Preheat your oven to 375°F (190°C), then bake the crust for about 10–12 minutes. After that, remove the weights and the lining, and bake for an additional 5–7 minutes until the crust turns lightly golden.
This process ensures that the peach tart crust will stay crisp even after the juicy peaches are added. Once the tart shell is baked, remove it from the oven and let it cool slightly before adding the filling. You’re now ready to move on to preparing the delicious peach filling!
Preparing the Peach Filling
Choosing the Right Peaches for Your Tart
The type of peaches you choose for your peach tart plays a crucial role in the flavor and texture of your dessert. Freestone peaches are ideal because they’re easy to pit and slice, making the preparation process much smoother. These peaches have a tender flesh and a slightly sweet taste that works wonderfully in baked goods. However, you can also use clingstone peaches, though they’re a bit harder to slice and pit.
When selecting peaches, look for fruits that are ripe but not overly soft. You want the peaches to hold their shape when baked, yet still have that juicy sweetness that will complement the crispy tart crust.
Slicing and Preparing the Peaches
To make the peach tart visually appealing, slice the peaches thinly. This helps create an even layer that bakes uniformly. Use a sharp knife to carefully slice the peaches into 1/4-inch thick pieces. If the peaches are too ripe, they might become mushy during baking, so aim for firm but ripe fruit for the best results.
Once sliced, place the peaches in a bowl and sprinkle with white sugar and lemon juice. The sugar will draw out the juices from the peaches, while the lemon juice adds a touch of acidity that helps balance the sweetness. Let the mixture sit for about 5-10 minutes to allow the peaches to release their natural juices.
Enhancing the Flavor of the Filling
To further enhance the flavor of your peach tart, consider adding a pinch of cinnamon or nutmeg to the peach mixture. These spices add warmth and depth, complementing the natural peach flavor. If you prefer a subtle nutty undertone, try incorporating a small amount of almond extract. Stir the spices and flavors together and let the mixture sit for a bit longer to fully infuse the peaches with the delicious flavors.
Assembling and Baking the Peach Tart
Layering the Peaches and Filling
Now that the peach filling is ready, it’s time to assemble your peach tart. Begin by spreading a thin layer of almond paste or cream cheese (if you prefer a richer filling) evenly over the blind-baked crust. This will create a smooth, creamy base that pairs wonderfully with the juicy peaches.
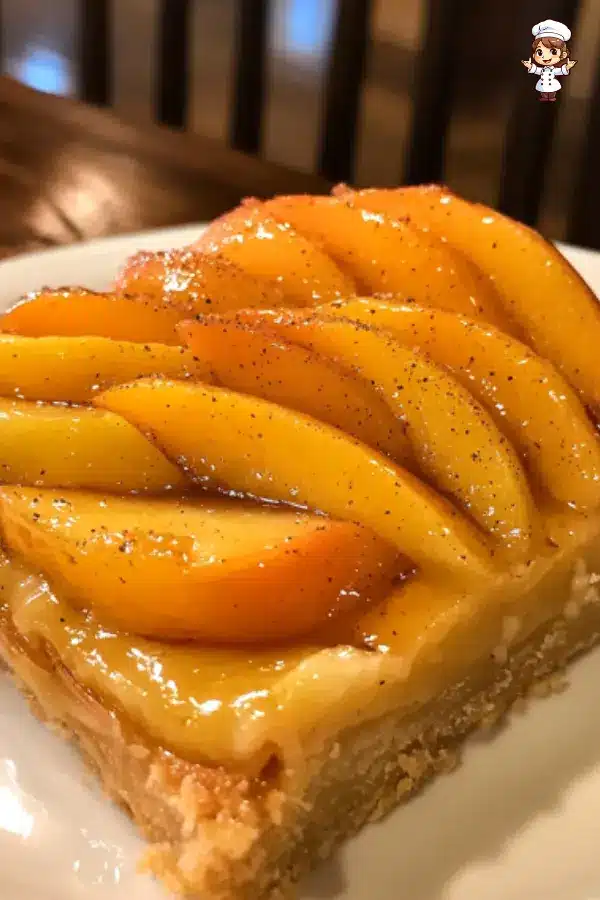
Next, start layering the sliced peaches in a circular pattern, beginning at the center of the tart and working your way outwards. Overlap the slices slightly for a beautiful, fanned-out presentation. If needed, trim a few slices to fit the tart’s edges and ensure the peach arrangement is even. Drizzle any remaining juices from the peach bowl over the fruit to add flavor and moisture.
Baking the Peach Tart
Preheat your oven to 350°F (175°C). Once the tart is fully assembled, carefully place it in the preheated oven and bake for 30-35 minutes. You’ll know the tart is ready when the crust is golden brown, the peach slices are tender, and the edges of the peaches are slightly caramelized. The sweet peach juices should be bubbling up, adding a delightful aroma to your kitchen.
During baking, the puff pastry will rise and become flaky, while the peaches will soften and release their beautiful flavors. To ensure the crust doesn’t over-brown, you can cover the edges with aluminum foil if needed during the final minutes of baking.
Finishing Touches After Baking
Once the peach tart is out of the oven, let it cool for a few minutes before serving. For a glossy finish, you can brush the top of the peaches with a light coat of apricot glaze or warmed peach preserves. This will give your tart an extra shine and a touch of sweetness. Finally, dust the top with a bit of powdered sugar before serving, adding a delicate touch of elegance to your dessert.
For more delicious recipes, check out our article on Peach Cobbler—another great way to enjoy the sweet and juicy taste of peaches!
Serving and Storing Peach Tarts
Serving Peach Tarts
Once your peach tart has cooled slightly, it’s ready to be served. The best way to enjoy it is fresh out of the oven, while the pastry is still crisp and the peaches warm. Serve it with a scoop of vanilla ice cream, or perhaps a dollop of whipped cream to enhance its sweetness. If you like a bit of crunch, sprinkle some toasted almonds or flaked coconut over the top to add texture and a nutty flavor that pairs perfectly with the peaches.
For a more indulgent twist, you can drizzle a little caramel sauce or chocolate ganache over the tart, elevating it to a dessert that feels extra special. To complement the flavors, serve your peach tart with a glass of Sauvignon Blanc or Prosecco. The crisp acidity of these wines balances the sweetness of the peaches, creating a delightful pairing.
Storing Leftovers
If you happen to have any leftovers (though it’s unlikely!), storing your peach tart is easy. Let it cool completely, then cover it with plastic wrap or place it in an airtight container. The tart will stay fresh in the fridge for up to 3 days. To reheat it, simply pop it in the oven at 300°F (150°C) for about 8–10 minutes to restore the crispness of the pastry.
For longer storage, peach tarts freeze well. Wrap it tightly in plastic wrap and aluminum foil, and store it in the freezer for up to 3 months. When you’re ready to enjoy it again, simply thaw it overnight in the fridge and reheat it as needed.
FAQs About Peach Tarts
Can I make Peach Tarts ahead of time?
Absolutely! Making your peach tart ahead of time can actually enhance the flavors. You can prepare the crust and the peach filling a day in advance. Simply store the crust and filling separately in the fridge. When you’re ready to bake, assemble the tart and pop it into the oven. This saves you time, especially if you’re preparing for a special occasion.
Can I use frozen peaches for my Peach Tart?
Yes, you can use frozen peaches if fresh ones are out of season. However, be sure to thaw and drain the frozen peaches before using them. This will prevent excess liquid from making the crust soggy. You may also want to increase the baking time slightly to allow the peaches to soften completely.
How can I prevent the crust from becoming soggy?
To keep your peach tart crust crisp, the trick is blind baking. Blind baking means partially baking the tart crust before adding the filling. This ensures that the crust stays crisp even with the juicy peaches on top. Another tip is to brush the crust with a bit of egg wash before baking to create a barrier that prevents moisture from soaking in.
For more dessert inspiration, be sure to check out our recipe for Peach Cobbler—a delightful alternative for peach lovers!
Print
Peach Tart
- Total Time: 55 minutes
- Yield: 8 servings 1x
- Diet: Vegetarian
Description
A delicious *peach tart* made with a buttery, flaky crust, fresh peaches, and a creamy filling. Perfect for any occasion or as a summer dessert.
Ingredients
- 1 sheet frozen puff pastry, thawed, unfolded, and lightly rolled
- 2 Bartlett pears, halved and cored
- 2 d’Anjou pears, halved and cored
- 1 red pear, halved and cored
- 2 tablespoons white sugar
- ½ lemon, juiced
- ½ (8 ounce) package cream cheese, softened
- ½ cup confectioners’ sugar
- ½ teaspoon vanilla extract
- 1 tablespoon turbinado sugar
Instructions
- Preheat the oven to 400°F (200°C). Fit puff pastry into a 10-inch square tart pan with removable sides.
- Place a pear half, cut-side down, onto a work surface. Use chopsticks to frame the pear and thinly slice lengthwise, leaving the bottom intact. Repeat with the remaining pear halves.
- Place hasselbacked pears in a bowl and add white sugar and lemon juice. Toss gently to coat and let sit for 5 minutes.
- Mix cream cheese, confectioners’ sugar, and vanilla extract together in a bowl. Spread evenly over puff pastry.
- Arrange the sliced pears over the cream cheese layer, fanning them out. Drizzle the accumulated juices over the pears.
- Sprinkle turbinado sugar over the top and bake for 35 minutes, or until the crust is puffed and golden brown, and the juices are bubbling.
- Let the tart cool briefly before slicing and serving.
Latest Amazon Finds


Notes
- For a more decadent treat, serve with whipped cream or vanilla ice cream.
- You can prepare the puff pastry shell and cream cheese filling in advance to save time.
- To make this tart ahead of time, store it in the fridge for up to 3 days, or freeze it for longer storage.
- Prep Time: 20 minutes
- Cook Time: 35 minutes
- Category: Dessert
- Method: Baking
- Cuisine: French
Nutrition
- Serving Size: 1 slice
- Calories: 300
- Sugar: 22g
- Sodium: 150mg
- Fat: 16g
- Saturated Fat: 7g
- Unsaturated Fat: 9g
- Trans Fat: 0g
- Carbohydrates: 36g
- Fiber: 3g
- Protein: 3g
- Cholesterol: 35mg
Keywords: Peach tart, peach dessert, puff pastry peach tart, caramelized peaches, easy peach tart, homemade peach tart