

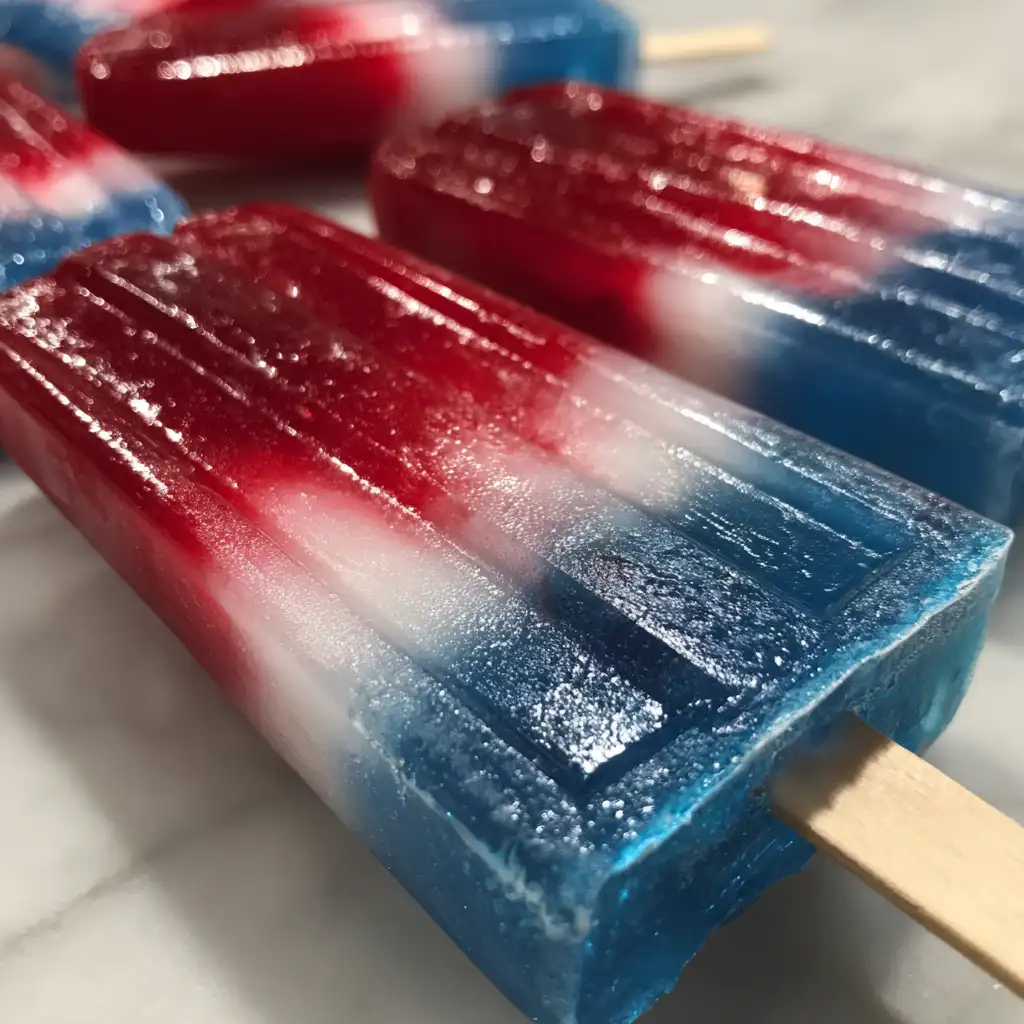
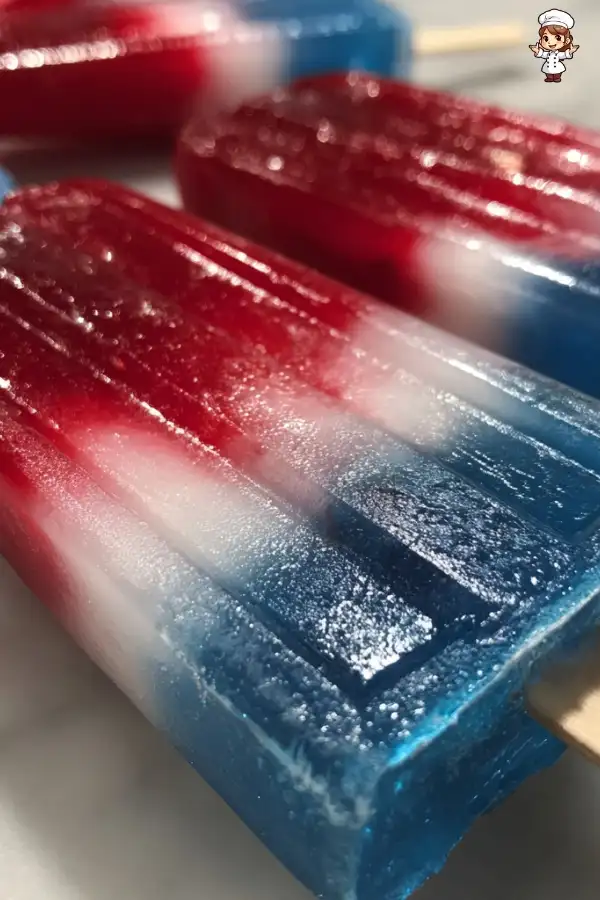
Bomb pops are colorful, frozen treats that bring back memories of summer days. They are typically shaped like a rocket and come in three vibrant layers: red, white, and blue. The classic flavors are cherry, lemonade, and blue raspberry. These pops are not only fun to eat but also visually appealing, making them a favorite among kids and adults alike. With their refreshing taste and eye-catching appearance, bomb pops are perfect for hot days, parties, or just a sweet treat at home.
Why Make a Homemade Bomb Pops Recipe?
Making your own bomb pops at home is a delightful experience. First, you can customize the flavors to suit your taste. Whether you prefer fruity, creamy, or even a little tangy, the options are endless. Plus, you can control the ingredients, ensuring they are healthier than store-bought versions. Homemade bomb pops are also a fantastic way to involve kids in the kitchen. They can help mix the ingredients and layer the pops, making it a fun family activity. Lastly, there’s something special about enjoying a treat you made yourself. It adds a personal touch to your summer fun!
Ingredients for Homemade Bomb Pops Recipe
To create your own delicious homemade bomb pops, you’ll need a few simple ingredients. Here’s what you’ll need:
- Water: 2 cups
- Granulated sugar: 1 cup
- Unflavored gelatin: 2 tablespoons
- Lemonade: 1 cup (freshly squeezed or store-bought)
- Cherry juice: 1 cup (100% juice)
- Blue raspberry syrup: 1 cup (or blue raspberry drink mix)
- Ice pop molds: 6 to 8 molds, depending on size
These ingredients are easy to find at your local grocery store. The combination of water, sugar, and gelatin creates a smooth base for your pops. The lemonade, cherry juice, and blue raspberry syrup provide the vibrant colors and delicious flavors that make bomb pops so enjoyable. Feel free to get creative with your choices! You can use different fruit juices or flavored syrups to make your pops unique.
Now that you have your ingredients ready, let’s move on to the step-by-step preparation of your homemade bomb pops!


Step-by-Step Preparation of Homemade Bomb Pops Recipe
Step 1: Gather Your Ingredients
Before you start, make sure you have all your ingredients ready. Gather your water, granulated sugar, unflavored gelatin, lemonade, cherry juice, blue raspberry syrup, and ice pop molds. Having everything in one place will make the process smoother and more enjoyable. Plus, it’s a great way to get the kids excited about making these colorful treats!
Step 2: Prepare the Red Layer
To create the cherry layer, begin by making the gelatin mixture. In a small saucepan, combine 1 cup of water with 1 cup of granulated sugar. Heat this over medium heat until the sugar dissolves completely. Once dissolved, remove it from the heat. Now, sprinkle 2 tablespoons of unflavored gelatin over the hot mixture. Stir it well until the gelatin is fully dissolved. This will be the base for your pops!
Next, take a separate bowl and mix 1 cup of cherry juice with 1/2 cup of the gelatin mixture. Stir until well combined. Pour this mixture into the bottom third of your ice pop molds, filling them about one-third full. Place the molds in the freezer for about 1 hour, or until the cherry layer is firm. This step is crucial to ensure that the layers stay distinct.
Step 3: Prepare the White Layer
Now it’s time to make the lemonade layer! In another bowl, combine 1 cup of lemonade with 1/2 cup of the remaining gelatin mixture. Stir until everything is well mixed. Once the cherry layer is firm, carefully pour the lemonade mixture over the cherry layer in each mold, filling them about two-thirds full. Return the molds to the freezer for another hour. This will create a beautiful contrast between the red and white layers.
Step 4: Prepare the Blue Layer
For the final layer, you’ll need to prepare the blue raspberry mixture. In a bowl, mix 1 cup of blue raspberry syrup with the remaining gelatin mixture. Stir until combined. Once the lemonade layer is firm, pour the blue raspberry mixture on top of the lemonade layer in each mold, filling them to the top. Insert sticks into the molds and freeze for at least 4 hours, or until completely solid. This colorful layer will make your bomb pops truly eye-catching!
Step 5: Layering the Mixtures
Layering is key to achieving that classic bomb pop look. Make sure each layer is fully frozen before adding the next. This prevents the colors from mixing and keeps your pops looking vibrant. If you want to add a fun twist, consider adding small pieces of fruit between the layers. This not only adds flavor but also makes your pops even more appealing!
Step 6: Freezing the Bomb Pops
Once all layers are poured into the molds, it’s time to freeze! Make sure to leave the molds in the freezer for at least 4 hours. If you can wait overnight, that’s even better! The longer they freeze, the easier they will be to unmold. Patience is key here, as you want your bomb pops to be perfectly solid.
Step 7: Unmolding and Serving
When you’re ready to enjoy your homemade bomb pops, it’s time to unmold them. To do this, run warm water over the outside of the molds for a few seconds. This will help loosen the pops. Gently pull on the sticks to release the pops from the molds. Serve them immediately for a refreshing summer treat! If you have any leftovers, store them in the freezer for later enjoyment.
Tips for Perfecting Your Homemade Bomb Pops Recipe
Choosing the Right Ingredients
When making your homemade bomb pops, the ingredients you choose can make a big difference. Opt for high-quality juices and syrups to enhance the flavor. For instance, using 100% cherry juice will give your pops a rich taste. If you prefer a more natural approach, consider using fresh fruit purees instead of syrups. This not only adds flavor but also provides a healthier option. Additionally, you can experiment with organic sugar or alternative sweeteners to suit your dietary needs. Remember, the better the ingredients, the tastier your bomb pops will be!
Adjusting Sweetness and Flavor
Everyone has different taste preferences, so feel free to adjust the sweetness of your bomb pops. If you like them sweeter, add a bit more sugar or syrup to your mixtures. On the other hand, if you prefer a less sweet treat, reduce the sugar content. You can also play around with flavors! Try adding a splash of lime juice to the lemonade layer for a zesty kick. Mixing different fruit juices can create unique flavor combinations that will surprise your taste buds. The key is to taste as you go and find the perfect balance for your homemade bomb pops recipe!
Storing Leftover Bomb Pops
If you happen to have any leftover bomb pops, storing them properly is essential. Wrap each pop in plastic wrap or place them in an airtight container to prevent freezer burn. This will help maintain their flavor and texture. When stored correctly, your bomb pops can last for up to two months in the freezer. Just remember to label the container with the date, so you know when they were made. Enjoying a homemade bomb pop on a hot day is a delightful treat, and with proper storage, you can savor them for weeks to come!
Variations on the Homemade Bomb Pops Recipe
Fruit-Flavored Bomb Pops
If you love fruit, why not create fruit-flavored bomb pops? You can use any fruit juice you like! For example, try using orange juice, pineapple juice, or even mango puree. Each fruit will give your pops a unique taste and color. To make these pops, simply replace the cherry juice and lemonade with your chosen fruit juices. You can even mix different juices together for a fun twist! Just remember to keep the layering technique to maintain that classic bomb pop look. Your fruit-flavored bomb pops will be a hit at summer gatherings!
Creamy Bomb Pops
For a richer treat, consider making creamy bomb pops. You can add yogurt or coconut milk to your mixtures for a smooth and creamy texture. To create these pops, mix 1 cup of yogurt with 1/2 cup of the gelatin mixture for the white layer. For the red and blue layers, you can use fruit purees combined with yogurt. This will give your pops a deliciously creamy taste while still keeping the vibrant colors. Creamy bomb pops are perfect for those who enjoy a more indulgent frozen treat!
Alcoholic Bomb Pops for Adults
Looking to add a little fun to your summer parties? Try making alcoholic bomb pops! You can infuse your pops with your favorite spirits. For example, mix vodka with lemonade for a refreshing adult treat. To make these pops, simply replace part of the water in your gelatin mixture with your chosen alcohol. Just be cautious with the amount you use, as too much alcohol can prevent the pops from freezing properly. These boozy bomb pops are sure to be a hit at adult gatherings, adding a playful twist to a classic summer treat!
FAQs About Homemade Bomb Pops Recipe
Can I use different flavors for each layer in the homemade bomb pops recipe?
Absolutely! One of the best parts of making homemade bomb pops is the freedom to choose your flavors. You can mix and match any fruit juices or syrups you like. For example, you could use strawberry juice for the red layer, lemonade for the white layer, and blue raspberry for the blue layer. The possibilities are endless! Just remember to keep the layering technique to maintain that classic bomb pop look.
How long do homemade bomb pops last in the freezer?
When stored properly, your homemade bomb pops can last up to two months in the freezer. To keep them fresh, wrap each pop in plastic wrap or place them in an airtight container. This will help prevent freezer burn and maintain their delicious flavor. Just be sure to label the container with the date, so you know when they were made. Enjoying a frozen treat on a hot day is always a delight!
Can I make a sugar-free version of the homemade bomb pops recipe?
Yes, you can definitely make a sugar-free version of your homemade bomb pops! Instead of granulated sugar, consider using sugar substitutes like stevia or erythritol. You can also use naturally sweetened fruit juices that don’t contain added sugars. Just keep in mind that the taste and texture may vary slightly, but you can still create a refreshing treat without the extra sugar!
What molds are best for the homemade bomb pops recipe?
When it comes to molds, silicone molds are a great choice for making homemade bomb pops. They are flexible, making it easier to remove the pops once they are frozen. You can also use traditional plastic molds, but ensure they have a sturdy base to hold the layers. Look for molds that come with sticks included, as this will make the process even simpler. Whichever type you choose, make sure they are the right size for your desired pop shape!
Print
Homemade bomb pops recipe
- Total Time: 5 hours 30 minutes
- Yield: 6 to 8 pops
- Diet: Vegetarian
Description
Homemade bomb pops are colorful, frozen treats shaped like rockets, featuring layers of cherry, lemonade, and blue raspberry flavors. They are perfect for summer days and can be customized to suit your taste.
Ingredients
- Water: 2 cups
- Granulated sugar: 1 cup
- Unflavored gelatin: 2 tablespoons
- Lemonade: 1 cup (freshly squeezed or store-bought)
- Cherry juice: 1 cup (100% juice)
- Blue raspberry syrup: 1 cup (or blue raspberry drink mix)
- Ice pop molds: 6 to 8 molds, depending on size
Instructions
- Gather your ingredients.
- Prepare the red layer by mixing cherry juice with gelatin mixture and freeze for 1 hour.
- Prepare the white layer by mixing lemonade with gelatin mixture and freeze for 1 hour.
- Prepare the blue layer by mixing blue raspberry syrup with gelatin mixture and freeze for at least 4 hours.
- Ensure each layer is fully frozen before adding the next.
- Unmold the pops by running warm water over the molds and serve immediately.
Latest Amazon Finds


Notes
- Use high-quality juices and syrups for better flavor.
- Adjust sweetness according to your preference.
- Store leftovers in plastic wrap or airtight containers to prevent freezer burn.
- Prep Time: 30 minutes
- Cook Time: 0 minutes
- Category: Dessert
- Method: Freezing
- Cuisine: American
Nutrition
- Serving Size: 1 pop
- Calories: 80
- Sugar: 15g
- Sodium: 5mg
- Fat: 0g
- Saturated Fat: 0g
- Unsaturated Fat: 0g
- Trans Fat: 0g
- Carbohydrates: 20g
- Fiber: 0g
- Protein: 0g
- Cholesterol: 0mg
Keywords: bomb pops, homemade popsicles, summer treats, frozen desserts